Friday, 23 August 2019

The Assembly Line Hoodie Dress - Summer version


Well August Bank Holiday weekend is upon us and for once the weather forecast is good and warm and this dress is the perfect iteration for warm weather.


When I first made the Hoodie dress almost a year ago I realised it's potential for pattern hacking. I still haven't done all I want to with this pattern yet but this version is my first hack of this pattern.


It wasn't difficult. First of all, there's no hood; then there are short sleeves and the length is shorter. I think this is the perfect cover-up dress for the beach or walking around town. The fabric is a light Chambray from Minerva and you can read my full review of the fabric and what I did over on their blog.

In other news, we have been creative this week. And it's not sewing related!


Yesterday we headed to MBC Ceramics to attend a Soap making workshop - It was the simple melt and pour type and is very easy to do. MBC Ceramics host a whole range of creative courses and I advise you to take a look if you live in NE England and are in travelling distance to Sunderland.


This Morning John made the most epic loaf of bread ever. it looked amazing and tasted delicious with fresh butter.


We've also made our own Greek yoghurt. Surprisingly easy and delicious.


We even dusted off the 6 demi-johns of country wine that have been sitting in the garage for I don't know how many years, fully expecting them to be awful. However, Only 2 demi-johns were not great and we now have 10 bottles of Elderflower wine and 10 of Rhubarb wine.

Right - I'll be back soon, I'm off to eat more of that delicious bread!

Tuesday, 20 August 2019

Another Saraste Dress


I love this pattern. I love this fabric. Love Love. Love.


This is the second time I've made the Saraste Shirtdress from Breaking the Pattern from Named clothing. The first one was a sleeveless version that was a little shorter than the pattern called for but I only had a short amount of fabric.


This time I made the same version -  a sleeveless dress but this time I made it as the pattern directed. I did forget that the seam allowances are only 1cm and started by sewing at 1.5cm and had to do a bit of unpicking.


I changed up the construction a little from the directions to allow me to fit the dress a little more easily. I received the fabric from Minerva in exchange for my review of it. The buttons were sourced locally from The Sewing Box in Morpeth. I had a few issues finding buttons that were suitable. when I found the right colour, the size was wrong; When the size was right the colour was wrong! However, The Sewing Box came up trumps with these 'day of the dead' style skull buttons.


You can read my full review of this fabric over on the Minerva Blog.

Friday, 16 August 2019

Ginger Jeans Take Two


 I made more Ginger Jeans. This pattern is fast becoming a staple and I've just cut out a pair of cropped trousers using the same pattern. I made these jeans to review some slub stretch denim which was sent to me free of charge in exchange for my review.


These have been getting some serious wear this summer and I've had lots of compliments when wearing them. Alongside my Doc Marten sandals, they have become my casual uniform!!
I wore them for pounding the streets of Liverpool and Chester last week while we were visiting our friends. You can check out my full post and review over on the Minerva Blog.

Thursday, 15 August 2019

Don't get Shirty!


For the first time ever I have made my husband a shirt from a Burdastyle magazine pattern. Actually, it's the first time I have made him anything from a commercially available pattern. All his other shirts have been made by using a rub off of one of his favourite shirts, and jackets have been self-drafted. So why did I wait so long to make him a shirt from a pattern?


Well, most of the Burdastyle magazine patterns for men fall into a very small size range and they just wouldn't fit. However, recently John has lost some weight and now falls within the size range offered in the magazines and I can make a range of different items without having to draft them myself. This shirt was an experiment in testing fit and checking if the sizes run true to measurements. I know I can trust a Burda size 38 for myself but need to know which size to make for John.

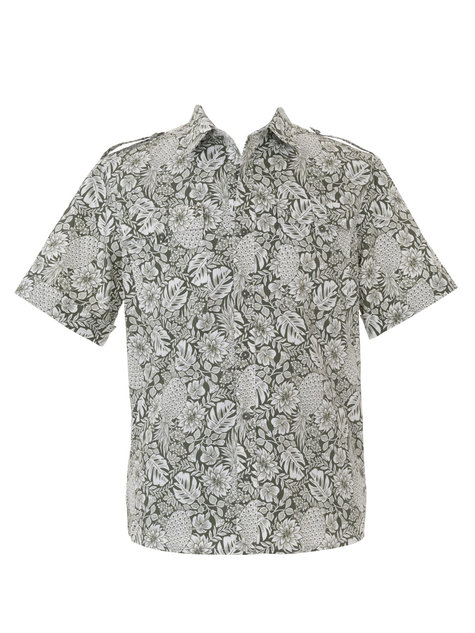
The pattern choice was the short sleeve shirt #143 from the June 2016 issue of the magazine. It has short sleeves with sleeve bands and shoulder tabs. A front button band, two patch pockets with flaps and side vents at the hem. It's available in sizes 44 to 60. I traced and cut a straight size 56. I used a seam allowance of 12mm (1/2 inch)

I did make some minor changes to the pattern. I added a couple of inches of length to the front as John often finds shirts too short. I omitted the pockets and shoulder tabs. I was going to include one pocket and the sleeve bands but decided against it during the making process. I also used more buttons than recommended.


As I have made quite a few shirts before the construction was simple. The back has two darts to add shaping and these were sewn first. The button bands were interfaced with a light stretch interfacing, which is my go-to for shirts as it doesn't bubble the way some interfacing does when it's been washed a few times. The collar and stand were interfaced with a layer of firm but soft sew-in interfacing which I have found perfect to give the right amount of support without being too stiff.

My fabric was a very light tana lawn in pale grey with a floral print. It's definitely a summer weight fabric and judging by the weather we are having may not get loads of wear this year!


Some people seem to find shirt-making difficult. I have come to the realisation that it's not a hard thing to do, you just need to take your time and be precise. I take time to mark the placement of the collar, stand and centre front as I have found it helps me to be accurate. For the first time, I fully enclosed all the raw edges. I felt that this very light fabric needed it. The back yoke, collar and stand are all enclosed anyway, but I used flat felled seams to attach the sleeves and french seams at the sides. The hems were double turned and topstitched.


I completed all of the construction on my Bernina 707 except the buttonholes which I did with the one-step buttonhole function on my Janome. I sometimes have issues with making buttonholes, but these all went in perfectly. The buttons were sewn on by hand. John chose the buttons at Abakhan Fabrics in Liverpool last week.


I think the fit of this shirt is pretty good. It has a slim shape but the width of the back is good and fits well. I particularly like the shaping offered by the back darts. They really do stop the shirt looking baggy.


I think John likes it. He even posed for photos - George Michael style!


Friday, 9 August 2019

Plastic Free - 10 ideas from a Newbie.


How are you getting on with living Plastic-Free? Is it something you do? Do you care? Do you have ideas to share? Back at the beginning of July I wrote a little bit about my thoughts on plastic and reducing waste. Several weeks later and I have some observations.

In theory, It's easy to go plastic-free - just don't buy stuff in plastic! In practice, it's much harder. Everything comes in plastic!!!!!!

I have become aware of how much stuff does come in plastic and it is really starting to frustrate me. I want to change everything NOW. Yes, I know that's stupid but it's a thing, and then I get disheartened by it all.

So I'm determined to focus on the small steps that we have made and just keep plugging away at it, bit by bit. Reduce waste, reuse where we can and finally recycle.

So this is where we are up to - maybe, just maybe these might be things that could help you along the way.

1. We don't use straws - we do have a couple of stainless steel ones that the kids use from time to time. When I've been out and about I've also noticed that many places are offering biodegradable or paper straws now.

2. We are using reusable water bottles rather than buying single-use disposables.


3. We are still shopping mostly at the supermarket, but trying to bag unpackaged fruit and veg when possible. I ordered some yarn from Love Crochet a while ago and it came in drawstring fabric bags. Yes, the fabric is most certainly synthetic, but we've been able to use the bags to put our loose fruit and veg in. Just need a few more to be made.

4. I'm actively looking for non-plastic or less plastic packaging - being aware that plastic bottles are much more easily recycled than pouches or film. Still far too much is packaged in plastic. I went into the supermarket today to buy my face cream. I have been using the store's own brand for years and it's good quality. It usually comes in a glass pot with a plastic lid. When finished with I clean and use the pot as storage for paint, ink, pins, paperclips etc. The same cream today was in a plastic tub! (I've bought a replacement from the Ethical Superstore. - This is the same supermarket that still uses plastic bags for loose fruit and veg., pre-wraps spring onions, garlic, ginger, etc in plastic film - when just a few months ago they didn't - what is going on?


5. We've made two raised beds and are starting to grow a bit of food - hopefully, this will take off, even more, when we get the big raised beds in. John also made a composter from some pallets we found at a local garden centre. I think it might be a bit big for our needs.


6. I made some crochet cotton dishcloths. They have been given the thumbs up for washing up.


7. We are booked on a soap making course - this should allow us to have the knowledge and skills to make out own soap and shampoo.

8. We bought bath salts rather than bubble bath - looking to make our own.

9. My hubby bought me a box full of goodies from the Ethical Superstore for my birthday - make-up remover pads, face scrub, washable wipes, bamboo toothbrush, Shampoo bar and a couple of other bits.


10. We've found a very local dairy that delivers milk and cream (in glass bottles) and eggs and when we get back of our holiday will be having milk delivered. There is also a refill store not too far from where I work. I don't think we'll use it loads, but it's great for stocking up on store cupboard items.


I'm not going to chuck out the plastic we do have. We will use the plastic food tubs, reuse bottles until they break and will try to reduce our purchase of plastic, but also the amount we throw away. We already have lots of glass jars and bottles are trying to reuse these too.

We're not there yet, but it's a start.
What are your top ten tips for going plastic-free?


Monday, 22 July 2019

Slow Sewing: The Making of a Quilt


Hey! I made a quilt.
This has been a looooooong project. The joy of making this has been in the slowness of putting it together. I think if I had rushed it I would have been heartily sick of it by its completion. As it is as I have taken so long over it it has been a joy; completed in short bursts over a long period of time. How Long, you might be wondering? Well over a year!


This is the story of my quilt, and no it's not as long as it took to make.
When I went to my first #sewupnorth event in Leeds TWO years ago I won a couple of fat quarter packs in the raffle. These small pieces of quilting cotton were so smooth and the colours were just stunning I knew that I would have to use them somehow. I'm not a quilter so the thought of cutting and piecing the fabric, let alone quilting it filled me with dread. However, after the fabric had sat in my stash for 6 months I decided to give it a go.


I cut the fabric into wide strips and then stitched the strips together to create very long strips. Then I cut these into narrow strips using my rotary cutter and metal rule. Once cut, I rotated the strips, which meant unpicking a seam or two to create the stepped pattern you can see in my quilt. I sewed with a 6mm seam and pressed as I went along. Once I had completed the top I had a long rest until I could face quilting it.


I did not want to use polyester wadding for this quilt as I have been trying to cut down on waste and my use of plastics and the cotton batting was out of my price range. Instead, I used a couple of old flannel sheets for the wadding and the backing and binding fabric came from an old cotton duvet cover that had a rip on one side where it had become a little threadbare. The other side was fine, so this became my backing. I layered the backing, flannel sheets and quilt top and pinned together using safety pins. I know you can buy special safety pins for quilting, but I found the safety pins I had already were perfectly ok for the job. I rolled the quilt into the middle from the edges and secured the rolls with offcuts of flannel and pins. this gave me a 30cm wide strip to quilt. I gradually unrolled the quilt as I stitched it.


I decided to try free motion quilting and used my trusty Bernina 707 to do this. It's easy to drop the feed dogs on this machine and it has an extension table for the machine which provides a bit more support, as I was working with a large amount of fabric at a time I did most of the quilting at our monthly Crafternoon events as I had access to a larger table to support my work.


Unfortunately, I found it very tricky to keep my stitch length constant and even, but the overall effect is ok and the quilt feels nice and firm. This process has taken a long time and I've put this down for a couple of months before picking it up again. Last week at our Crafternoon session I finally finished the quilting.


During this week, I trimmed the edges of my quilt and cut 10cm wide strips to use for binding. Yesterday I sewed up the binding strips and stitched it to my quilt. Before beginning this I did a bit of research into how to mitre the corners, as on my last quilt this was unsatisfactory. There were loads of tutorials on Youtube and they all had basically the same method for stitching the top. Once I had stitched the binding to the top. I folded it under and finished the underside with tiny fell stitches. This took a couple of hours, but I find hand stitching quite relaxing and meditative (as long as I don't have to do too much of it).


Finally, I have a finished quilt and have saved a couple of flannel sheets and a duvet cover from landfill so I'm happy. Those of you who are expert quilt makers will be able to pick a boatload of mistakes with this. I don't care. It's been an achievement for me and because I've taken my time with it I have actually enjoyed it. It really is worth slowing down sometimes.

Tuesday, 16 July 2019

Arts in London


A couple of weeks ago we had our annual residential trip to London with some of the children I teach. It's one of those trips where we try to cram in as much as possible and we get home feeling completely shattered, but happy. This year was no exception.

Monday morning and bright and early (6.45am) we met the students at school and set off by coach. It's a long way from the northeast, but we made good time and arrived at our accommodation at about 3pm.

St Paul's at night

We were staying at the Youth Hostel at St Paul's. Its a great location for exploring central London. It's cheap, clean and comfortable. We use it as it's perfectly set up for large groups and is a safe place rather than a large hotel with the general public being able to access all floors. At the YHA you can only access the corridor where your room is. The YHA also provide a great breakfast and packed lunch at a good price. We even had one of our evening meals there.


One of our favourite places to take the group is the Rainforest Cafe. It's a fantastic place to eat. the food is good and the kids love the environment. We walked from there to the Gillian Lynne Theatre to see School of Rock. The Gilliam Lynne Theatre is a modern Theatre, which meant that the view was good, no matter where you were sitting. We had good seats right in the centre. The show is the stage version of the film that stars Jack Black. I wasn't sure if I would like it. It's a good show and I did enjoy it, even if it would not have been my personal choice. Our students really loved it.


Once we had taken our coach back to the hostel and got everyone settles it was time to relax for half an hour before bed. This trip has been the very first I have ever taken where the children have settled quickly on the first night. Consequently, they were up bright and early the next day, ready for our activities.

Inside the globe

We had booked a tour and workshop at Shakespeares Globe. Our group was split into two and each group taken by an actor, who showed us the theatre and talked about why it was built and the way it was set up. then we went off to do a drama workshop focusing on Macbeth, as that's the play they had been studying. They had such a great time.

Making Art at the Tate Modern

Art at the Tate Modern

After eating lunch outside the Tate Modern we explored the gallery for a while. My group found the space where they could make art and together they made pieces to add to the existing installation in the room. we then had a look at some of the artwork on display. the children made their own little videos about the work.

The dome of St Paul's from the inside

We headed back over the river and into St Paul's Cathedral, where they looked for tombs of famous people and some artwork.


As people started to arrive for evensong, our group headed back to the YHA to chill and relax for a bit before tea, which we ate at the hostel. Then we headed back to Shakespeare's globe for the evening performance of A Midsummer Night's Dream. This is part of the summer season and is on over the coming weeks at various times. The children enjoyed the slapstick comedy of the piece, but some found the plot a bit confusing - but then it is isn't it! The performance was excellent. There was lots of audience participation, adlibs, singing and fun. If you get the chance to see it, then you should go. It's well worth it. If you're a bit strapped for cash you can join the groundlings (standing tickets) for just £5.


Some of the sights at the WB studio tour

On Wednesday morning we headed out for a short walk and then collected our bags and back on the coach out of the city to the Warner Brother's Studio Tour. This is where they made the Harry Potter films. I wasn't quite sure what to expect, but the tour is excellent. Lots to see and a great advocate for the creative industries - exactly where art might lead you! It was then a very long journey home and a late night.

Hogwarts model

Over the next couple of days, I asked the children which parts of the trip they enjoyed the most. I'm glad to say every different activity was mentioned. They had a great time and I'm planning the next trip already. This never ends!!!

Just a few more days until the summer break and a long rest!

LinkWithin

Related Posts Plugin for WordPress, Blogger...