Thursday, 19 November 2020

Classy Coat - Burdastyle 119 11/2012


Hold tight, this a photo heavy post! 

I've toyed with a bit of coat making this year and learnt a few skills along the way, but I really wanted to have a go at making a good wool winter coat with proper tailoring and everything!!!! So when Minerva offered me the chance to review this amazing Lady McElroy wool blend coating I jumped at the chance. I recieved the fabric in return for a review, which you can read here.

I don't make coats unless I need them. Last winter I had identified that my smart winter coat was well past it's best. The cuffs were fraying, the lining was worn in places and the faux leather piping had split. The colour had faded a lot too. I knew I needed a replacement, but I'm determined to use the fabric of the old coat in some way too.


I thought long and hard about the style of coat that I wanted to have. It needed to be at least knee length; have a proper fastening rather than a tie belt; be formal enough to wear for special occassions and also fine to wear casually, if I so wished, and to top it all off a classic style that is not going to date. After browsing my burdastyle magazines and paper patterns, I eventually settled on style 119 from 11/2012. I think I'd ear marked this when the magazine first came out, but never had cause to make it.
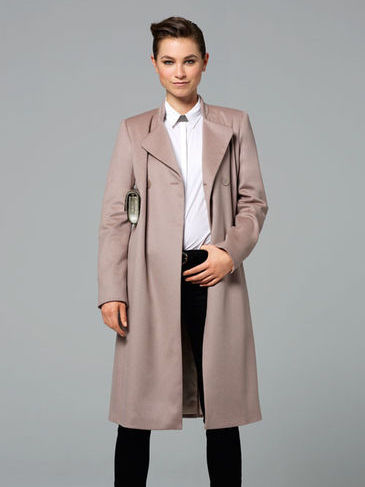
This coat is made using some more traditional tailoring techniques to support the fabric. I bought some traditional interfacing and shoulder pads from Minerva and purchased the lining from The Sewing Machine Guy, which is my local fabric store (If you are ever in South east Northumberland do go and check it out!!!). As Burdastyle Magazine instructions are very, very brief I used a range of other resources to help me understand the construction. In short I referred to Couture Sewing Techniques by Claire Schaffer, The coat sew along on Gertie's new blog for better sewing and Gerties's new book for better sewing.


First Up I prepped the fabric. Normally I'd wash my fabrics in the machine, but as this blend has a very high wool content, I used my iron to steam the fabric, just hovering the iron over the fabric to allow the steam to penetrate it. I then let this dry. The traditional interfacing was prepared by soaking in a cold bath for and hour, leaving to dry naturally and then gently pressing.

While I was waiting for the fabric to dry. I traced the pattern - In Burdastyle, I usually cut a size 38, but as this is an overcoat, I decided that I'd go up a size and cut the 40. I did a pin fitting of the tissue before cutting the fabric and decided it was fine. Now the coat is finished I think the 38 would have been a slightly better fit, but the 40 is actually ok. It's not overly big and I'll be able to wear my thick jumpers underneath it!!!!

Once the main pieces were cut out, I cut the interfacing. I completely interlined the front, side front and collars. The back was underlined with cotton and the interfacing was used as a back stay and added at the hem edge and the sleeve cuffs.


The interfacing was permanently hand basted to the wrong side of the fabric. Once the front pieces were interfaced, I added a second layer of the interfacing above the bust as a chest piece to increase the stability in this area. I taped the roll line and pad stitched the lapels. I used Gertie's instructions for this and had a watch of her youtube tutorials. I also made bound buttonholes, which I think I'm getting better at.

Once the bound buttonholes are made, I baste them closed during construction. I also make a matching window in the facing. To reduce bulk I used a small square of organza, which prevents the edges fraying and allows them to be neat. These are then hand stitched in place.

I basted the coat together, without the sleeves in, to check the fit. I ended up taking a little bit off the side back and centre back seams to create a little more shaping at the back as it's quite a straight design. The pockets are easy as they are inseam, so no fussy welt pockets to stress over!

Once I was happy with the fit, I use a catch stitch to secure the seam allowances and then constructed and inserted the sleeves. I don't have a sleeve board but find a suitable alternative is a rolling pin rolled in a towel.

The hems were pressed up and then the collar and facing were attached. Once this was done the hems were catch stitched in place and the shoulderpads and sleeve heads were stitched in. The lining was then constructed and added along the edge of the facing and the sleeves were bagged, which gives a neat finish.

I decided that I would hand stitch the hems so that I had greater control over the vent.


It was finished with 4 buttons (plus one on the inside) and a final steam press.

I really do love the classy lines of this coat. It will be easy to wear in many situations and I hope that it will last for many years to come. 


Friday, 13 November 2020

Horse, Horse, Tiger, Tiger


Have you ever discovered a phrase in another language that you just love? This is one of those phrases - I learnt this when in China a few years ago doing some charity work. Some of the charity staff told me this phrase, 'mǎmǎhūhū'. It is translated as horse, horse, tiger, tiger and generally means a bit so-so - I'm feeling a bit horse, horse about this and also a bit tiger, tiger. It's far more decriptive than so-so.

Anyway this phrase sums up this make in more than one way. I love it and dislike it almost in equal measure. to the point where it will get worn and i'll enjoy it and it looks good, but there are a couple of issues that let the whole thing down.

Firstly let me just say how much I love the TIGER print viscose challis from Minerva. I was gifted the fabric in return for a review which you can find here.

I knew what I wanted to make with this, It's the Victoria Blouse from Fibre Mood. I'm a sucker for a high neck blouse and I love the styling. I was going to make this from an eyelet cotton that I had in my stash, but there wasn't enough of it. So when I saw this fabric I knew it was a perfect match.


The PDF come with layers so you can print just your size - so I looked at the measurement chart and cut a size 40. It's loose fitting, so I might have got away with the 38, but I have quite broad shoulders so I went with the 40 and it's fine. Do be aware that you need to add seam allowances to this pattern. The instructions have you use different seam allowance widths at different places - I just went with a straight 1cm all over.


The instructions are generally ok, but there a couple of parts that are not that clear and could be confusing for a beginner sewist. However, if you make tops regularly this is not a difficult make. I did decide to make a couple of alterations to the fastenings. The pattern calls for a hook and eye fastening at the neck and press studs at the wrist. I decided to use small round buttons and rouleux loops to fasten these instead.

As the fabric is a quite light I decided to double the yoke. Mainly to keep the insides neat, but also to provide a bit more stability. I found that this fabric was quite easy to work with and wasn't too shifty to cut and sew.

The blouse sewed up really well and all the pattern makings matched beautifully. I really loved the finish of the blouse and the styling. However there were a couple of things that I feel let the pattern design down. Fiirstly is a small issue of the back slit opening. It's just too long. I will be making this much shorter next time.


The main issue was the sleeves. The blouse is loose fitting and really would benefit from shirt style sleeves, with a flatter sleeve head. The one drafted has quite a steep sleeve head and this works really well for a fitted bodice, but isn't so comfy for a loose blouse. It makes the top feel tight across the back and top of the arm which it actually isn't. I think I can live with the blouse as it is, but I've altered them for my next version.

Here is what I did:

Draw a horizontal line perpendicular to the grainline at the bottom of the sleeve head and a vertical line from the top of the sleeve head to hem, parallel to the grainline. 

Cut from the hem to the top of the sleeve head, leaving a hinge of paper. Cut along the horizontal line and leave a hinge at the sides. I also cut a couple more lines from the centre point to the sleeve head curve. 


Then swing the sleeve open to widen and flatten the sleeve head. I then closed the hem back up. 


I stuck the pattern onto another pieces of paper and then retraced the new sleeve pattern. 


The sleeve now has a flatter sleeve head and wider bicep, which should allow more movement on this loose fitting blouse.


Thursday, 12 November 2020

Boden inspired culottes


I do quite like Boden clothes and style, but rarely buy from them. They are just out of my price range and as someone who enjoys making her own clothes, I'd rather construct something I know will fit perfectly. These culottes were inspired by this Boden Skirt.

I prefer trousers to skirts as a rule - especially in the summer (I've lived in shorts this year - cut off jeans ones mostly). Anyway I decided to make the Culottes instead. I recieved this fabric from Minerva in exchange for my honest review which you can read in full here.

Once finished, I wasn't sure I was going to like them. I'n not really convinced about the pleats and pockets on these, but they have been a regular in my work wardrobe over September. Sadly packed away now as the fabric is super light and not suitable for the cooler weather. I have had lots of compliments when wearing them, and they do sum up my pesonality. I think they will definitely make an appearance when we get around to next spring and summer.


Sunday, 1 November 2020

Oh the Horror!


I experienced the horror of an unexpected sewing disaster last week. It was also potentially an expensive disaster (and still is)!

So, what awful expreience could possibly befall a sewist? 

Not enough fabric? 

Cutting a hole while trimming/ slicing buttonholes?

Melting fabric with a too hot iron?

Fabric shrinking once the garment was made?

I have all these happen to me in the past - but this was not the issue I faced recently.

I'll begin at the beginning...

Waaaay back, like summer 2019, I was on a course in london and happeneed to spot this beautiful bamboo silk in a shop close to where the course was being held, but at £18 per metre it was out of my budget at the time. I put a couple of metres of this fabric on my Christmas list for last year and Santa delivered the beautiful soft and drapy fabric.

I knew it was precious and would need careful handling. I consided what I would make with it very, very carefully. I wanted a shirt with a bow, so I settled on the Saraste shirt from breaking the pattern and added a separate tie, that could be used as a bow. I washed my fabric and made up the shirt, completing it just as lockdown started. You can read all about the make in this blog post.

Not much call for shirts during lockdown, so it didn't get worn until a couple of weeks ago. Worn, popped in the wash on the recommended cycle (the same way I'd washed it before making), and it came out with the collar looking like this!

I was horrified. I wasn't sure how this had happened. I had trimmed the seams, but not too much. I hadn't top-stitched the collar as I wanted a nice flat smooth edge. That turned out to be a big mistake. The undercollar had shredded by at least a cm in some parts. I considered recutting the collar, but I knew that would compromise the collar stand. My option was to try to mend it. On the plus side it was mostly the undercollar that had shredded.


I carefully unpicked the outer edge of the collar, where most of the shredding was. I pressed thefabric as flat as possible and reinforced the damaged area with a strip of light fusible interfacing. I couldn't just trim it back as the damaged area was too deep and would have left the collar too narrow. Instead I cut a bias strip from some of the left over fabric, it was long enough to go the full length of the collar edge. I stitched this over the damaged area and pressed it to give enough width to complete the edge and seam.


The edge of the collar was folded to the inside and topstitched fully around the edge. The undercollar has a little ridge where the biast strip is, but I'm hoping that it will hold. The edge is not really as neat as I would like and I don't know how it will stand up to futher washing. I also had to  fold by baby hem over again and sew it a thrird time as it had frayed slighty on places there too. However I was not going to ditch a shirt that cost £40 without trying to save it, especially as I've only worn the blooming thing once.


Lesson learnt - interface the heck out of fine fabrics and top stitch ALL collars - even if you don't want to.

What's your sewing nightmare?


Friday, 9 October 2020

In the 'Other than sewing' category


Life gets super busy sometimes, don't you think?

The last few weeks have been like that. New routines at work have taken some getting used to by staff and children alike, which has left me feeling tired when I arrive home. Last week I don't think I did much at all in the evenings, apart from crash in front of the TV.

A couple of weeks ago I started to paint the kitchen cupboards and they look really nice, but the layers have paint have made the drawers quite a tight fit and the paint is catching on some of them. So rather than rush it. I'm going to finish the job at half term. The drawers that I've already done need the plane taking to them and then repainting and I'll complete the other doors and drawers too. I just need a good run at it. It doesn't take much time, but it the wole getting set up, waiting for layers of paint to dry and having everything out in our space, rather than drying. I did consider doing some on Saturday last week, but the rain was torrential.


Despite the super wet Saturday, John & I still managed to enjoy a rather wet walk with the dog. We avoided the muddy paths and instead headed for the prom. It's safe to say it wasn't busy - so we jumped in a puddle or two and got very wet, calling at the Co-op for a few supplies and the local wool shop for a reel of black thread.


The thread was for the only make I've finished in the last couple of weeks. Its the Fibre Mood Victoria top. I still need to photograph it and i'll share more once I've done that. I've started a Cleo Pinafore dress, but as i'm so tired I'm taking it quite slowly at the moment. My next big project is a winter coat for me - I have a few patterns in mind and my fabric arrived this week. 


This week marked the slightly earlier finish of the school day. We're having a shorter lunch and finishing earlier. I've taken advantage of the warm afternoons to get home early and get out for a decent walk with the dog. After a stressful day It really does calm the mood and give a bit of perspective. I'm relishing these times as I know that after the half term holiday the dark mornings and nights mean I can't get out and walk so easily during the week. My mood can be quite low in the darker months, particularly November and December and I'm aware that I need to get some fresh air and our door exercise.


Normally by this point in the year I have thrown myself into Pantomime Society fully and would be enjoying the rehersals, but it's not on at the moment due to covid restrictions and I am missing it.

I also have a few paintings to complete and again I need good light to do these, which is tricky at the moment. Again I hope to be able to grab a weekend or some time at half term to get these finished.


Wednesday, 16 September 2020

Oh So Flattering

Our second beetroot harvest

The last couple of weeks have been a bit crazy. I've also had some time to reflect on a few things and I've made some items that I'm not completely happy with, in light of this my sewjo has upped and gone. I'd like to share a few of my reflections and where I am at the moment.

Flattery:


A few days ago I shared one of my makes in a facebook sewing group. It was my peppermint wide-leg pants, I wrote about them here. I didn't ask for any comments, I just shared that I'd made them. Someone from the group decided to tell me that they did not think they were flattering on me and made reference to me asking for honest comments. Now this annoyed the heck out of me - I hadn't asked for comments and certianly not about how something looked on my body.

Now don't get me wrong - I'm all for complimenting something that's been done well. It's perfectly OK to give feedback on how well something has been done (as long as that advice has been asked for). Or even for fitting - again if asked for. However it's not OK to make a judgment about how flattering something is on someone. To do this is to make a judgment about how someone's body conforms to your ideas of how we should look - and that's not OK.

Now we all like compliments, when given honestly and by people we trust. I love it when someone comments on how well I've made something, or the style lines I've used. I'm happy to recieve constructive comments on how to do something better or improve fit, but I will not let someone tell me how I should look, because that is non of their business. I refuse to allow other people's negative options to rent free space in my head.

However, the whole affair has helped me - I now care even less what people think about my body and I will dress it how I like - I suggest you do the same. I will also be very careful about how I comment on the images others share and check my own bias at the door! I wonder what your thoughts are on 'flattering comments".

Sewjo:

I've done a bit of sewing this week. I'm back at school and we are required to wear masks in all communal areas, so I've made some more - this is soul destroying sewing and I hate it. However I have 5 new masks. I used the Dhurata Davies pattern in a small. I like how this pattern comes in different sizes so I can cater for the whole family. It's still tedious sewing though.

I also drafted a skirt, started sewing it and have decided that I don't like it - so it's in the refashion pile. I have also made a couple more bras. I made another Watson bra. 

It's a lace lined with jersey and powermesh for the band. I also tried adding an internal sling, but it was a waste of time - didn't make any difference and I won't include one again - I don't think I really need it. I have realised I need to make a slight alteration to the side seams on the Watson Bra as they slope forwards quite a bit, mainly due to my wide rib cage.

Initially I thought this bra was a wadder. I also used a much wider and stronger elastic for the bottom band than normal and really struggled to fasten it the first time I put it on. However, before wearing it on Friday I gave the elastic a little stretch and fastened it ok - It's very snug, but actually quite comfy. The cradle actually fits as well as an underwire bra would - which is a pleasant surprise.

The second bra was not quite so successful. I made Simplicity 8436. It's the second time I've made this bra. This time I opted to use a size 36 wire (style 9 from Sewing chest) instead of a 34 wire (can't remember the style). This new wire is a much better fit for me and that part I'm really happy about and I think my construction is ok. 

I made a couple of errors, which mean this bra is not quite a winner. Firstly I didn't get the tension right on the elastics, which have led to a slightly odd fit. Secondly I didn't check the width of the strap elastic in the kit I bought - it was 12mm wide and I only had 10mm rings and sliders, so the straps are fixed. Finally the kit came with a single hook and eye fastening and it's too narrow for this design.

I really need something a bit wider. Therefore the band wrinkles a bit. I love the style, but I'm really not convinced that this is drafted particularly well. I've yet to wear this. I'll give it a try, but I'm not holding out much hope for a comfortable day! EDIT: I wore this, and was surprised to find it was very comfy - no issues at all during the day with underwires or straps - super comfy, just need to work on that elastic tension. The Bra fabrics are from The Sewing Machine Guy and Elastics and findings from Sewing Chest.

When I finished both of these bras I was completely fed up, on reflection neither is a failure and after some time to think I'm happier about them.

Reflections:

As work picks up and my working days are much longer I often find I need to create some space. I love the autumn weather, but am desparately hanging on to the days when there is warm sun. I completely enjoyed the walk when I got home from work on Monday.

The sun was warm and the route peaceful. I stuck in my headphones and walked and listened to a podcast (Rob Bell's The RobCast - if you want to look it up - this episode is fantastic - give it a listen). I took time to breathe and smell the air - it has a certain summery/ autumn smell as the warm sand and grass start to cool at the end of the day. It was an hour of bliss in my otherwise hectic day. I need to do this regularly.


The autumn term is busy and tiring and I can get quite despondant and anxious at times, often when I feel there is not enough time in the day or issues arise that I have no control over. I'm trying to be intentional about taking time and resting, getting out and walking is important for this and I need to make sure that I do that when I can. 

Over the coming weeks I probably wont sew quite as much as I have been doing. I have a couple of house related projects to complete. I've just oiled the benches in the kitchen (they're solid wood) and we've bought some paint and new handles for the cupboard doors and drawers, so I'll be working on them over the next few weeks. I'm trying to stay chilled and it might mean that I don't post here quite as much as I have been doing over the last few months. You might also see something other than sewing over the coming weeks. I hope you are all keeping well. Take time to invest in you and keep calm and carry on - see you soon.

LinkWithin

Related Posts Plugin for WordPress, Blogger...