Tuesday, 7 June 2016

Crazy Cambie


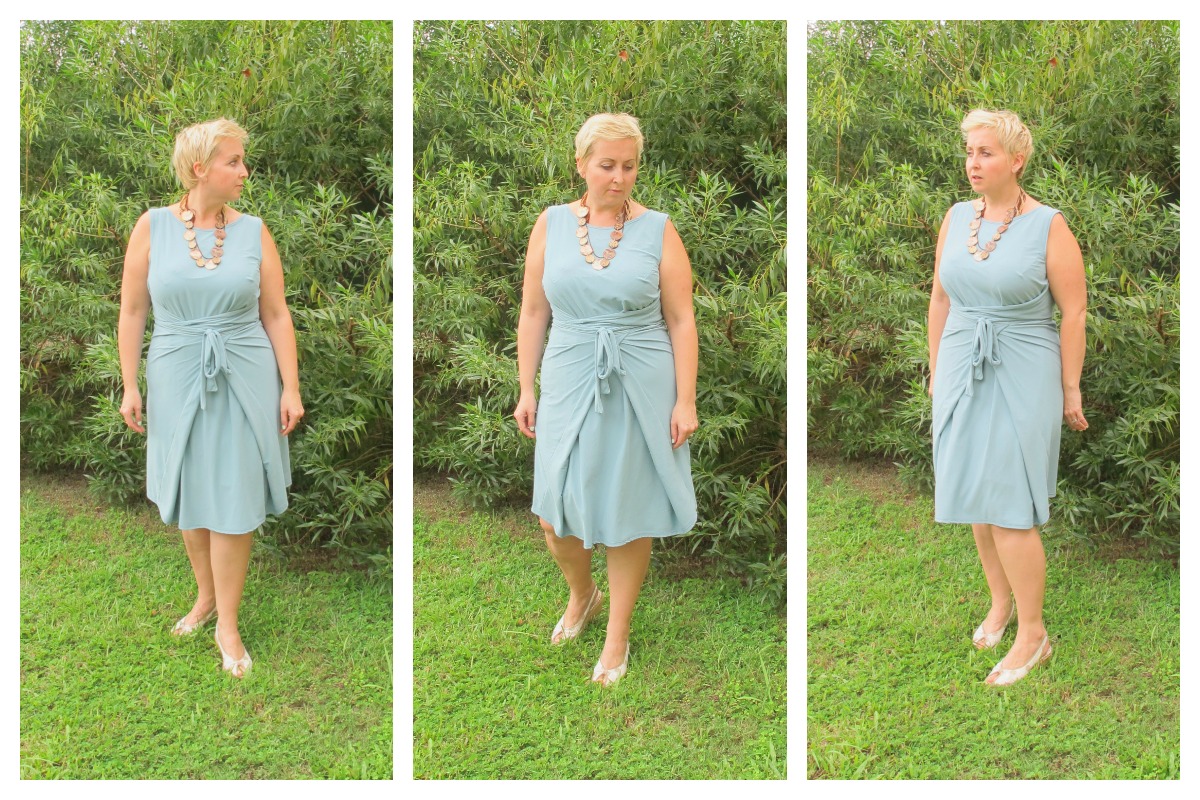
I made a Cambie - yeah I know I'm a little late to the party, but I did get there in the end. This is my Crazy Cambie. It's actually a wearable muslin - as the only thing I actually bought was the zip.


A friend had given me the fabric a couple of years ago when she'd seen it in bargain corner at Ikea. The lining is a cotton sheet and the pattern was a gift.


The fabric is a thick cotton fabric, heavier than a normal cotton with a good texture, curtain weight I think. Pre washed at 40 as I know Ikea fabric does shrink.

I made the Cambie in size 6 and followed the instructions for the bodice. I made a couple of small chages to the skirt - pleating to reduce bulk at the waist and putting the pockets at the side seams rather than princess seams - the skirt is a bit less full than the gathered version, but the structure does give plenty of body. I also used a regular rather than an invisible zip. I didn't even try to pattern match as the pattern repeat was so large and quite a random design. I'm quite pleased with the over all effect.


I thought that the fit might be a bit tight, but after following the instructions exactly the bodice is actually a little big. It needs a couple of cm taking out of the waist and a bit off each side seam. I also found the sweetheart neck gaped a little. I'll be adjusting the pattern to pinch out a couple of cm from the neckline just where the sleeve joins.

My only issue with the instructions are that it is almost impossible to adjust once complete (without unpicking a huge amount). The waistband is in one piece. I may seam it at the sides to allow for adjustment next time.

I wore this to work today - not sure it was a good idea when doing ceramics with year 7 all day, but it survived, was comfy and despite the weight was cool to wear. The photos were taken after a day of work not too creased either! (iphone, so not really the best quality) Shoes are from ASDA - emergency purchase!

Soundtrack to the Cambie making:
Placebo, Clean Bandit, Alt-J, Broken Bells (well it was an all day epic).

So would you wear something this crazy? I love having something a bit unique - no one else has a dress quite like this?


Sunday, 29 May 2016

Chai Latte Kielo


I told you I was converted to this pattern.

This has to be one of the best independent dress sewing patterns out there. The design is flattering to all shapes and sizes. The pattern instructions are soooooooo easy to follow and it's a really quick make. Oh and you can make it in a woven - if you choose your fabric carefully. you can get it here.

As I've said before, I had bypassed this pattern, simple because of the styling on the sample. It was sheer and in a colour that I would never ever wear. However after seeing a few floating around the blogosphere and pinterest I was interested. I bought the pattern and looked for something to make it up in - a cheap fabric, just in case it was a train wreck. I bought 2m of this semi sheer fabric from the market. I then discovered that Dorothy Perkins have blouses in this exact fabric.


Despite the pattern being designed for a knit I made this up in a woven. I did measure the pattern and was convinced that it would work, and it did. The whole thing took less than 2 hours to cut out and sew and I already have orders for one for my daughter and a friend. I also made one for my mum. blogged about here.


I cannot recommend this pattern enough. I think this is my new favourite, I am going to make a knit version too.

Its great to wear as the fabric doesn't crease. I wore it with my upcycled denim jacket and flat shoes. perfect for sitting in the sun and sipping a Chai Latte.

Sunday, 22 May 2016

Shirt Success


Yeah - I finally managed to make a shirt I'm happy with.

I have made only a few shirts. I've never used a pattern - each one has been a rub off of a commercial shirt. I have had a few problems with the fit and styling. One of the biggest problems was making the collar and cuffs firm enough.

So this was the shirt I made for John for his birthday. I still think there are a couple of issues, but its a big improvement on the last one.

A couple of years ago I traced a shirt that fitted him well and used it to make my pattern. It was not too bad, but the collar was a bit tight and the length a little bit short. I fixed these issues for the next version, but I still hadn't sorted out the floppy collar. which was not aided by the soft fabric.

This time I decided to sort out the collar and cuffs and I also included a separate button placket, where the previous versions had a simple folded over CF edge.


I did quite a bit of reading about collar construction techniques and how it should be interfaced. I used a combination of techniques, but I do find the Grainline Archer sewalong really helpful generally for sewing shirts. However I didn't use this technique this time. I made the collar and pressed it into shape, attached the stand and then added the collar to the stand.

To ensure the correct firmness and crisp finish I actually used a double layer of interfacing. I used a medium firm iron on and this seemed to work really well.

The seams were faux flat felled - next time I would like to try doing a proper flat felled seam. The hem was a rolled hem, but done without a rolled hem foot.

My daughter chose the buttons and I initially though they were a little bit too big. I do think they work though, but next time I'd go a bit smaller.


I know I've done a good job when John asks me if I'd made it! He was impressed with the finish and initially though it was a RTW shirt. NO CHANCE!

Sunday, 15 May 2016

More art not less


It's that time of year when exams start. My eldest son has his first GCSE exam this week and my daughter has just taken her options. The year 6 students at the school I work in have just taken their SATs and a couple of weeks ago Ofsted paid us a visit.  There has been much change to the curriculum in the UK and the government first of all want all schools to become academies and then change their mind! Schools want to have outstanding Ofsted ratings and teachers are suck in the middle trying to make sense of it all. All these things have prompted me to write this post.


We went off to my daughters high school a couple of weeks ago to meet with her form teacher in order to agree her options for GCSE (She's only in year 8 and options are usually taken in year 9, but let's not get into that one).


Actually the process was quite painless. She knew which options she wanted to take and the school were happy with them too. She chose Art, Drama, Spanish and Geography. Completely her own choice, and supported by us. I know of other schools where students have been told they can't do arts subjects and they have been forced down a more 'academic' route. This saddens me as the arts have been left out of the EBacc and many schools are squeezing them out of the curriculum. Less art at KS3 and fewer GCSE classes. Often not replacing arts teachers when they leave.


I'm glad that the school my children go to recognises their abilities and preferences and will let them take the subjects they are interested in. Both my sons are quite academic, but they both have an arts subject. One took music and the other product design. I know that my daughter will thrive doing the arts and it's her ambition to become a drama teacher.


I'm also fortunate to work in a school that values the arts. Since starting there in 2014 I've seen students become passionate artists. From learning new techniques to working as artists and creating individual pieces that reflect their personalities. There's still a long way to go, but I'm so impressed with the work they have created and I wanted to share some of it here (sorry for the picture heavy post, but I am one proud teacher).


We started the year with quite traditional techniques and then work increasingly independently as they become more confident. I expect a lot from my students and they do work hard. But it's a different sort of work to English and Maths but is still rigorous and fun! This different way of working allows students to develop creativity in a wider context and become wholistic learners.

Some students really do engage with all aspects of art and you can see the joy on their faces as they create work or learn a new technique. Others just enjoy the physicality of the subject and engage with the messy stuff. I have just started some clay work with year 7 and they are having a whale of a time with it. I will share some as they progress.


Making and creating is part of being human and should be fostered in our education system at all levels.

I'm glad to be where I am at the moment. I get to be part of developing creativity in young people and that is set to increase next year as we run an arts trip to London and start to deliver the Arts Award for our students. I'm excited for this and can't wait to see the young people I work with grow and develop. #moreartnotless.


Year 5 South American inspired masks, Year 6 Still Life food, Year 7 Impressionistic Lamdscapes, Year 8 Portraits and Tom Phillips style found Poetry. Still to come. Year 5 using colour and pattern, Year 6 Printmaking. Year 7 Hybrid animals in clay and year 8 recycled book art.

Sunday, 8 May 2016

The Hunter Tank

A while a go I had the opportunity of testing the Hunter Tank for Jennifer Lauren Vintage. The pattern has been released this week, so grab yourselves a copy. This is a lovely summery top with a tie at the front waist. It is designed to sit at the waist.  and would look fantastic paired with high waist skirt or trousers. I made this in a light weight navy cotton with a strawberry design and used navy bias binding for the neck and armholes. 


This is a quick make and I made it in an afternoon. The fit was good and I liked the design, although I'm not sure it really fits with my style. My daughter really does love this and it goes really well with her skinny jeans.

If you're looking for something to sew for your holidays then this is a good option. I made this using less than 1m of fabric.  


Sunday, 1 May 2016

Frida Fantastico


I have been waiting to blog this for ages. 
At Christmas my husband bought me 2m of this lovely fabric from Fancy Moon.

I decided I wanted a dress, but with only 2m and a very distinct pattern it had to be a slim skirted version.
I drafted a bodice using my own block, added some cap sleeves and used the pencil skirt from Gertie's first book.


I was really careful with the pattern placement on the bodice and managed to match the pattern on the bodice back quite well. Unfortunately I didn't have enough fabric to match the back of the skirt.


The bodice is lined with a light cotton muslin and I underlined the skirt with the same fabric. The shell fabric just needed a little extra body.


I finished the dress way back in February, but it had been too cold to wear. I did wear it a couple of weeks ago when we had the warm spell. Just waiting for it to get warm enough to have this in regular rotation.  

What would you make out of fabric like this?

Sunday, 3 April 2016

Named Kielo Convert

I am a Named Kielo convert!

Mum in her Kielo Dress.

I had originally bypassed this pattern as I was not really impressed by the styling on the Named website. I think it was the really sheer fabric and colour choice that put me off. How misled I was!

However, recently I had seen quite a few versions around the internet including this one by busylizzieinbrizzie.

and this one by Wasted Weekends.


The styling seems to suit most bodyshapes and I had been on the lookout for a maxi dress pattern for the summer. As I'm going to be in Hong Kong and China for a few weeks I really needed a light fabric that wont crease and will look fab after being screwed up in a case for many hours! I found this blue fabric at a local market for £2 a metre. It's semi sheer so I will need to wear a half slip with it.


I know that the Kielo is drafted for a knit or stretch woven, but I thought I'd give it a go in my fabric as it had only cost me a total of £4 for the 2m needed. (On a side note, I went into Dorothy Perkins the other day and this fabric is one of their current lines, as a blouse and dress.)

I cut a straight size10 (38) and made not adjustments during the construction. I made a self bias binding for the neck and armholes, and made sure not to make the seams bigger than the 1cm included on the pdf pattern.

I allowed about 5cm more on the back vent as the fabric is a woven and others had said it was a bit low. I took off about 5cm at the hem and did a rolled hem. Unfortuately I haven't photographed my version yet as it's too sheer and needs a slip which I don't have. I will post this soon.


My mum was visiting when I was making my dress and was impressed by the fit and styling and asked me to make her one. We headed off to The Sewing Box in Morpeth and bought a beautiful drapey Crepe de chine style fabric (with no stretch), also synthetic and the sort of fabric that would look stunning even after being screwed up for hours. My mum travels quite a lot and this is the perfect dress for her to take out to Spain or on her travels.

I cut and sewed a Size 14 and finished it the same way as I did mine (mum made the bias binding - which was no mean feat with this slippery fabric). We are the same height and so the length of the dress was the same as mine. I am now convinced that this pattern works well in a light weight woven with no stretch, but I would like to make it in a knit to see the difference. I plan to make a shorter one for work and one with sleeves for the winter.

I am converted to this pattern - it's amazing what fabric choice can make to the styling of a dress.


LinkWithin

Related Posts Plugin for WordPress, Blogger...