Friday 28 May 2021

Summer dress in Broderie Anglaise


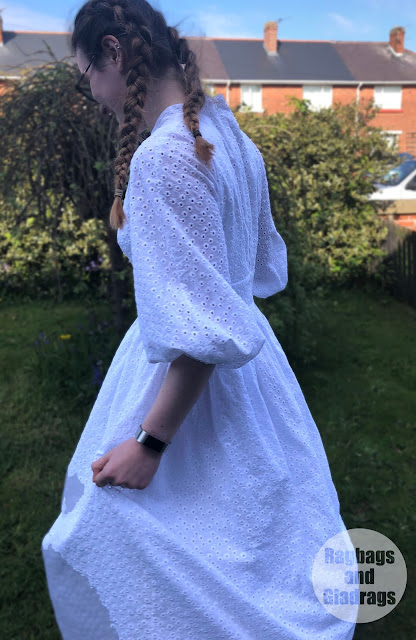
Way way way before the current season of the Great British Sewing Bee had started. I had this project in mind. My daughter had seen a dress on a TV celebrity before Christmas and had said she wanted one similar to it. However, finding suitable fabric was a struggle and we kept putting it off! I had found a pattern in one of the Burdastyle magazines that I had. It’s pattern 111 from July 2015  It's very similar to the Orchidee dress, which has just been released by Deer and Doe, if you are looking for something more up to date.


Once she had seen this Broderie Anglaise fabric, she was more than happy for me to make the dress out of this. The fabric arrived just a day before the first episode of GBSB and once it had aired it seemed like the world went buffet dress and Broderie Anglaise mad.


This is NOT a buffet dress! (I’d never heard the term before GBSB and I’ve been sewing for over 10 years). This has a high neck at the back and a deep V front, which closes with buttons. The bodice is shaped with darts front and back and attached to a midriff band. The skirt is attached to the band. The original pattern called for a tiered skirt, but my daughter wanted a simple gathered skirt and ‘not too full”. The sleeves are almost raglan is style, but rather than finishing at the neckline the end just a couple of centimetres away from the neck edge.


The original pattern calls for a side zip and a self tie belt. I opted to intall the concealed zip in the back seam as I had a long enough one in my stash. I also made the button front a faux fastening. I used some small self cover buttons that I had left over from a wedding dress I made a couple of years ago.

I absolutely LOVE broderie anglaise fabric and I almost made something for me rather than my daughter - but I have lots of clothes and she doesn’t have too many of this type of dress - Plus we both wear the same size so I can pinch this if I want to!!!!.


This fabric is very very fine. The base cotton is a lawn weight and it is quite narrow. I only just squeezed this out of 3m. Due to the fine nature of the fabric I used a fine microtex needle - however I broke 2 needles going through the embroidered sections - so I’d advise you go for a slightly thicker needle. Also my overlocker hated this fabric - the varying thickness of the fabric played havoc with it and I wish I’d just used my pinking shears on the raw edges. After I’d rethreaded it several times!!!!!!!


I lined the bodice, midriff and skirt with a plain white cotton as it was quite sheer. In retrospect I should have chosen something a bit lighter - a poplin weight would work perfectly. The sleeves were left unlined. The pattern calls for a facing rather than a lining, so I had to think through the construction order quite carefully in order to achieve a neat finish on the inside. The sleeves are finished with an elastic casing which helps keep them in place and the hem is about 5cm deep.


I used the Kenneth King method for installing an invisible zipper.  It takes a little longer, but the results are great every time and it helped that the invisible zipper foot for the Pfaff machine I have is the best one I have ever used.


My daughter Loves this dress and has been swishing around in it for the last few days since I finished it. She plans to wear it with a corset style belt - Very cottagecore!!!!


Originally posted on Minerva

Wednesday 26 May 2021

Hoodie Pattern Review - Burdastyle 103 January 2017


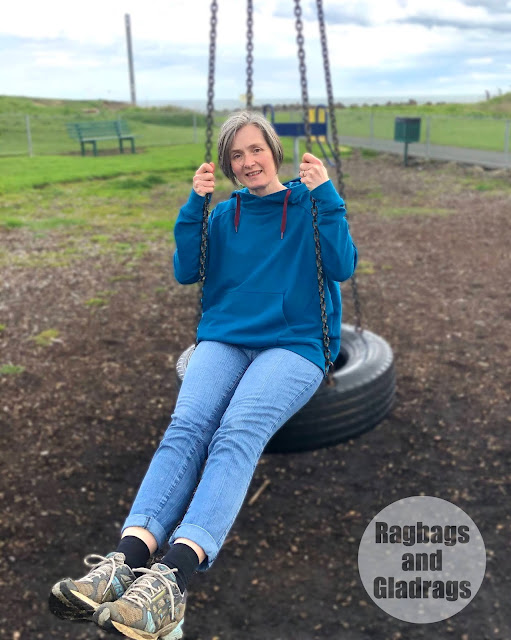
After the issues I had with the zero waste hoodie I made a few weeks ago. I decided to follow a pattern and make a looser fit top. I had my eye on this one from Burdastyle Magazine. It's in the Janurary 2017 issue. I liked the style lines and the shape of the hood.

I bought this cozy petrol coloured sweatshirt fabric from 1st For Fabrics during lockdown and have only just got around to sewing it up.

The pattern is drafted very well and came together very quickly. The fabric behaved well and is cozy without being too thick. I wondered if my machine would be able to cope with the multiple layers of fabric at the front of the hood, but it was fine and I had no issues at all.

I sewed this on my Pfaff select 3.2 with a Smetchz stretch needle. The seams were sewn with a narrow zigzag length 2 and width 1; they were neatened with my overlocker. I omitted the eyelets and instead made a buttonhole opening for the hood cord, which I had reclaimed from an old hoodie.

I made a size 38, which is my usual Burdastyle size, but could have easily sized down as this pattern is very roomy and this hoodie is definitely loose fit, but hey! Who doesn't love a baggy hoodie. 

I'm looking forward to wearing this as a cover-up on cooler summer evenings and early mornings or while I'm warming up during workouts or skate sessions. It will certainly replace my old hoodie - which has 3rd hand (at least), stained and has now been relegated to the gardening/ decorating pile.

Photos taken by my daughter on our dog walk. It was a bit blowy!!!!

Sunday 23 May 2021

Ginger Jeans take 3


I am growing to love this pattern the more I make it. This is the 3rd version of this one and I don't think I've ever sewn such stretchy denim. I was gifted this fabric my Minerva in exchange for a review as part of their brand ambassador program. I have shared my make on their site and you can read it here.

A few weeks ago I was cleaning the bathroom and I used some bleach spray, which I managed to get onto my black skinny jeans. So it was time to get making and create a new pair.

As usual I followed the online sewalong, which is super useful. If you are planning to make a pair of jeans - whatever the pattern - I can highly recommend the Closet Core Pattern sewalong. It will take you through construction techniques and give advice on fitting and adapting the pattern to suit you.

As I was using the stretchiest denim, I ended up taking in the seams quite a bit. I went with the high waist and skinny leg version and hope that these will make fab skate jeans and they are almost as stretchy and comfy as a pair of leggings, truly Jeggings.

I really love these and I think they'll probably get as much use as my last pair (which are worn several days per week).


Sunday 16 May 2021

Activewear

I made activewear!!!! This has been something I have wanted to do for a while, but I’ve been reluctant to have a go as finding the right fabric worried me. So when I had the opportunity to review this fabric. I jumped at the chance. This is the fabric I used for this.
I decided to make some leggings and a crop top. 


I did a lot of research into which pattern to use for the leggings and opted for a free pattern. I looked at quite a few, but settled on the 5 out of 4 Ninja pants pattern as they came with a selection of different options.


I opted for the full length leggings with a high waist and fabric waistband. The information on Minerva told me that the fabric had 35% stretch, which was less than the requirement for the pattern. My measurements put me at the top end of a size S, so I went up a size and cut a medium, grading to a S at the waist. I should have made the small as these are a bit too big and the fabric does have better stretch than I thought. However, I was concerned that the fabric might become stretched too thin and cause embarrassment. My daughter assures me that although the pattern on the fabric became a little stretched during a really deep squat (no I’m not showing you my butt), that it was much better than the ones that she had.


For the top I decided to give the free Noelle Bralette top by Madalynne a go. I had made this before and chose a size that was too big. This time I opted for the smallest size and replaced the bottom band with wide plush elastic, which I stretched to fit. Ensuring I cut the right length. 


I have a 30 inch underbust and the elastic length was 231/3 inches. The top is lined with a cotton jersey offcut that I had, which had a comparable amount of stretch and I also included removable bra cups.


The straps are of a fixed length. I pinned clear elastic to the front pieces where straps would normally be joined and then used purple fold over elastic to bind the edges and the elastic. Once this was done I tried the top on and pinned the straps at the right length for me (Helped by my daughter).


In retrospect I should have used black FOE as it would fit the fabric design much better. This morning I wore my new set for a pilates session. The top was super comfy and didn’t move or ride up, which is a first! The leggings were OK, the gusset allows for a good range of movement and the waist was ok.

If I had made these in the correct size these would have also been perfect. They actually didn’t move much, just a little. You will have to excuse my sweaty appearance as these were taken post workout!

Sunday 9 May 2021

Ultraviolet T: Paprika Patterns


Lisa from Paprika Patterns approached me about making up a couple of their newly released patterns and I was excited to take part. 

This is the Ultraviolet T. It is cleverly designed to work with both knit and woven fabrics and each has it's own cut lines. The pattern is a boxy T with grown on sleeves. It comes in different cup sizes and a good range of sizes. The larger cup sizes have a darted bodice, but as I was sewing up the smaller sizes I chose the version without the dart.


Originally this pattern was released by Erin at Tuesday Stitches, but when she closed her shop. She worked with Lisa at Paprika Patterns in order for the patterns to still be available for the sewists out there. This one was released this week.

Initially, I was a little dubious about if this top would find a place in my wardrobe as it is quite cropped, but I do love the curved hem and I love a woven T.

I sewed this up in some fabric that I had tie-dyed last year, which is why it looks so creased. It feels comfy to wear and is perfect for those warm days where you need something loose and breezy.


Initially I was a little confused with the no trim PDF, but once I had worked out the layout it was easy to follow.

The instructions are super easy and I love using a bias band for both the neckline and the hem, it gives a super neat finish and looks cool with the tie-dye.

Today I have worn this with my jeans, but it would work very well with shorts or high waisted pants. It would be great as a cover up over a strappy dress too. I think this pattern has a lot of possibilities. Do go take a look.


LinkWithin

Related Posts Plugin for WordPress, Blogger...