Saturday 27 June 2020

Free Sewing Pattern Review - 2 tanks


What with the warm weather hitting the UK this week, I decided that a couple of Tank tops would be a perfect addition to my wardrobe. I settled on a couple of free patterns to try and decided to use up the fabric I had in my stash, which mostly meant off cuts and required some careful cutting.
I have had mixed results - so here we go...


First up is the Gathered Back Tank by Life Sew Savory. I was drawn to the relative high neckline and the cute gathers on the back of this pattern. The pattern is easy to download and print and according to the size guide I cut a M. I went straight in and cut two of these tops out as I was certain I was going to love it. The first was a very stretchy sports type fabric - too stretchy for this pattern, probably more suitable for leggings - but I'm not going to wear white based leggings - ever! It turned out too big and has been gifted.


The construction was super simple to follow and the only alteration I made was to turn the back and arm bands over to create a binding rather than a band. After deciding that this version was too big - which I put down to the fabric. I started on another version, using Rico cotton jersey.


I've made a t-shirt in this that I wear all the time (worn with my Burnside bibs here), but there was very little left over and once cut out I realised that the fabric was upside down. Not put off, I sewed it up anyway, thinking that it might make decent loungewear.


On this version the bands really did stretch out. I knew that they were not perfect and it can depend on the fabric choice as to what length to cut. But I went with the instructions and it just didn't work. I think if I'm honest the armholes are too low for my liking. I also found there to be too much fabric in the gathers at the back. In a knit I think this needs to be a lot less. I won't be wearing this and I'll turn it into underwear.


So for me this pattern is a fail. However it could be redeemable. I think that it would work perfectly well in a lightweight woven and actually be quite cute. If you are going to try this I strongly advise sizing down and reducing the gathers at the back.


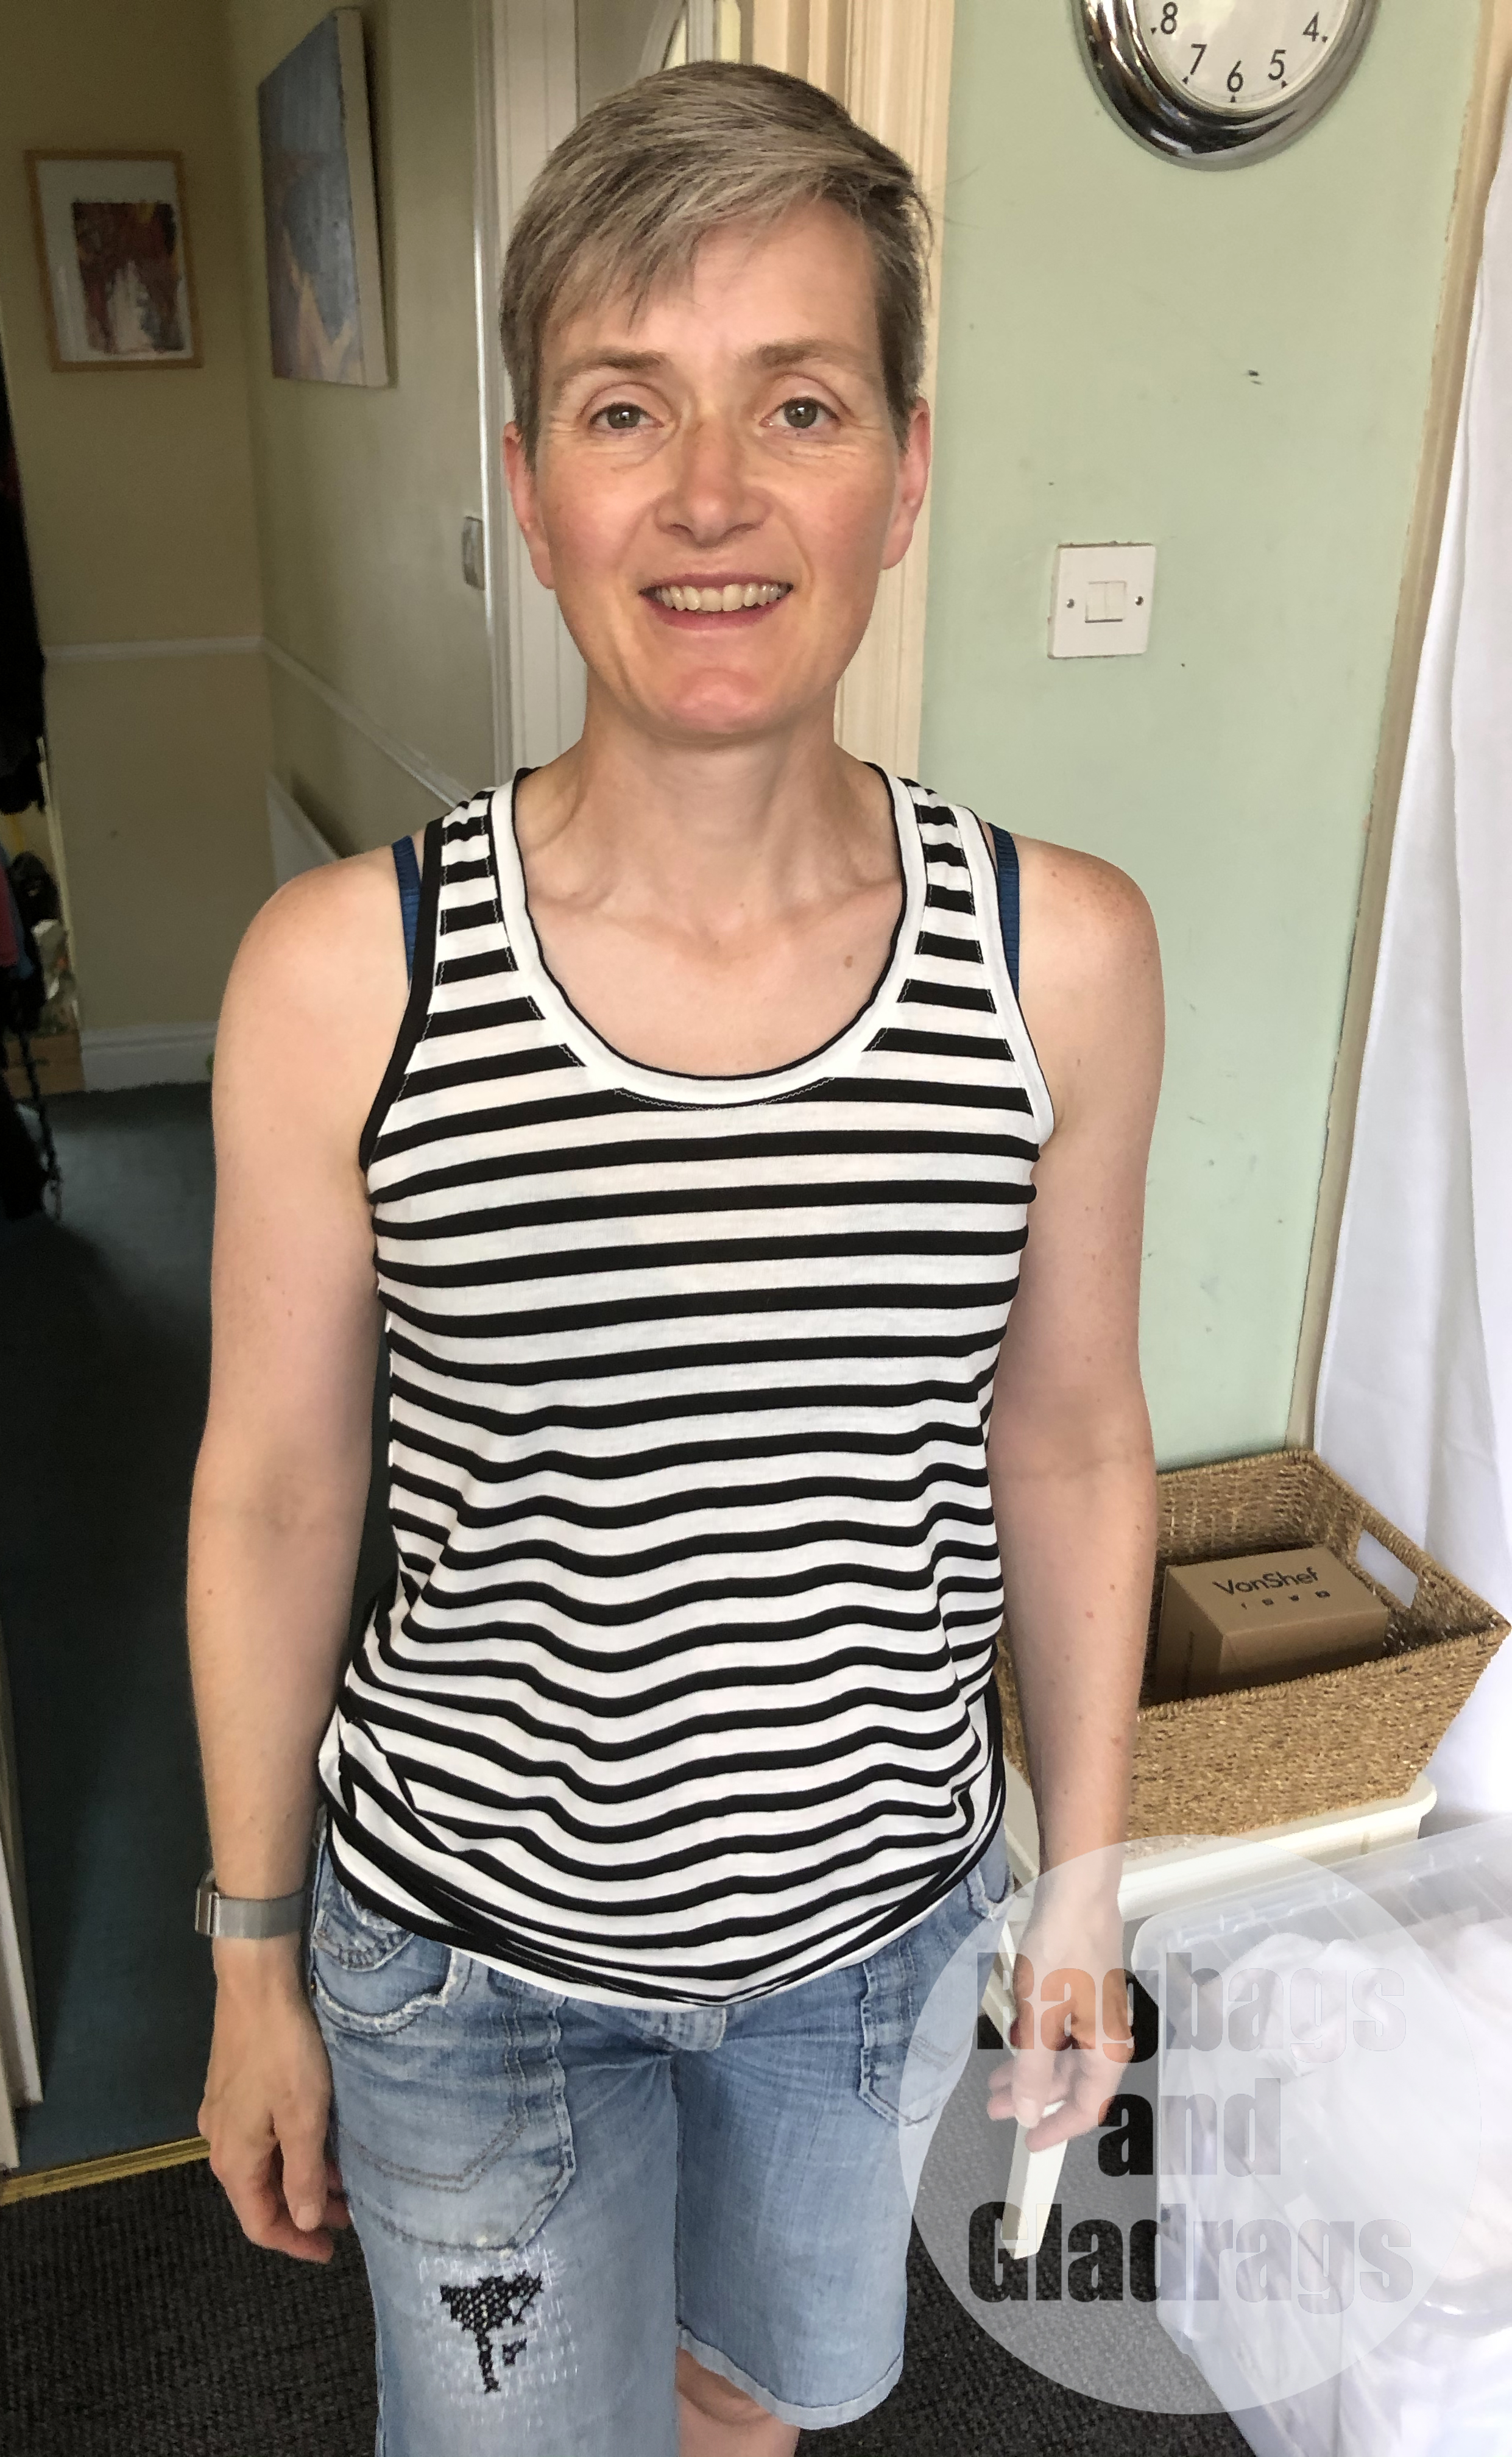
Secondly I tried the Lago Tank by Itch to Stitch. I had more success with this one; this could be down to fabric choice though. I used a remnant of viscose jersey that I had made a top from last year. There was very little left and it did require careful cutting. I actually cut the whole top in one piece, which means I omited the waist shaping and kept straight side seams - this was just so I could squeeze the top out of the small amount of fabric I had left. It's a super quick sew. Side seams and shoulders then the neckband and arm bands were sewn in the round. I misjudged the back and got a few puckers, but not enough to unpick and do it again. I didn't bother matching notches, I just pinned at half and quarter marks and stretched to fit.


I sewed and topstitched with a narrow zigzag on my Bernina and used a jersey needle. I had completely forgotted I'd bought at stretch twin needed for top stitching like this, but remembered in time to try it on the hem and it worked perfectly.


I've already worn this top twice this week - so it's definately on the winners list.


Do you have a free pattern that is an absolute go to?


Wednesday 24 June 2020

Summer Linen T shirt - Hoodie Dress Hack and refashion


Who doesn't love a light linen top when it hot, hot, hot? I had been wondering about making a Linen top for some time, but couldn't get my hands on fabric that I liked - I need to feel the hand of fabrics like linen to check they are the right weight - I had all but given up on the idea when I devoded to clear out my wardrobe. Lurking at the back were a pair of white linen trousers I bought several years ago from Asda. They were a size too big and initislly went into the charity shop pile as I just don't wear them enough to keep them. However I remembered my desire for a linen top and decided to try and refashion the trousers into a top.


First up I needed a woven t shirt pattern. I knew I loved The Assembly Line Hoodie Dress and I'd made two hooded versions which you can read about here and here, and a short sleeve hood-less version that I made last year.


I used the bodice pieces, the neck facing and the short sleeve that I drafted last year. The trousers were prepared by removing the waistband and cutting up the inseam and crotch seams, leaving the outer leg seams intact.


This allowed me to cut the bodice fronts from the upper part of the leg. Then the sleeves from the lower part. The facing was cut in sections, where I could find enough fabric. There was enough fabric left at the bottom of the legs to add onto the bottom of the t shirt (just over 10cm). I was glad about that as it would have been VERY cropped without it.


You can see the side seams of the legs have ended up just off centre, but I kind of like it - I deliberately mis-matched these with seams on the bottom extension.


This top certain fits the Refashioners 2020 theme of #usewhatyouhave. I was so glad to wear this today as it was super cool to wear at work. I really needed it - It was hot and sticky! I certainly think this will ge far more wear as a top than it ever got as trousers.


In fact my whole outfit is refashioned. The necklace is one I made a few weeks ago with some repurposed buttons and My culottes were made 2 years ago from an Ikea curtain - burdastyle pattern. I love it when I can give something a new lease of life, don't you?

Wednesday 17 June 2020

Free Sewing Pattern Review - Peppermint Playsuit


In the current climate, keeping costs down for some people is incredibly important. Sewing can be an expensive past time. Patterns are expensive, good quality fabric is expensive, threads zips and buttons all add up. Over the years I've collected some free patterns and I'm very very grateful to those that offer patterns for free. It takes a long time to draft a design, test and then grade that pattern. I've made three patterns and I know they aren't perfect, I don't pretend they are, but the time it took was incredible. So I'm all up for promoting and supporting designers who are willing to offer freebies and I'm always looking to designers that offer the sewing community Free patters for appropriate ones to buy.


However, right now, while we are in lockdown and many people aren't working it's a great time to review some free patterns and this one includes a refashion. In fact the only thing I bought was a zip.


So this free pattern was created by In the Folds for Peppermint magazine and you can find the pattern here. You do have the option to make a donation if you are able.


My daughter loves a cute playsuit pattern and her prefered colour is black (can you tell?). I didn't have enough fabric in my stash so I raided the refashion pile. I found two pairs of black jeans that had originally been my hubby's but had worn between the legs. With some very careful pattern placement I just managed to squeeze the fronts and backs out of the jeans legs, as long as I cut the jeans apart on the inseam. The facings and straps I managed to cut from off cuts of fabric that was already in my stash. I used two of the jeans pockets to create the patch pockets on the front.


From the photographs you can see that the playsuit is designed for quite a fluid fabric and my denim is certainly not fluid - so I wondered how well this would actually work.

This pattern is drafted very well and the sizes matched the description and body measurements well. I thought I might have to add some length to the body as my daughter has a long torso like me, but it was absolutely fine.

As it's a PDF download I always look at how many pages it's going to take. This one is not too bad at about 30 pages. It uses the layers function so you can select just the sizes you want to print, rather than having to print everything. This makes assembling and cutting out so much easier.


So how did it all work out?

The construction went well. It's a really simple prject to put together and the hardest thing to do is the concealed zip. I've recently changed how I do this and the method I now use has always led to perfect insertion.
Basically - baste the seam closed with a long stitch and press open.
Press the coils on the zip open so you can sew really close to the coil.
hand baste the zip to the seam allowances only, centering the zip on the seam line. Use small stitches.
Rip open the basting and open the zip - right to the end. I use a pair of tweezers or small pliers to pull the zipper pull right to the end.
Sew really close to the coils - in the seam allowances. You can use a regular zipper foot, but I prefer a concealed zipper foot for this.
Then pull the zipper up all the way - you should have a perfectly installed concealed zip.


I do think the denim is a touch heavy for this pattern. it also had some stretch so some of the seams aren't as crisp as I'd like. Something a bit lighter and slightly more drapey would be perfect a Chambray or linen for example. However as part of my contribution to The Refashioners 2020 #usewhatyouhave -  I used what I had.


I thought the legs might be a bit too short, but they are actually quite a nice length. I can see Bethan wearing these with a cropped t shirt or bralette underneath but as the weather is so unseasonal here in the UK (I even wore my warmest winter coat yesterday) she's paired the playsuit with an off the shoulder sweater and leggings.


All in all this is a fantastic beginner pattern. It's simple to construct and a very cute style.


I really like how the seams and pockets from the original jeans add a little something to the styling. Bethan decided she liked the playsuit with a belt as it gave her more definition at the waist. Have you tried this pattern? What did you think?


Friday 12 June 2020

Coach Style Jacket - DIY (Free Pattern)


When my son got back from Uni, he asked if I could make him a coach jacket. I had no idea what a coach jacket was, but after doing a bit of research discovered that it was one of the simplest of jacket styles out there. As this was a custom item, I matched the design to what he wanted and then I set to work to create the pattern.


I checked my stash and didn't have anything suitable so out came the drafting book and I set to work. As it's such a simple design it didn't take long to draft. It's basically an un darted overgarment block, with a simple collar. The front has diagonal welt pockets and is fastened with poppers.


I used Aldrich - Metric Pattern Cutting for Menswear. It's the first time I've made a garment using a block drafted from this book, although I've had it for a while. The drafting for menswear includes a 1cm seam allowance on some seams, but not all, which I found a little strange. I was pleasantly suprised that the first (and only) muslin I made was a pretty good fit. I made minor changes to the length to accomodate my son's personal taste and the collar needed a bit of work to make it comfortable.


I have decided to make the PDF of this available as free pattern (draft). You can download the file here. (you can check out all my free patterns here.) However, there are no pattern markings or instructions, bar my own notes and the information contained in this post. I didn't draft pockets, but cut the pieces out when my son had decided where he wanted the pockets to be. This design would also work well with patch pockets or zippered pockets. You may use this for your own personal use, but must not sell or distribute the pattern in any way. It's single size and would match an XL size (chest 114cm). One day I may grade it, but that takes a lot of time, which I don't have right now. My instructions are brief - I forgot to take construction photos as I just wanted to complete it - and wasn't planning on making a real pattern or anything - so lots of finished photos here.


On to construction. The outer layer was made from Cotton Drill. I used just over 2m. The body lining is a lovely softly woven cotton, about 1m (each of these was about 150cm wide). The fabrics were purchased from Minerva. The sleeves were lined with a traditional lining fabric, something slippy, again I used about 1m - this was a remnant from my stash. The snaps are Prymm. Interfacing was from my stash.
The pattern has 1cm seams throughout, except for the hems on the sleeves and body, which are 4 cm.


I cut the body fronts (x2), back (x1 on the fold), sleeves (x2 on the fold), front facing (x2), back neck facing (x1 on the fold), Collar (x2 on the fold) from the main fabric. All pieces cut on grain.
I also cut 2 welt strips and 4 pockets bags for the pockets (no pattern pieces for this)
I cut interfacing for the front facings, collar and interfaced the area  for the pockets and the hem line.
I cut 2 sleeves from acetate lining - cut to hem line length
I cut the body front and back from the cotton lining. - when cutting the back I added a couple of cm at the fold to give an ease pleat in the back.  -also cut to hem line length.


First I made the welt pockets in the front pieces (Catherine Daze Has a brilliant tutorial here).
Next I joined the front facings to the front body lining pieces.

On the back lining piece I stitched a few cm down from the centre back at the top and bottom  - the distance I had added on to the pattern to form the pleat. Press the pleat in to the fabric. You can see how this looks in the photo below.
The back neck facing is then sewn to the top edge of the lining. I added a hanging loop, but you could omit this if needed.


The collar pieces were sewn together - right sides together along the outside edges, seams trimmed, turned and pressed. The neck edge of the collar was basted together. Top stitch the outside edge if you wish.

I sewed the body front and back pieces together at the shoulder and and pressed the seam open. I did the same in the lining. Then the sleeves were attached flat and pressed towards the body - on both the lining and main fabrics.

The side seams were then sewn, from the hem, up the sides and down the sleeve. I also pressed the hems up.


Next I pinned on the collar. I started at CB and pinned along the neckline towards the CF. There should be a small space at the CF of a couple of  cm once the jacket is complete.
I sandwiched the collar between the outer layer and lining (right sides together). You will find stay stitching the neckline and clipping tight curves (not through the stitching) will help achieve a smooth collar insertion.


Once the collar was pinned in, I continued to match up the front edges of the jacket and facing. Then stitched from one end to the other, making sure to pivot neatly at the top of the CF edge (I marked this with pen on my interfacing so it matches perfectly. Turn and press - top stitch if you wish.


Next up was bagging the lining. I won't cover that here as there are many many posts on how this one from Grainline studio is particularly good. I left a gap in the hem to turn the jacket through, it's easier than leaving a gap in the sleeve.


If you don't want to bag the lining. you can simply turn up the hem, fold over and press 1cm so that the raw edge is enclosed and hand stitch in place. Do the same with the sleeve hems.


Next up are the fastenings. My son opted for silver snap fasteners, but you could also use buttons. Mark even spacing between them - 5 or 6 should be about right, depending on your preference. You could use a zip, but this would require a little alteration to the front pieces and facings - you would need to remove the overlapping sections. the zip should then be inserted between the front and the facing to give a clean finish.


So here we have one completed, coach jacket. Its a relatively simple make and has lots of opportunities for pattern hacking. It's exactly what he asked for and it's my 4th coat/ jacket make of the year so far.


Wednesday 10 June 2020

Lingering


In my head I titled this post 'Lingering over Lingerie', but it just sounded wrong. What I'm actually doing is wondering if I can make some decent lingerie to fit me. The only sucessful items I've made have been some undies, which I drafted from a RTW pair I liked - I wear these a lot, they are comfy, but not very feminine.

Cloth Habit Watson

I have dipped my toe into bra making before and sewed up a Cloth Habit Watson Bra. I was impressed with the instructions and it all came together nicely. I just wasn't really that impressed with the fit and knew it would take some work to get it right.

Sierra Bralette

I also had a go at the Sierra and Barrett bralettes from Madalynne (both free). Again a sucessful sew, comfy, but neither did anything for my shape and I think this is where my reticence to sew bras has come from. I love the idea of making a bra, but as there are many types of elastics and fabrics to source and a good pattern to find. I've found it all a bit overwhelming and I stalled with my making.

Barrett Bralette

For many years I struggled to find a bra that fit, was comfy and elegant. I have a small bust and I don't really want to shop the Angel range at M&S. I'd been fitted for Bras at M&S and usually a size 36AA was suggested, well first off there were no nice bras in this size. Secondly, they didn't actually fit, the band was too loose and the cups too narrow. When told to try the sister size of 34A, I just found the same issues. I often left the lingerie section feeling fed up and my self esteen left in shreds, as I felt less of a woman because I couldn't find a bra to fit.

M&S padded plunge bra

A few years ago I did a bit of reading. I stopped adding 4/5 inches to my band measurement and instead I just went for the size just above my underbust measurement. I measure 30 3/4 inches underband. So I went for the 32 band. A 32 B cup size was too narrow and uncomfortable, so I went for a 32C. Depending on the make of the bra I will sometimes go for a 34B. However these sizes are still not quite right for me. I have a small bust, but my breasts are wide set and wide. even the 32C and 34B can be too big in the cups, depending on style.

I have found the low front of a plunge bra suits me best and I know that I can get a push up plunge from M&S in a 32C and know that it will fit but over recent months there seem to me much less of this style available. I want to be able to make a bra that will make the most of my shape, without loads of padding and that doesn't squash what little I have flat (Sierra and Barrett I'm looking at you).

Kirstin - Small bobbins

I've been seriously impressed with Kirstin of Small bobbins makes, but most of these seem to be in the Bralette category. However I love her blog and the sew-a-longs are fantastic. It also helps that she faces some of the same issues I do. 

Orange Lingerie - Fenway Bra

I've browsed Orange Lingerie and really quite like the Fenway bra - which I think i'll try when I've got a bit more experience. I know I can't do a full cup - I find long wires really uncomfortable. I'm not adverse to a soft cup bra, and I'd also like a halterneck style to wear under a few tops/ dresses that really need it.


I think I'm going to try the Free Maya Bra from AFI Atelier. I know it will need some significant modifications to make it a more plunge style, but being a free pattern I can try and work out what to look for in bra sewing patterns. I downloaded a group of sister sizes and have made one test version (a while ago, so I'm going to check that this still works for me. - I'll let you know how I get on. I think I'll also revisit the Watson Bra.

My other quandy is fabric and notions. You need a lot of different elastics and fabrics to make a bra, some have stable fabrics and others use stretch. I keep wondering about buying a kit, or just buying individually. The kits I have seen do seem quite pricy and then you need to add shipping on top. I love the fabrics and designs in Small Bobbins shop, but when a kit is about 30 euros, plus shipping to the UK, It seems a lot to be spending on what could be a train wreck. However, I need the right type of fabrics to make sure that the bra will work  before buying the nice ones - do you see my dilema? I'm thinking of buying a few bits from sewing chest as they seem to be quite well stocked and are in the UK. I'm just not sure what to buy.

So where do I go from here? Any suggestions for supplies for making a muslin, that won't cost the earth, before I choose some nice fabrics? Any suggestions for patterns that work really well with a small bust (I am not petite in any way)? Any other knowledge/ books etc that you would recommend? (I already have Lingerie Design - a complete course)


LinkWithin

Related Posts Plugin for WordPress, Blogger...