I really quite like these slim pencil pants from Burdastyle 04/2013 114B, and I have a gorgeous red gaberdine that I'd like to make them in. But I'm not sure about the flat front. I'd like to make them a little more like jeans and add pockets and a fly front. Now pockets I can do, but I've only ever attempted a fly front once and can't really remember how I did it. So today I decided to make a practise fly front.
I'm a great believer in dis-assembly to help understand how things are made. and while I didn't actually take anything apart to work this out I used a pair of trousers and looked carefully at how the fly front zip was constructed.
Here's my take on a fly front and I'd love to hear how you tackle this job -do you have any useful tips?
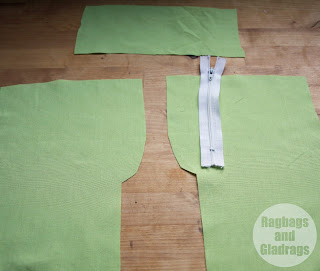
Right and left front with extension, zip and a rectangle of fabric to make a zip guard. this stops the back of the zip lying against the skin.
Fold the rectangle for the zip guard in half and Sew as shown. I decided to enclose the seam but you could just neaten the edges with an overlocker or zigzag stitch.
Sew the zipper tape to the zip guard, close to the edge.
Sew the centre front seam on your garment. Most pattern have a notch where you need to stop.
I pressed the seam open and pressed the extension to one side.
This is how it looks from the right side - you can see the extensions as this fabric is quite thin.
Fold the front section down. this is just to help line up the zip.
Lay the zip face down onto the front. You can see the zip is not right on the edge- this will mean that you can't see the zipper teeth when it's completed. the zip will be neatly hidden from sight.
Hold the zip in place with your fingers and pin it to the extension, close to the zipper teeth.
As you are doing this fold the zip guard out of the way. we don't want to sew it to this part of the front.
Use a zipper foot to stitch as close as possible to the zipper teeth. This is what it will look like when you've done that. the zipper guard is NOT sewn to this bit.
The front should look like this. You can see the centre front fold on the fabric.
The other front piece should extend slightly beyond the centre front. you can see this pressed edge here.
Fold and pin the extension on the other side to the zipper tape and guard.
Sew close to the zip with your zipper foot. It should look like this.
Once pressed the zip should now look like this. We need to secure the layers and make sure the zipper guard does not flap around.
On the wrong side, pin the zip guard out of the way.
Stitch on the right side to just before where you want to curve to follow the extension - you can just see the extension through the fabric.
Fold the zipper guard back in place and pin. The next set of stitching will secure the zipper guard and stop it flapping around.
Stitch through all the layers in a smooth curved line. I just used back stitch to secure this stitching, but on a garment I'd probably use a satin stich for a better finish.
This is the finished zip from the front.
and from the back (I would normally neaten all edges with an overlocker).
I hope you found this useful. I find it really useful to try out techniques before I use them on a garment.


Thanks for visiting my blog :)
ReplyDeleteFollowing you on GFC - I'm intimidated by my sewing machine and really need the inspiration to persist with it!
Angela @ A Typical English Home