Friday, 16 April 2021

Zero Waste Patterns - are they worth it?


*** Photo heavy post***

I've been trying out a couple of 'zero waste' patterns recently. I'm a great fan of reducing waste. We've been actively trying to reduce our plastic consumption at home and reduce the amount of waste we create. It's been much harder during Covid times as our options have been somewhat limited.

We've almost got the bathroom sorted and since we started to make our own soap the amount of plastics and waste in the bathroom is minimal. We compost a lot of our food waste, which in turn helps us grow food - all good.

But what to do with those fabric scraps? I have always been pained to throw things away, which has meant an ever growing pile of small scraps of fabric. - that are really not much use!

I know that I can use this to stuff toys or the Closet Core patterns pouffe, or piece them together to make a Zero Waste Daniel style garment. (not managed this sucessfully as the pieces don't seem to go together) I've even made a quilt and have pieces cut for the next one, but this only really uses up my cotton scraps. I have even pieced fabric to enable me to cut out a garment from other waste materials - This I have had some success with and you can see the results here, here and here. I recently took part in the ZWDO community call and it was interesting to hear different designers take on creating zero waste designs.

However, the idea of setting out from the getgo to have not waste in my sewing really did appeal and when I saw the Zero Waste Hoodie on Zero Waste Wardrobe I knew I'd need to give it a go.


I had ordered some beautiful fleece backed sweatshirt fabric from Minerva and this warm snuggly fabric arrived a few weeks ago. I pre washed it and got ready to get started.


I checked the body measurements to see if the pattern would fit me and the width of the hoodie corresponded almost exactly with the very well worn one I've been wearing so I decided to go for it.

The pattern calls for 80cm of 180cm wide fabric. I don't think I've ever found fabric that wide for dressmaking and mine was 155 cm wide, so I had to adjust the layout to fit all the pieces on. 

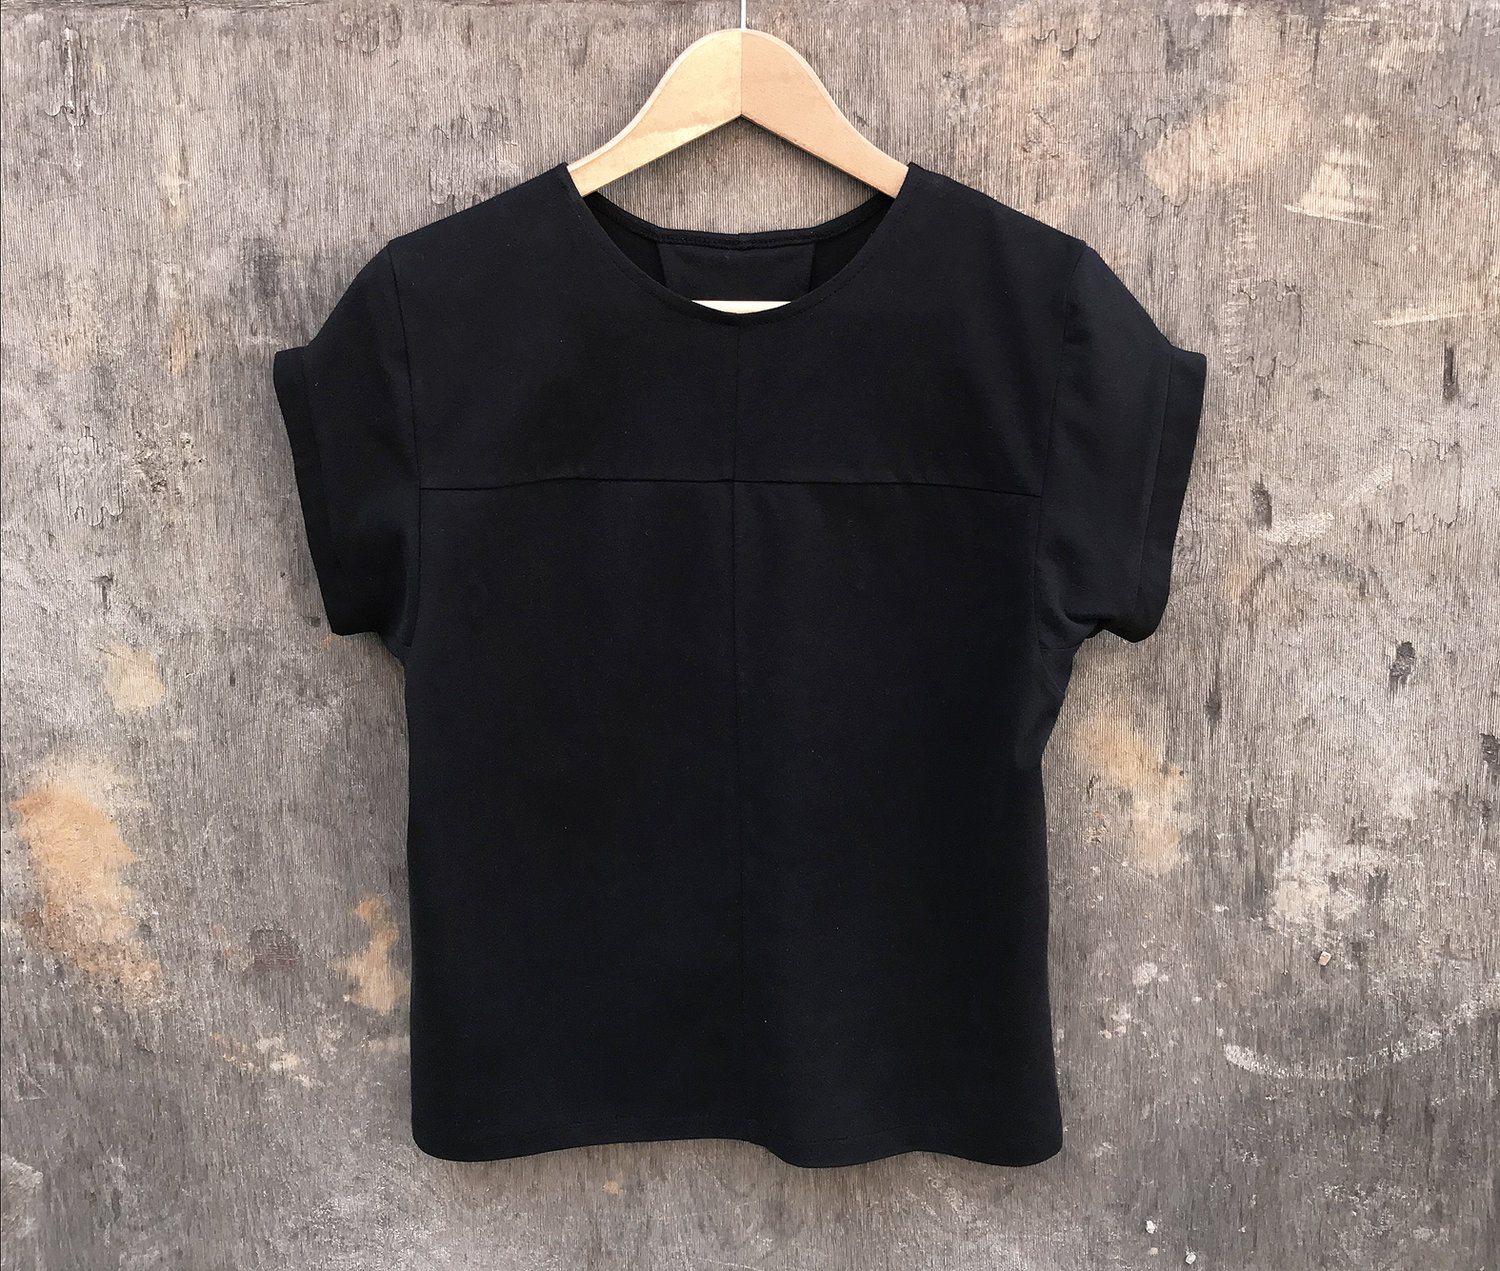
I cut it all out and had enough left over for the t shirt from the same designer. I checked the shoulder width here and added a couple of cm's as I have wide shoulders and got it cut out. I was left with a rectangle of fabric measuring about 45cm wide and 60cm long - not bad.

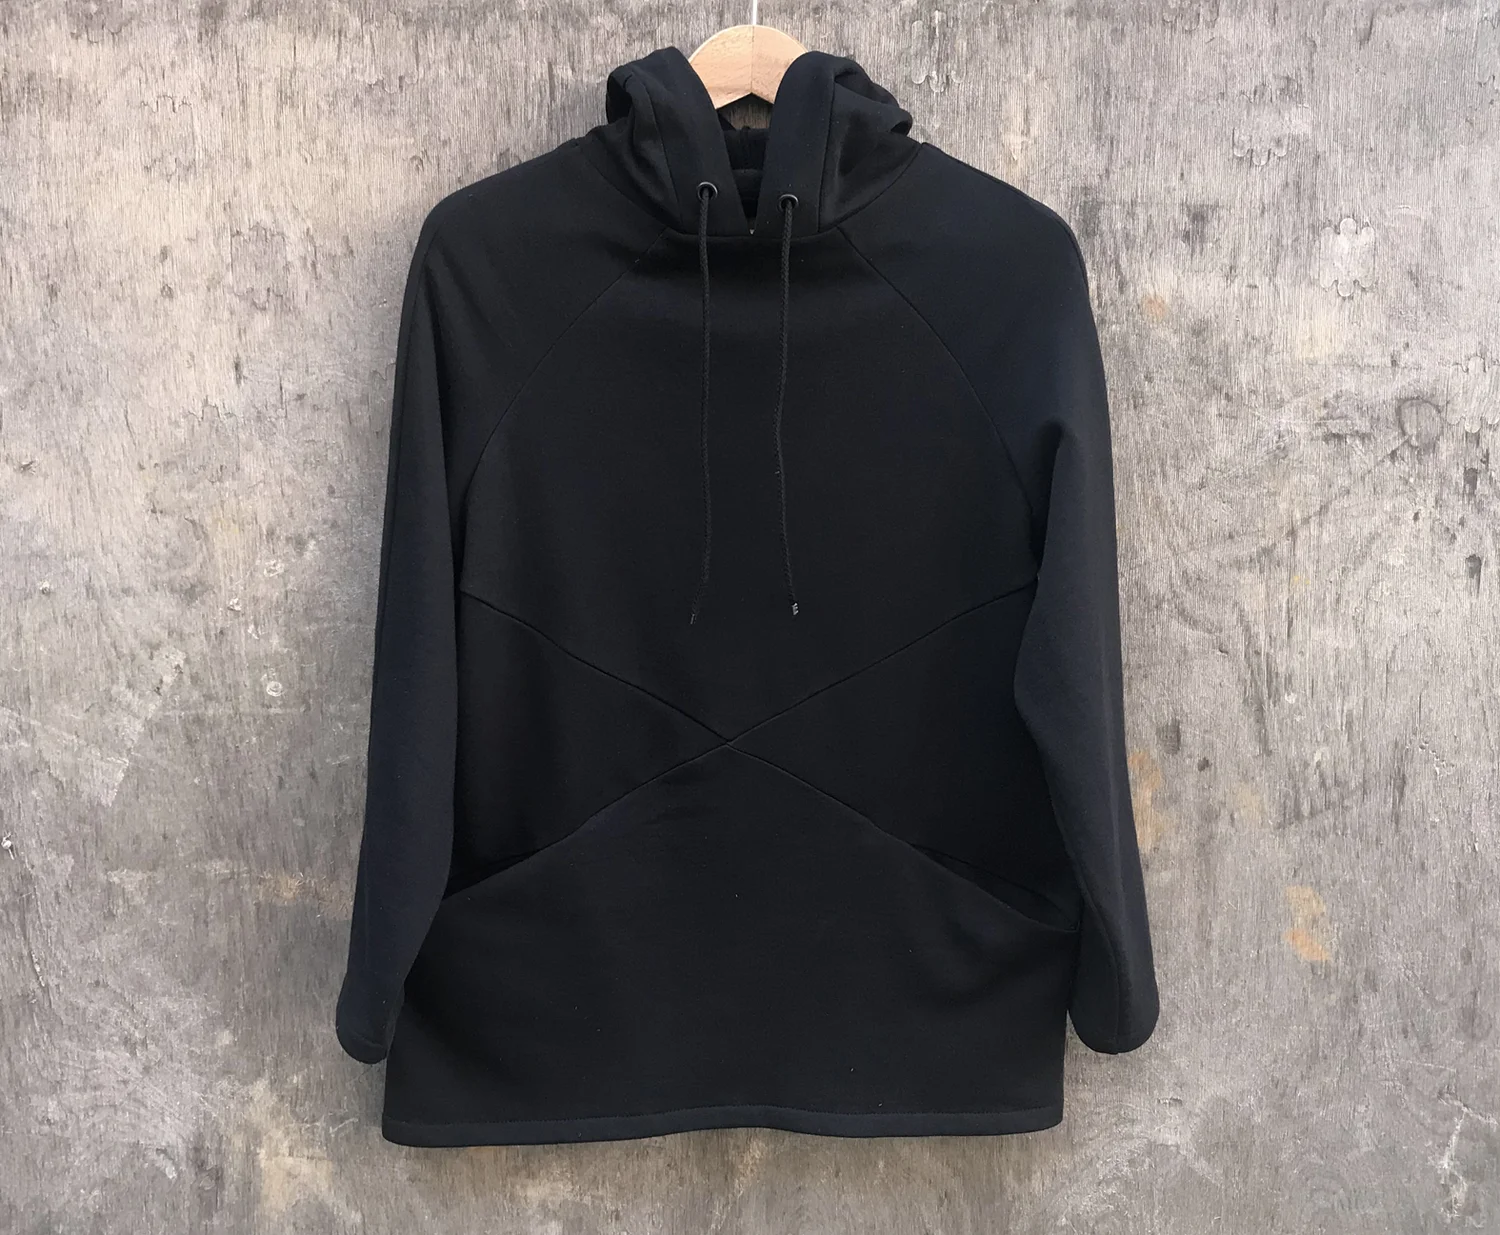
I loved the design lines of the Hoodie. the construction of the pockets and the body is very well planned. The sleeve are raglan and quite narrow. At first try on I thought they were too narrow, but actually they're fine, but you can't really wear this as a second layer over a long sleeve top. Over a t-shirt is fine.


Once I had constructed the body and sleeves I tried it on and this is where things started going wrong! The shape at the shoulders was just wrong and unless you have a triangular body it's just not right. The neckline was very high and the fabric gaped horrifically. I decided that I would make the hood part and see how adding it on would affect the fit.

The hood is an interesting construction and uses pleats to shape the back of the hood. The hood edge has an eyelet for a cord to go through. I had issues with this as my eyelets would just not go in right. I've done eyelets lots of times and never had them end up bent and out of shape before - yes I did use interfacing. I had to cut a strip away from the edge to get rid of them! This left me with a much narrower hood band and not enough room to add a buttonhole. The hood then gaped and really did need the cord to give it some shape.


Anyway I basted it to the body of the sweatshirt and had a look. It was just not going to work. once the hood had been removed I set about rescuing this top, to make it wearable.

I took a large wedge out of the shoulder seams to make it lie as near as correctly as I could across the shoulders and then lowered and reshaped the neckline. 

From the remaining fabric I cut two hem bands for the sleeves and a band for the neckline. I think It could have done with being a tiny bit tighter as it stands a bit too proud, but I'm not changing it.

The T-shirt sewed up ok. The sleeves are a slightly odd construction, but they work. I also added a neck band to this garment. However I don't think I'd sew it again. The uses of some of the odd shaped pieces of fabric are rather clumsy and would benefit from more thought.

I had very high hopes for these garments and was left frustrated and disappointed that the hoodie was so far off the mark. The idea is great, but the drafting needs some work to make this usable. I was left with rather a lot of waste due to the issues with it. The T shirt is actually quite comfortable to wear.

It's a good few weeks since I finished these and I actually have found myself reaching for the sweatshirt quite a bit. It does have narrow sleeves so I think it will get more wear over the summer worn over verst tops and short sleeves.

For comparison I have just cut out the burnside bibs and a t-shirt based on a lengthened top from the TAL Hoodie dress from a piece of fabric and have less waste fabric left over than was left after this hoodie project. In the future I think I'll just be super economical with my pattern placement and continue piecing fabric to ensure I can cut out all the pieces with very little waste.

What's your thoughts on this? do you have a loved Zero Waste pattern or do you reduce your fabric waste in another way?

Wednesday, 7 April 2021

Get Yer Skates On

I don't know if you have noticed, but there has been a resurgence in roller skating over the last couple of years and due to the pandemic a shortage of stock (just like sewing machines).

You might call me mad or say I'm going through a midlife crisis - which may of course be true. However, I'm not the only one. I've recently realised that there are many people of a similar age to me, the world over, who are returning to, or starting skating for the very first time.

Instead of a midlife crisis, let's call it a midlife revival.

This was pretty much the skate set up I had as a teenager when I used to skate. I skated everywhere - to school and back; at the local lesiure centre for a roller disco; distance skating; street hockey; I even did some promotional work at parades and festivals. I even used my skates on stage as part of a dance routine with my dance class. But all that was 30 years ago and I haven't really skated since.

Fast forward to 2020 and I decided I'd give it another go. My daughter had a pair of very rarely used quad skates and I decided to head to the basketball court next to the local skatepark as it's fairly smooth. My son came with me as moral support. It was awful. I realised quickly that I had very little leg strength and while my brain had remembered how to do things, my body just didn't seem to be able to do them. Some of that was the skates - they were very solid and had little flex or movement in them. The slight change in pressure that usually results in a turn/ curve didn't happen in these and for the most part I thought it was me. My legs felt like jelly and I knew I'd need to get stronger to do this again. I didn't go out on her skates again - she annouynced that she wanted to use them, so that was the end of that.

But I'd started following some skaters on instagram and it had inspired me to have another go. I knew I'd need some new skates of my own and after trying my daughters I knew that going for just an entry level skate was a bad idea. As I hoped that I'd get better quickly and need something with more flexibility.


These are available from Double Threat Skates

I started to trawl the online skate sites and look at what was available. I started by looking at the Moxi skates. These are all fairly expensive apart from their entry level skate which has a cool rainbow on, comes in pink, black or yellow and costs £100. These are called Rainbow riders.

Chaya Melrose Elite - Still out of stock hopefully in soon at Slick Willies
 

However the more I looked into it, the more I thought I might have issues as lots of people said the boot was quite stiff and narrow and I have super wide feet!!! I started to look at other brands including the Rookie Artistic which come in black or white, Impala skates - lots of pretty colours but similar set up. They I came across Chaya skates. Intially I was taken with the Melrose style, which came in three levels. the basic skate (£89), the melrose deluxe (which came in a stunning royal blue! £109) and the Melrose Elite which had three colourways including a cool rainbow design (£144). I poured over the specifications and particularly the plate, truck and wheel set ups as I knew this would give me the flexibility to upgrade as I got better. I decided that the Elites would be the best option for me - but they were out of stock everywhere! I was still concerned about the width of these too. 


Chaya Jump 2 - from SkatePro

I started looking at Chaya's other skates and found the Jump 2 - which is a park skate, but has a similar truck/ plate/ wheel set up to the Elites. these have a more trainer style boot with a high top, but only come in one colour. These were in stock and £139. My hubby bought me them for Mother's day.


When I used to skate, I was pretty fearless. I rarely wore pads and my Bauer Turbo skates were actually 3 sizes too big and I used to slip them on and off quickly. However I loved those skates and knew that I wanted a similar plate, truck and wheel set up, which I feel I have in the Chaya skates. As I am much much older and maybe a little wiser, investing in some pads is important as I don't really want to be breaking any bones. I have wrist guards and knee pads. I ordered a small helmet, but it's still a little too big, so I beed to get some sizing liners to make it snug, I'll certainly need these if I plan to do any park skating. I was surprised how quickly some of the basics came back to me - still rather wobbly though.

Check out my video on Instagram

I have been very taken with the jam skating moves I've seen on insta and I'm hoping to learn how to do some of these cool moves. During the super windy and rather wintry weather earlier this week I decided to skate inside and practised some of these moves. I spent about an hour, even though my video clip is just a couple of minutes long. I've also found a couple of fairly local skate groups and there a couple of folks who are keen in my little town, so I'm hoping we can get together to skate a bit too.


My hubby has bought some cool laces for me and I'm going to make a skate leash to carry my skates to the skatepark -It's too rough on the pavement near my house. I can't wait until the roller discos can start again.

Have you every taken up or returned to a sport later in life? How did you find it? What did you enjoy and what scared you the most about it?

Saturday, 13 February 2021

Butterfly Hoodie


Well, here it is! The garment I didn’t plan on making. 

I was seriously looking forward to sewing up this beautiful french terry fabric. It was gifted to me by Minerva in return for a review - All opinions are my own. You can read about it and find a link to the fabric here. I washed it as soon as it arrived and while it dried I planned what I would make with it.


All sorts of ideas presented themselves. The Ruska Dress from Breaking the pattern; another Hoodie Dress by The Assembly Line; a pyjamas set; jogging pants, a hoodie for me; I was busy asking the family what I should make when my eldest piped up, “A hoodie for me.” At first, I wasn’t sure he was serious, but he was.


I didn’t have a suitable pattern, so I asked him for one of his hoodies that fitted well and took a rub-off pattern from it. I adapted this as the one he gave me was a little too wide for him (his words). I used a combination of different tops to judge the right width and shoulder length. 

The front and back body pieces are essentially the same shapes, with a different neckline. The sleeve is a simple draft, again symmetrical in design. The hood is in two pieces, seamed down the centre and then a band is used for the faced edge. Of the whole thing, I think the hood could have done with being taller as it does pull a little when up. I don’t think it will be worn up much.


I had already cautioned him that there might not be quite enough fabric as many patterns that I’d seen for men’s hoodies in his size required more than 2m, which is what I had. However, the pattern fitted comfortably on the 2m of fabric. I cut out in the morning and had completed most of the construction by mid-afternoon. The hem and cuff bands I added the following day, simply as the light was becoming poor in my sewing space.


Sewing this up was a breeze. I constructed this on my Pfaff Select 3.2 sewing machine, which is a mechanical machine, with a selection of stretch stitches. I used a triple straight stitch for the constructions seams and this worked very well, providing enough stretch in the stitch to avoid any popping, but a strong and secure seam. It looks good too. The seam allowances were 1cm and once the seams were sewn I overlocked the raw edges. You don’t really need to do this on this fabric, but it has a tendency to roll on the cut edges, so finishing them helps keep them flat. Instead of inserting eyelets for the cord to go through I used a strip of interfacing and created a buttonhole. My son said he had a suitable cord and would put this in but he hasn't done so yet.


I cut the hem and cuff bands from the same fabric, at 85% of the length of the lower bodice edge and lower sleeve edge. For this fabric, this was the perfect amount as they eased in well and don’t stretch out.


I had never sewn with this type of fabric before, despite sewing for nearly 10 years and I was pleased with how well it behaved, being sewn and pressed. It’s a great option for a snuggly top, but it still lightweight enough not to be too heavy and a good choice for those new to sewing knit fabrics due to its stability. I used a Schmetz Jersey needle and Guttermann polyester thread to sew this up.


It’s already been worn several times this week and I hope it becomes a firm favourite for my son. My hubby says it’s a bold choice! What do you think?


And if he doesn't wear it I think I'll be refashioning it into something for me. There are a few scraps left over. I hate wasting fabric, so I'm planning what I can use these small pieces for. What are your go to scrap busters for this type of fabric? Or do I just go Zero Waste Daniel and piece them into another garment?

Sunday, 24 January 2021

Baggy Trousers

Sing a long with me....

No? Not a Madness fan then?

This post isn't really about songs by Madness, although I do like to relive the 80's and listen to the best of every now and again. It's more about the start to 2021; how we are coping with Lockdown and the most recent of my makes - yes you guessed it - baggy trousers.

2021 didn't start off quite as I envisioned it. I knew before Christmas that it would be strange at work as the goverment here announced, the day before we broke up for the holidays, that schools would be carrying out lateral flow tests in January. This caused a lot of stress for the senior leaders. However by the time new year had passed it was clear that things were going to change rapidly.


My school had a training day on the first day of term and it was virtual. This was a blessing, but before the end of that day we knew that the schools would be closed for at least half a term. Thus started the madness of planning and scheduling lessons for children to complete at home. As an art teacher, this is a bit tricky as many students don't have art materials at home. Some of my students were midway through a ceramics project (which I am now dyring and firing on the days when I'm in school). I have had to rething my curriculum, prepare resources, answer questions online, run live lessons and teach face to face on the days when I'm in school. I have struggled to switch off from work and have found hours in front of a computer draining and more than a bit soul destroying - those of you who work like this all the time - I don't know how you do it.


However, I have tried to get out for a brisk walk early on the days I work from home and try to watch the sunrise over the bay. It sets me up well and helps keep my spirits up. I am turning off my computer at a set time and I haven't put work emails on my phone. I need to switch off!!!!

To keep my mental wellbeing good I need to get outside and excercise and have also started doing some short (30 mins) fitness classes. It's really helping. Having the dog to walk is a positive too. During my weekends I try to do a bit of sewing, but I've decided to keep this slow and steady. In the last month I have completed 3 items. and that's only because of the christmas holidays.


First up is a long sleeved asymmetric t shirt, which I first made several years ago and promised myself another one. The fabric was from Minerva (in exchange for a review, which you can read here) and is navy and white striped. this was a super quick make and I sewed it up on Boxing Day afternoon. It's already been worn quite a few times.
 
 
I've also made the TAL Apron dress, but have only just finished it and have no photos as yet, so more on that in a future post. 


My slow sewing make has been these Burda 6856 trousers. These are also a Minerva Makers project and you can find all the details here.

I planned to make these well over a year ago, I'd bought the pattern and some lovely heavy wool fabric with the intention of making the high waisted version. However after an unsuccessful toile I opted for the wide leg version, which you can read about here. I knew I wanted to try this version, but also knew it would need some serious alterations.

Before beginning I reduced the width of the fron darts by 2 inches - taking out a whopping 4 inches of ease, that I don't really need around my upper thigh. This was a good call and I think the fullness of the resulting trousers is about right.

I basted the waistband together. It fitted perfectly, but didn't have any lining and I would have struggled to wear anything tucked in. So I decided to let the seams out just a mm or two and just at the upper edge - these trousers hit my ribcage, which is quite broad compared with my waist. However, I over did it and they are now a touch too loose. I think in future I will look for a fabric with a hint of stretch to create a snug but comfortable waistband.


The legs are quite long, but I kept them at the original length and just rolled the up - I have a habit of shortening trousers by too much. I actually like these far more than I thought I would, they care comfy and cool and take me back to that 80's vibe, they are also slightly punky, especially when teamed with my vivienne westwood t-shirt and red docs.


Sunday, 10 January 2021

A Touch of Colour

WARNING: PHOTO HEAVY POST - this may take time to load!!!

Some of my long time readers will know that I delve into the world of all things creative - it's just who I am. As well as my love for making clothes I am a passionate artist. I love colour and I love to create. I can get lost in art work creation, far more than I do in any other media. However, it takes up a massive amount of space. I don't have my own studio and the dining table and back yard are more often my pop-up studio spaces. This means that I tend to have short bursts of art making as the family like to be able to eat their dinner and the washing needs to dry somewhere too (I use the airer for my prints and paintings).


In those quiet days between Christmas and new year, while the weather was poor and everyone had eaten far too much to worry about what was on the table, I made art. I was prolific. I worked on over 20 pieces!!!!

Don't misunderstand, I did not create this many pieces from scratch. I began by experimenting im my sketchbook with some abstract forms. I haven't done this type of work for some time and it shows - I used to work in a purely abstract way some years ago and I'm drawn to shape, colour, line and texture. I used a few small tubes of acrylic, posca pens and oil pastel. I had forgotten how much I love working with oil pastel. It must be one of my favourite drawing media.

The next day I raided my portfolio of unfinished work. Some of this stuff had been in their for 4 or more years and was begging for a new lease of life. Some of this work I cut up.

I wasn't really happy with the collages so stopped and instead pulled out the paint, pastels and paint pens again. I limited the paints to just a few colours and instead tried to focus on my use of the pastel.

When I work like this, I don't feel precious about the work. These are pieces that I feel are not working or lack some form direction. As I start to work, 

I look for the shapes that the original suggests to me. As I work on them some are successful, some aren't. Some I love, some I don't. Although I often find other people love the ones that I don't like.

Many of the original pieces were monotypes. some were abstract in nature as I had experiemented with using a Gelli plate - I still haven't quite got into using this thechnique. Others were more traditional oil based monotypes created on perspex. I love the long working times of this technique, but that means drying times are long too. Many of these had a more landscpae feel about them, as they had been created during my Seaspace project. The original surface really did determine the materials I used on top. The oil pastels work well on the oil based monotypes, and the paint pens are better on the Gelli printed work.

I let the shapes and colours of the original dictate the form and shapes of the layers that I added. Often sitting for a few minutes before adding anything. Letting one piece dry while I added to another. Some had only a few marks added, others had several layers. Many ended up feeling like abstracted landscapes.

I have shared just a few of them here (When work settles a little I'll actually try to get some of this stuff posted as an online gallery). I wonder which is your favourite?

LinkWithin

Related Posts Plugin for WordPress, Blogger...