Friday, 29 April 2022

Cropped Hoodie

As my latest obession is skating. I have been considering clothing that is suitable for skating in. During the Spring and Autumn. It can be quite cold, but once you get warmed up, you don't really need a coat, but a hoodie is perfect. I have a fab hoodie that I wear a lot in the winter, but it is long and doesn't really go with my high waist trousers and wide legged jeans. I also wanted something that would serve as a cover up if I wanted to wear a longer dress or skirt, that wouldn't make me look like a sack.

I decided to use the Assembly Line hoodie dress as a basis for this make. It's drafted for a woven, but it is loose enough to work with this stretch fabric. I've used this pattern multiple times and the bodice makes a great woven t shirt.


I didn't have to make very many changes. I did lengthen the bodice by about 3 cm and then added on the hem band, which I cut slightly shorter than the circumference of the top. I considered leaving it unfinished on the bottom hem and that would have worked too.

The only other change I made was to make a hood lining in the same fabric rather than just adding a facing and I think this works perfectly.


The fabric is a dream to work with for a stretch fabric it is nice and stable and doesn't roll too much. It presses well, although I do recommend a press cloth.


This was a super quick make and only took one afternoon to finish it, and I've already worn it out for skating on numerous occasions. Perfect for cool spring days when I would be too warm in a coat, but it's still too cool to wear just shirt sleeves.


I think this will be super versatile - it is great for skating due to the length, I think it could also work over the top of a dress as an extra layer and this colour is just fantastic.


Friday, 22 April 2022

Pattern Review: New Look 6299


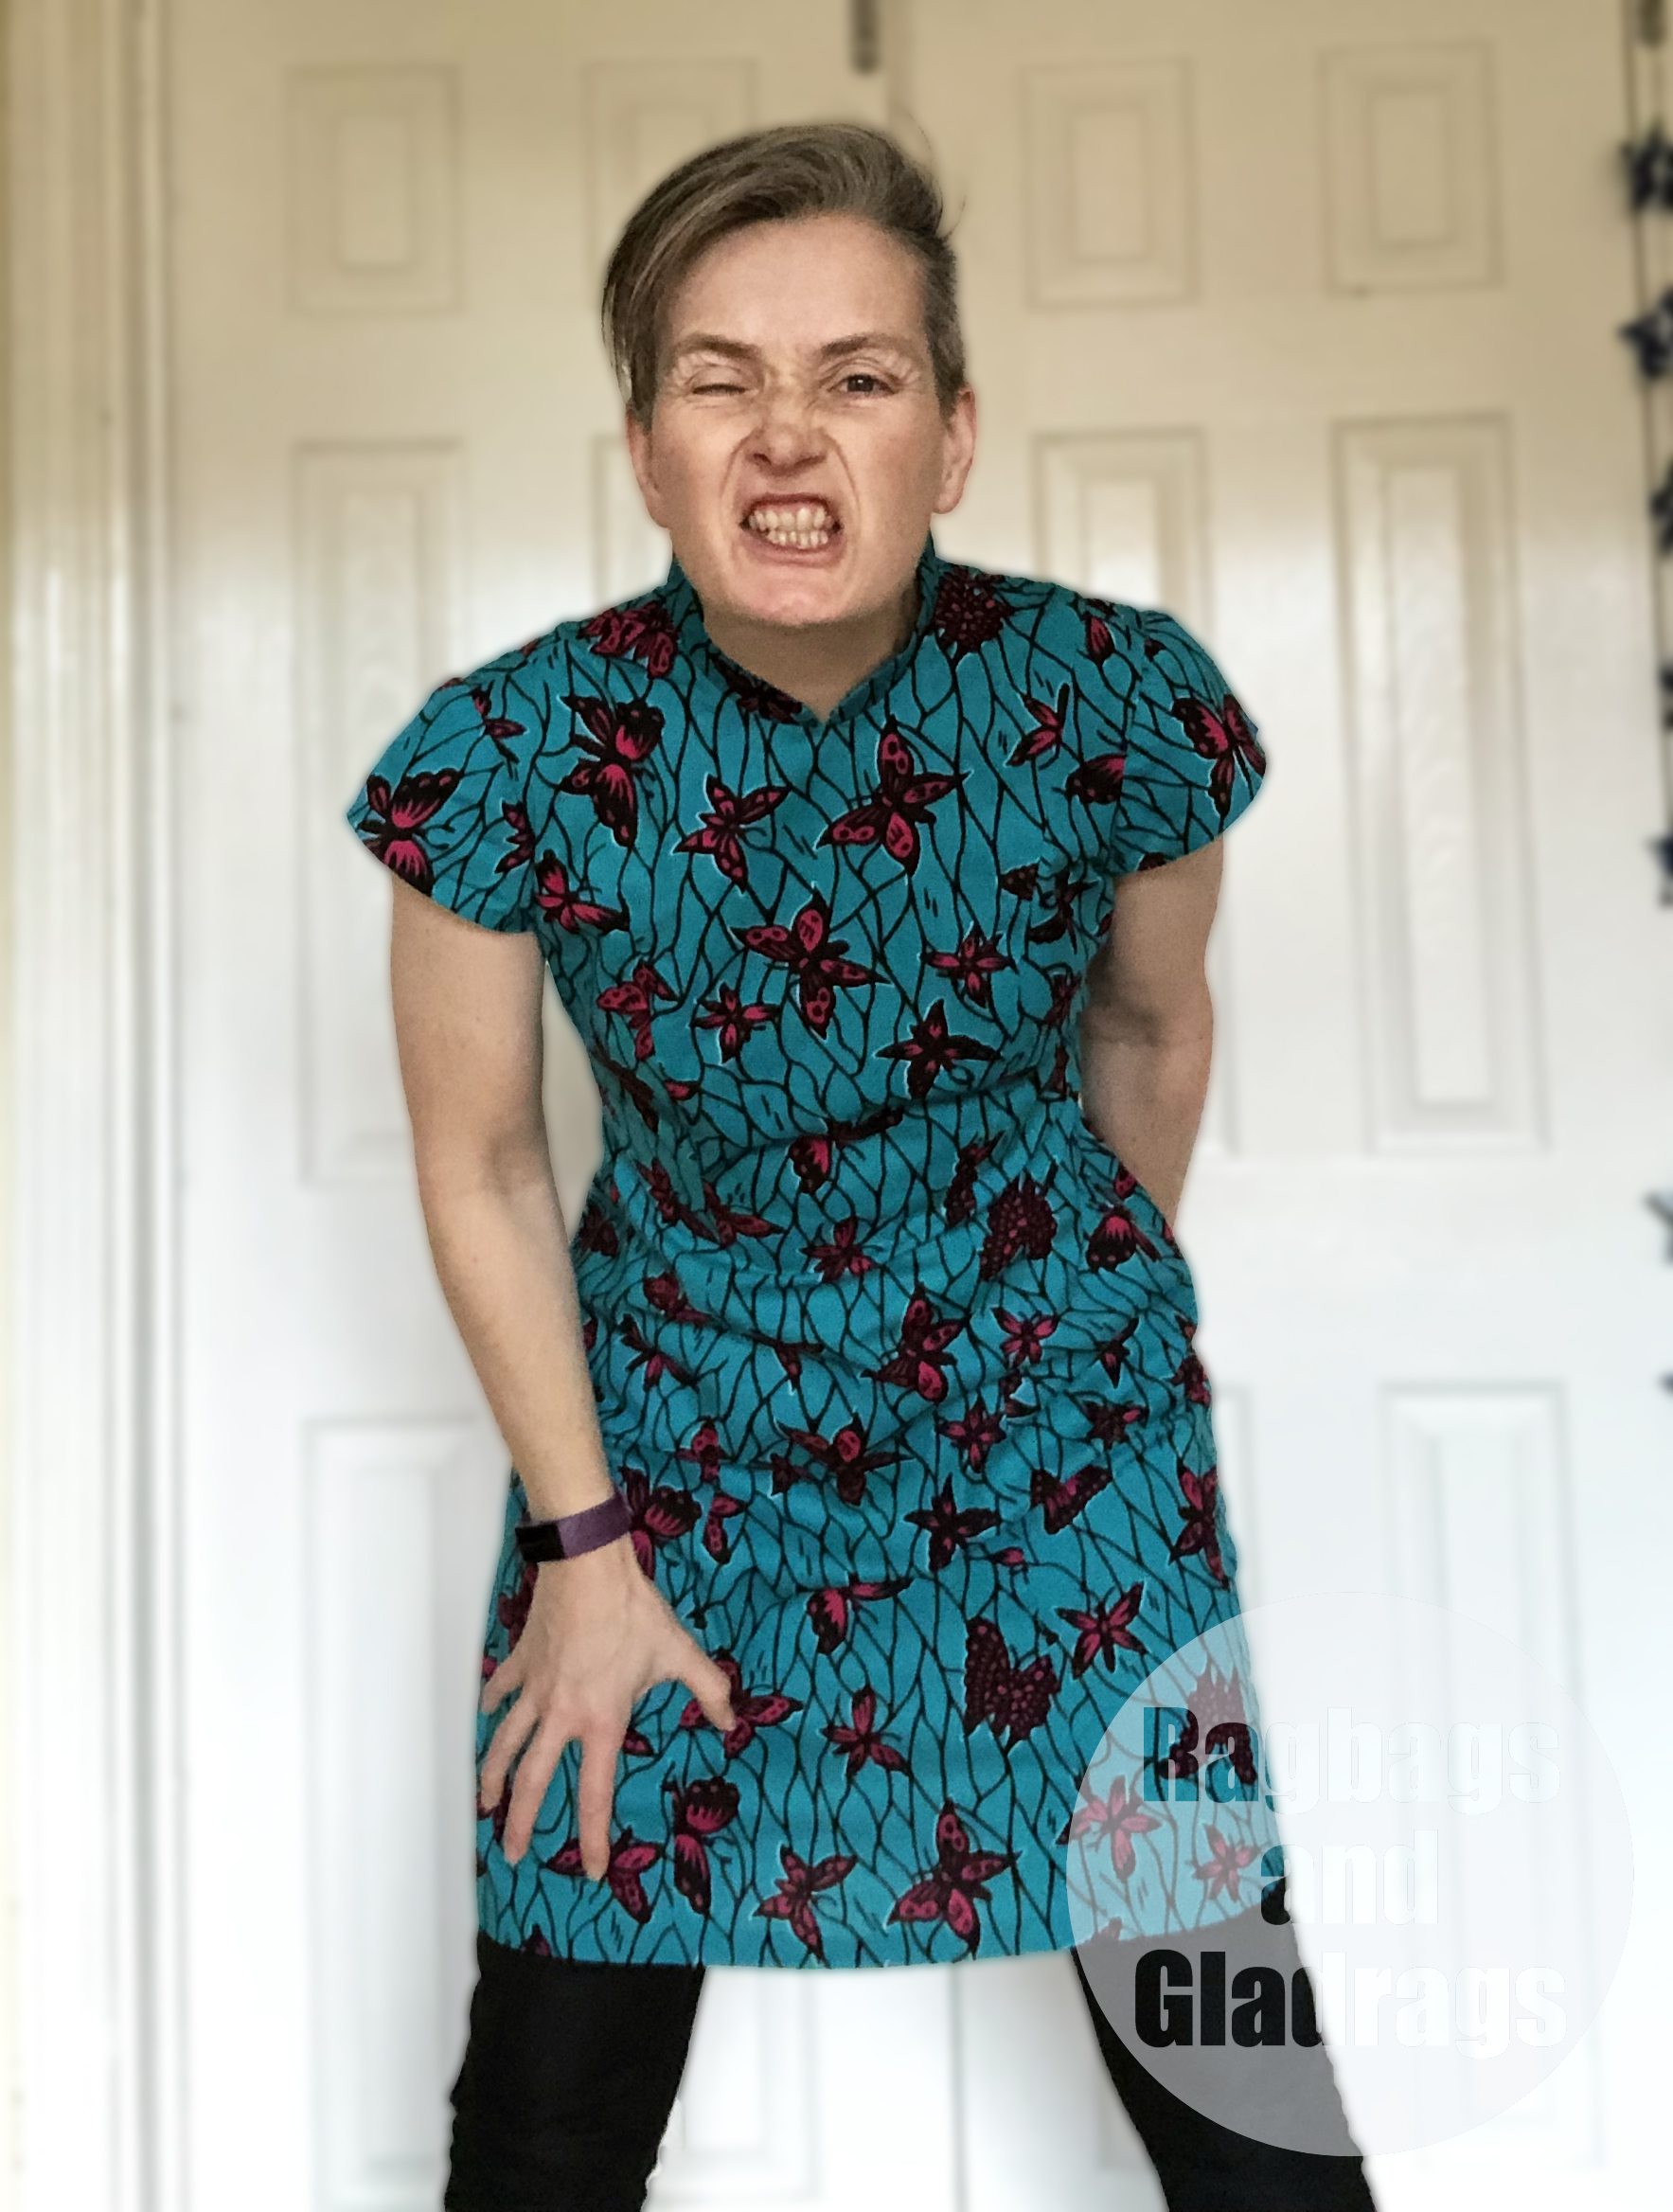
I love a fit and flare dress. So when Minerva offered me the chance to review New Look 6299, I jumped at it!
The pattern has princess seams and the option of cap sleeve or ¾ sleeves. There is a boat neckline or a shirt collar - or plain jewel neck if you prefer. There are optional godets that will add more swing to the skirt. The skirt length is just above knee length but could easily be shortened to tunic length or lengthened to suit your preferences.


Originally I planned to sew this in a range of different plaid fabrics I had in my stash - but they were mainly polyester and of different weights and very different colour and patterns combinations. Once I had cut them out I realised I hated the combination. I raided my stash and found some more of the waxed cotton that I used for this Kalle dress.


It was a bit of pattern Tetris and I did have to piece one of the side back panels to get everything out of the fabric I had.


I decided to make view A - which is the cap sleeve version with the collar and no godets. I decided that a full-on collar would be a bit much so I used the collar pattern piece to draft a mandarin style collar instead.
There is about 9cm ease on top of body measurements for this pattern. Which is common for the big 4 pattern companies. My measurements put me in a size 12/14, after looking at the finished garment measurements I cut a straight size 10. 


I sewed it up without any adjustments but realised I could have actually made the size 8 and it would have been perfect. The 10 is a little loose in some areas, but not horrifically so. Once sewn I took a smidge off the front princess seams above the bust and a little just below for shaping. I also took in the side seams at the waist. I could have gone further with this, but due to the structure of the fabric I didn’t need to - it holds the shape well.


The sleeves had a lot of ease in the sleeve cap, more than was really necessary, and again due to the nature of the waxed fabric, this was quite tricky to ease in without any puckers. 


I considered shortening the skirt on this to be tunic length but decided to leave it at the full length. I’m  171cm tall, so this will be just above knee length with a small hem. I kept the hem at 2.5cm. 


The dress is constructed with a facing rather than a lining, I think a lining would be a better option. As this is a summer weight fabric I can get away without it. I think this pattern is a good basic dress pattern with lots of options. I think it could be stunning in a brocade, or cotton velvet. I may just make this up as a party dress for next Christmas in velvet, with a detachable collar so I can wear my bling jewellery with it. But for now, this was a stash buster of a project. I’m trying to reduce fabric waste, and I’ve certainly done that with this one.


Friday, 15 April 2022

Hoodie Banket


It's been a while since I shared anything here. I'm still sewing up items on a regular basis but my production has somewhat slowed, so my next few posts will be sharing some of the makes that I haven't blogged about.

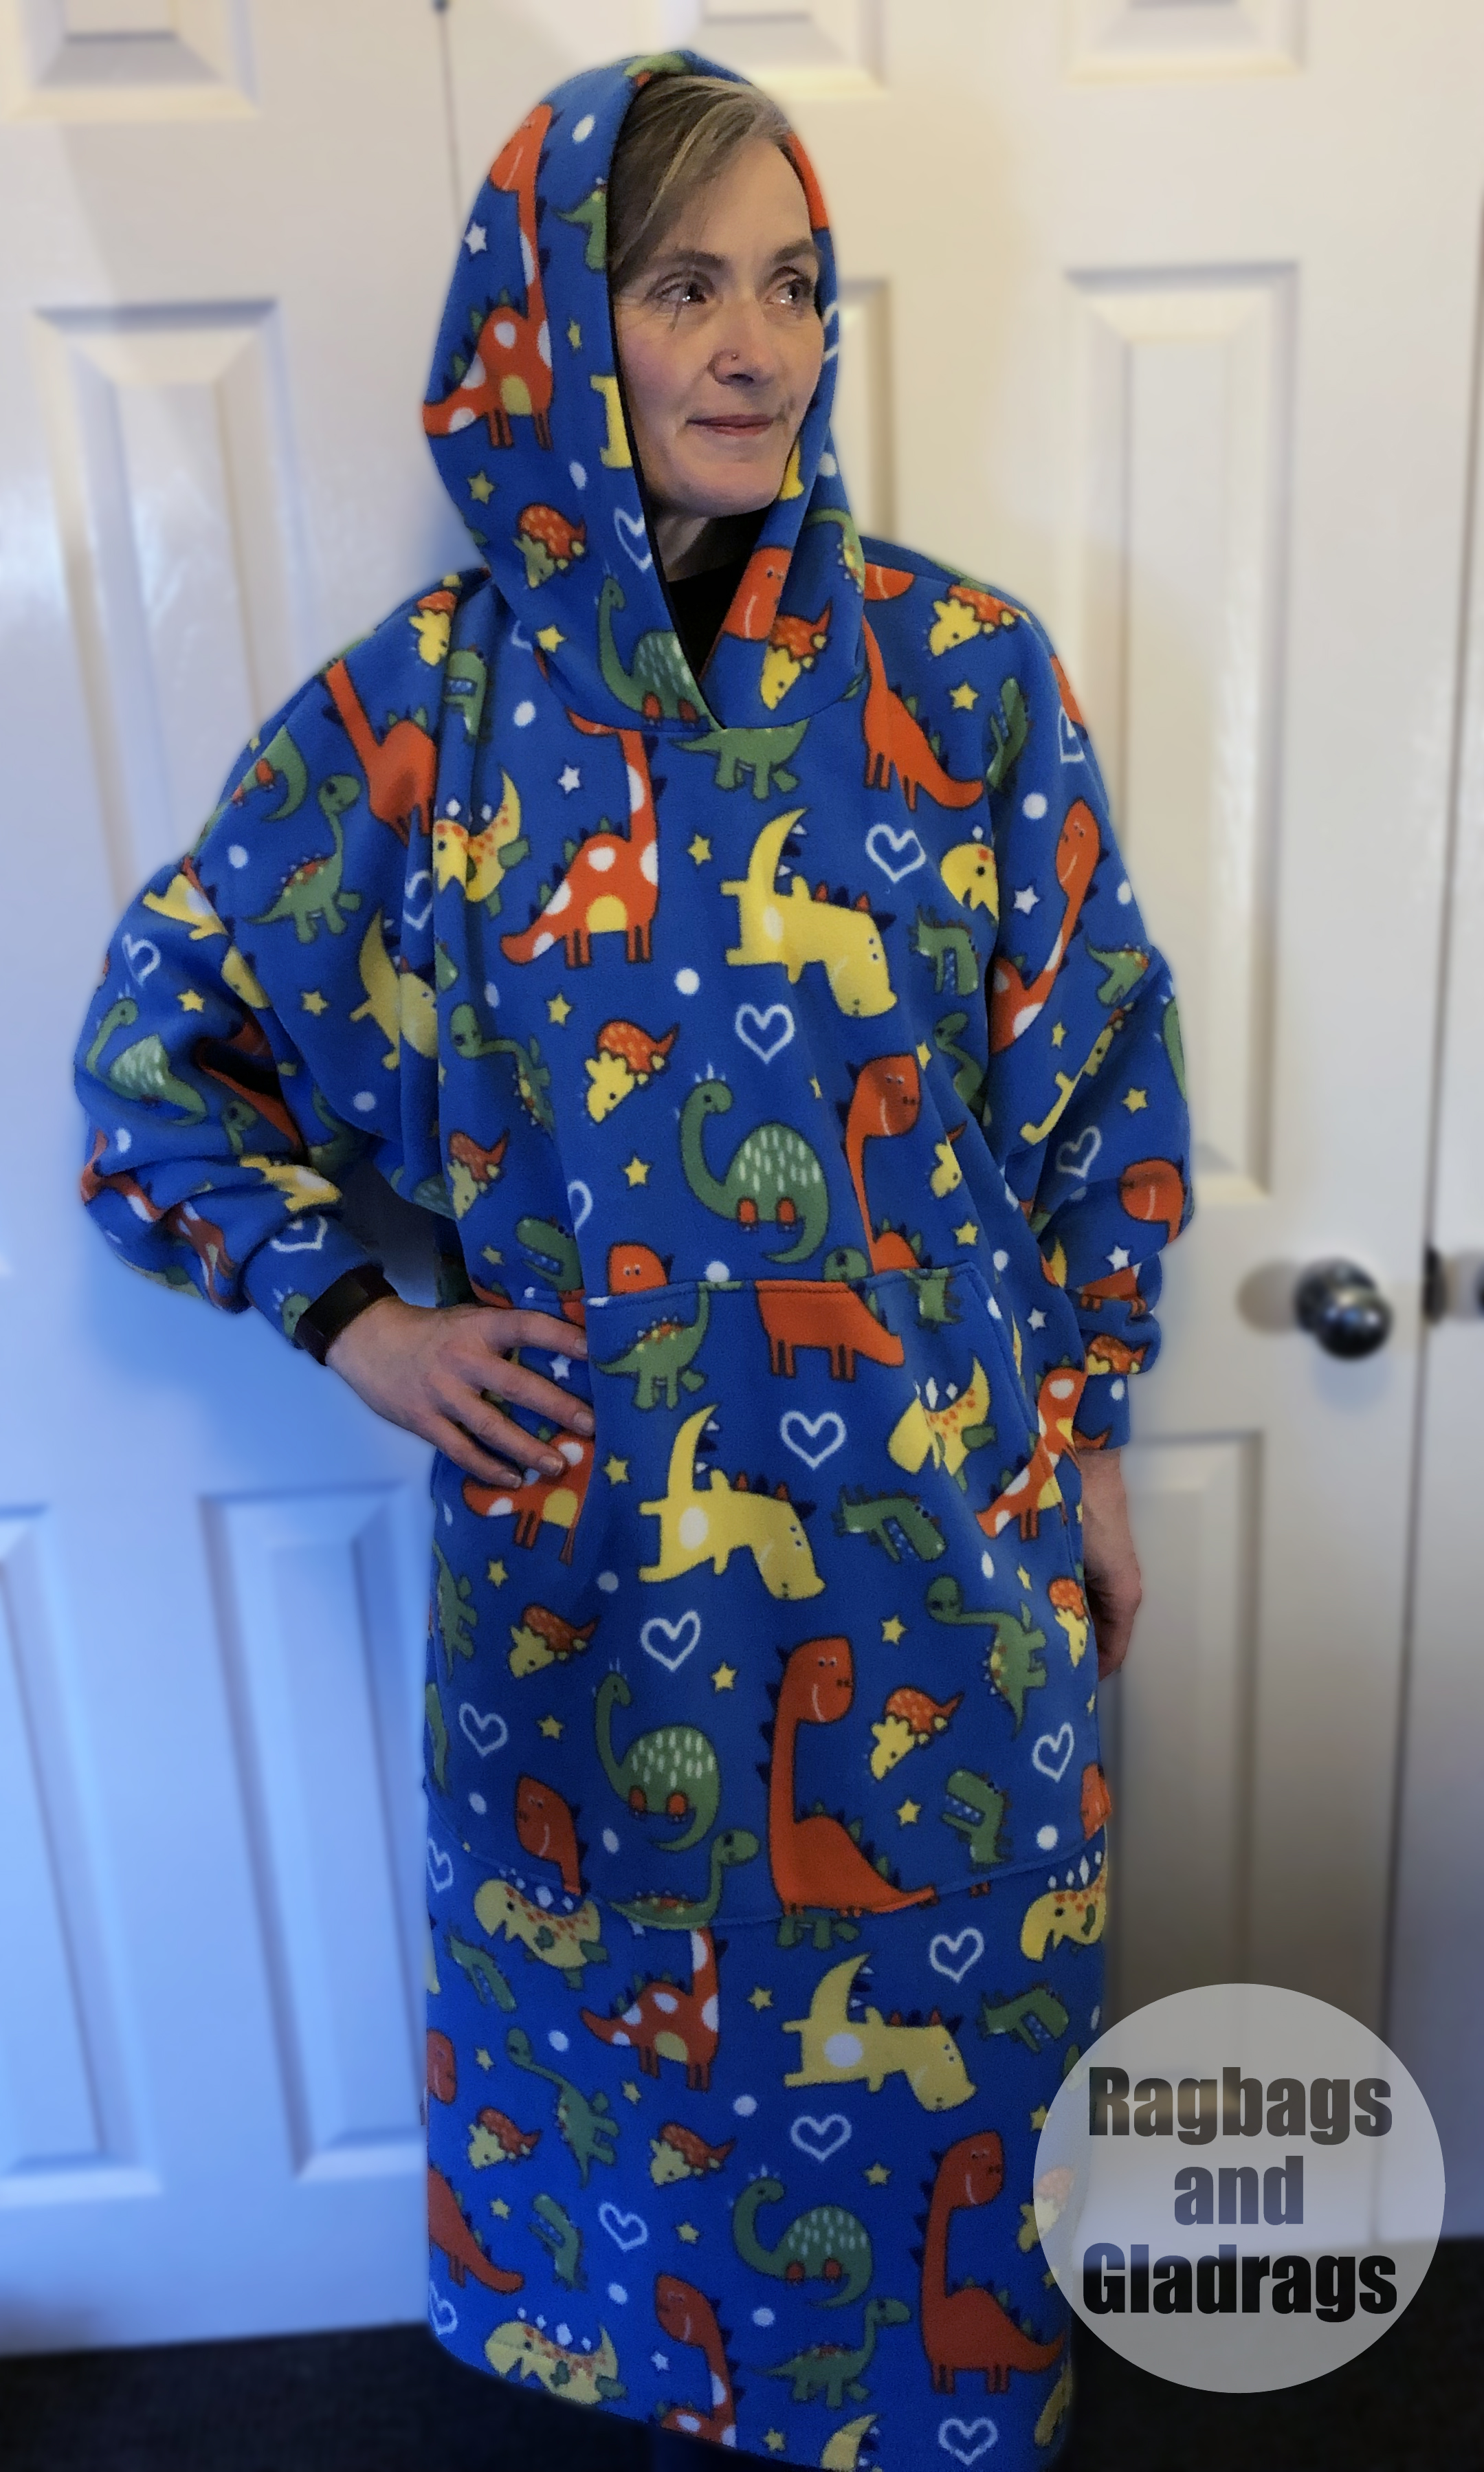
First up is the Hoodie Blanket that I made for my daughter as a Christmas present - yes - it was that long ago!!!! This has to be one of my favourite and also easiest makes of last year.
My daughter has discovered a love of dinosaurs in her later teenage years! To the point where she is considering getting a dinosaur tattoo (she hasn't as of yet)! So when I saw this beautiful dino fleece I just knew she would love something made in it.
I  had planned to make my sister a Billy Wearable Blanket, which is a free pattern from Do It Yourself Better Club. www.doitbetteryourself.club/product/the-bill.../


I made that version up in a plain fleece that I bought from a local shop. So I knew that the pattern would work super well for this fabric. The Fleece from Minerva was way superior to the locally bought stuff. It was thicker and more even in texture. It sewed up better and didn’t cause my machine any issues.


I decided to sew up the longer version, my daughter is a student and her room is quite cool so, something cosy to snuggle is is a perfect option. She has also told me it will be great to wear when the fire alarms go off in the middle of the night - don’t you just love student accommodation?


I constructed this pretty much completely on the overlocker, with the exception of the hood and it’s lining which was made from some Jersey from my stash). The pattern calles for rib cuffing, but I couldn’t find a close enough match or anything that would perfectly constrast so they were made from self fabric and are fine. I did check that hands would fit through these as the fabric isn’t very stretchy. One thing to note is that sleeves are quite short. Bear that in mind if you have long limbs.


This has A LOT of ease. I sewed up the XS size and it has plenty of room. The pattern features a hood and a large kangaroo pocket. There are options to make this without the hood or as a fully lined version. It would be a great with a waterproof outer and a fleecy lining as a changing robe for outdoor watersports. Or made in towlling for a beach change/ coverup. However, we like snuggles and comfort and I can say that my daughter has worn this on heavy rotation over the winter months.


She was rather reticent to model for me - so instead she took the photos and I was the model. I did convince her to let me take a quick photo though.


Saturday, 18 December 2021

New Skate Set Up


I've well and truly caught the skating bug. When I was looking to get back into skating, back in March, I wanted to make sure I bought a good pair of skates that I wouldn't need to upgrade quickly. I bought the Chaya Jump 2 skates. These are designed with park skating in mind and while I didn't really intend to do park skating, I've found I really enjoy it and it's allowed me to make lots of new skate friends.

I'm really happy with my park skates on the whole. I do find that my feet get very, very hot in them as they are mostly synthetic, with this in mind I started considering a second pair. I knew I wanted a leather boot that would mould to my foot and then had to decide what style of skate I wanted.


I want to continue to enjoy park skating, do some jam (dance) skating, cruise the streets and give Roller Derby a try. My current skates suit the park, but the wheels are a little soft and I could do with harder ones, especially for the indoor park. I could also do with some slideblocks to enable me to progress in the skatepark. With some harder wheels my current skates would also do for basic roller derby training. so they are staying.

As for dance skating, my current skates are flat and for some of the moves I need my weight to be further over the toe so I knew I needed a boot with a heel. I considered the Bont Parkstar as it has a small internal heel, but ruled it out as I already had park skates. I started looking at Moxi Lolly skates, which are a similar price to the Bont, the Moonlight Roller - which is a bit cheaper and Luna skates, which were out of stock everywhere.


After doing some research I discovered Wifa Skates. Wifa are an Austrian Brand that have been making Ice figure skates since 1920. Recently they have developed boots suitable for rollerskating and the come in a range of lovely colours. The boots are firm but comfy and much more sturdy than the Moxi Lolly. You can buy the boots directly from Wifa and have the option of boot only or two different plate set ups that use a plate designed and made in Italy. I opted for the orange boot only. Since I ordered mine, you can now buy them from Roller Girl Gang and they have a full fitting stock in to try.

My plan was to take my boots with me when I visited my sister in London and visit Double Threat Skates to sort out a plate and have them mounted. However, due to the broken arm, we didn't go to London. Instead I called DTS and had a conversation about a suitable plate and plate mounting. I sent off my boots to them and they fitted my Bont Prodigy plates.


While they were away being mounted, I started to consider wheel options. I knew I needed something big and soft for outdoor skating and something harder for indoor. I managed to get a set of Moxi gummy wheels and bearings on facebook marketplace. These are 78a wheels, which means they are soft and will be great for rough terrain outside. I also bought some Grindstone Smokeshow wheels from Be Good Skates. These are harder at 92a and will be better for skating on smooth surfaces, especially indoor. I wanted something that will work for both skatepark and roller disco, and possibly roller derby. This will be my first time using a harder wheel, so i'll see how I get on.

The final touch is some coloured laces and new skate socks which I got from Roller Girl Gang. I just need to make a new skate leash for hanging them up and carrying them.


By the time they had arrived and were set up my arm was pretty much healed. Unfortunately the weather has taken a turn to the worse and I haven't had much of an opportunity to try them out. I managed a short blast along the prom, but then with Storm Arwen, lots of rain and dark cold nights I haven't been outside in them again. I did notice that the Moxi gummy wheels are brilliant outside, they are as soft as my Chaya wheels, but much bigger so made short work of the rough pavements. I only got to try the Smokeshow wheels on Thursday as I managed to get 1/2hr in the sports hall at work (normally there are loads of clubs on). Short video on insta. They slide a lot more than my other wheels, but I soon got used to them. I'm still getting used to the heeled skates as the weight distribution is different to a flat boot, but it does allow me to get much lower. Hoping to get out some more on these in the next few weeks.


Sunday, 12 December 2021

My Heart Will Go On Dress


I love a quirky fabric and when I saw this one by Little Johnny on Minerva I knew I needed to make a dress in it. The pattern is the Saraste dress from the book, Breaking the pattern by Named Clothing. I have made the sleeveless version of this dress a couple of times so I knew it fit pretty well.


However, after making the shirt version I noticed some strange pulling on the shoulders. I did a bit of investigating and made some alterations. I made a square shoulder adjustment, which meant raising the armhole by 2cm and adjusting the slope of the shoulder to match and a 1.5cm broad shoulder adjustment. I used a straight sleeve from the Solina dress from the same book. I also drafted my own inseam pockets - I mean a dress with pockets is defo the way forward and I miss having them in my other Saraste dresses.


I knew that matching the pattern would be important with this fabric, so that meant some careful cutting out. The repeat isn’t too big so 3m was ample to match the key areas. I worked hard to match the centre front on the button placket and the yoke on the back - I think I’ve done a pretty good job with those. It’s harder to match the princess seams, but I tried to keep the pattern flowing as much as possible here. I did not try to match the pattern on the skirt sections - as they are gathered It’s pretty impossible to see any mismatch and it would have taken yards and yards of fabric and I hate fabric waste!


I’ve dubbed this dress ’my heart will go on’ dress. The pattern is lots of lovely heart shapes and as someone who doesn’t often do florals, It fits well with my likes. It’s a beautiful smooth fabric, presses well, It doesn’t crease particularly. The photos were taken after a full day at work and it’s still fairly crease-free. I have already worn it a few times to work. I am a natural fabrics person and don’t enjoy sewing or wearing synthetics on the whole, so having a long sleeve cotton dress to wear during the cooler months is a bonus. It saves me shivering in my classroom when the heating isn’t on.


I had hoped to get some photos outside, but what with storm Arwen and then torrential rain the next weekend. It’s had to be in the evening when I got in from work - Hate the dark nights - bring on the long days and sunshine!


Sunday, 7 November 2021

Upcycled Tees


Ever since I started my sewing journey I have tried to upcycle/ refashion existing garments. Over the half term holidays I spent a day doing just this. I had several of my hubby's t-shirts that didn't fit him, so I had a look at them to see what could be made, rather than ditching them.

3 of them I made into t-shirts for me. I had to choose a pattern carefully so that I could fit the pieces on the existing body/ sleeves of the t-shirts. I considered both the Stellan T-shirt pattern and the Basic InstincTee.

Both of these are free patterns, but I found that the stellan pieces were a touch too wide so I used the size small of the Basic InstincT tee. This fits my frame well and the shoulders are a good width, which is always my issue with T shirts!

The Blue and Black Tees had a graphic print on, so I had to be careful to place the front in a good position to have the print placed well. I cut self bands from the T shirt hems to create the neckline.

The grey Tee was plain and I used some contrast ribbing from my stash to add a neckband and sleeve bands.

These are already getting some wear with my new wide legged Dawn jeans.

The other couple of Tees were desitined to be made into underwear. I used my TNT Watson pattern by Cloth habit. I thought I had nailed the fit on this, and I have with the regular band, but the longline version fits very differently. The hook and eye is very low at the back and this means there is not as much underbust support, which is where fitting is key in a bra. The longline version is wearable, but the fit is not great. I really like the back version though. Lingerie is fab to make from t shirts as the pieces are so small.

All the elastics and hardware I had in my stash. I lined the cups with mesh and used cotton for the inside of the front band, making it stable.

I enclosed all the seams so it looks pretty neat! I really should have different colours in my bobbin thread to ensure that it matches the elastic - but life is too short.

The knickers are also the watson pattern, but the waist is raised by 2cm. I do need to find a good source of suitable elastic for knickers as my options are not the best here.


Tuesday, 26 October 2021

Megan Nielsen Dawn Jeans Review


My jeans making journey continues with the Megan Nielsen Dawn Jeans. Way back in 2018 I made my first pair of Closet Core Patterns Ginger Jeans, which you can read about here. I'm actually wearing these right now, which is a testament as to how well they have held up. I went with a stretch jean as I thought it would be easier to fit. And that first pair was easy - however every denim I've used since has had different amount of stretch which has meant lots of alterations for each version!

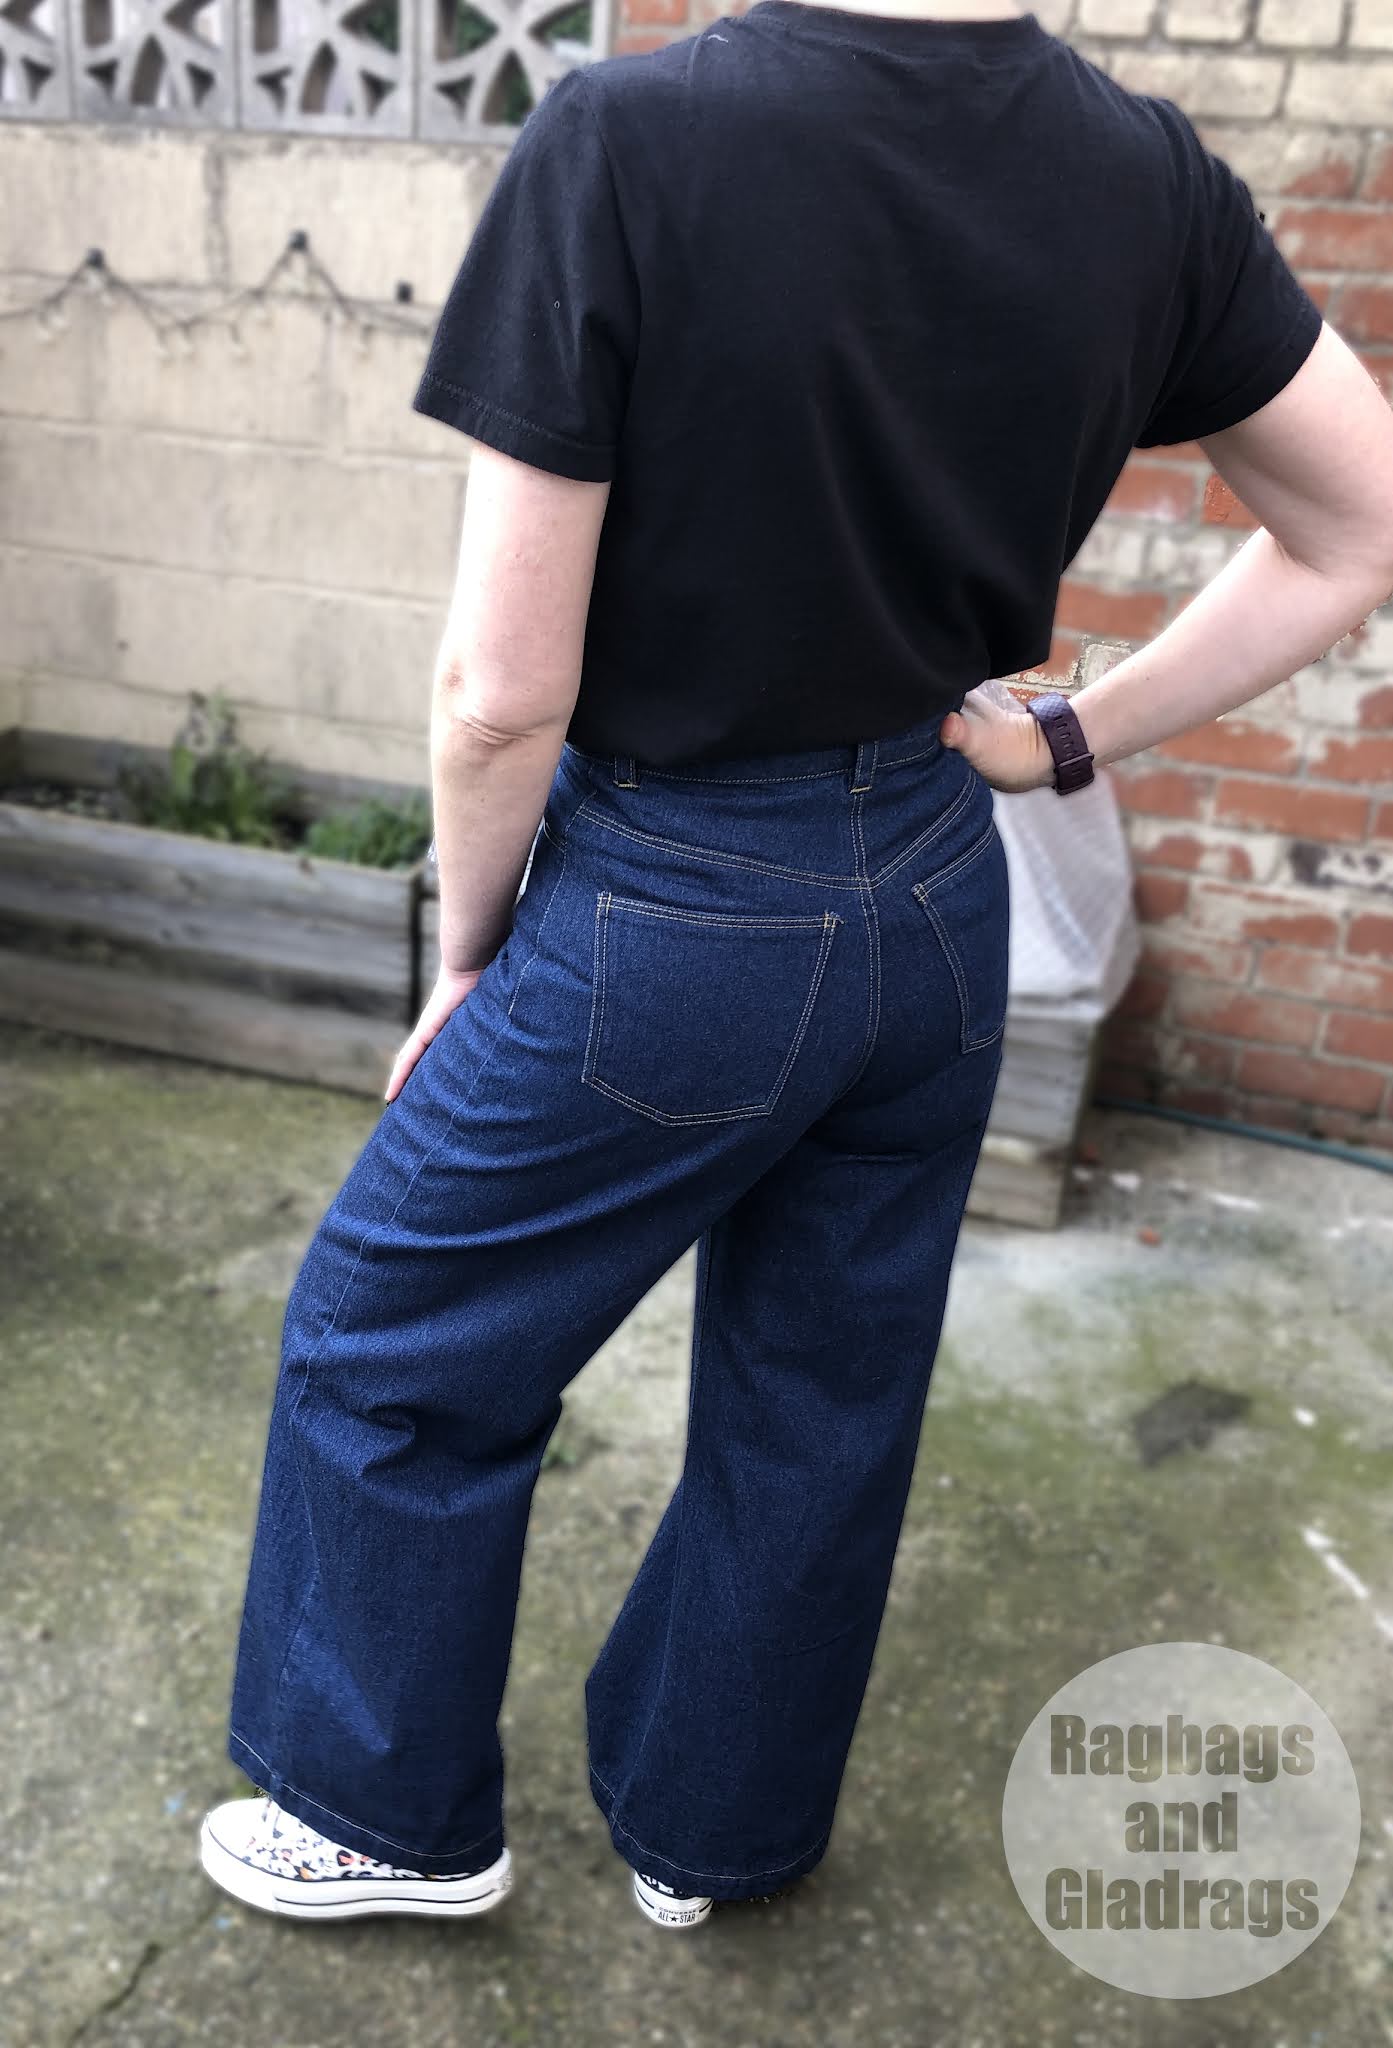
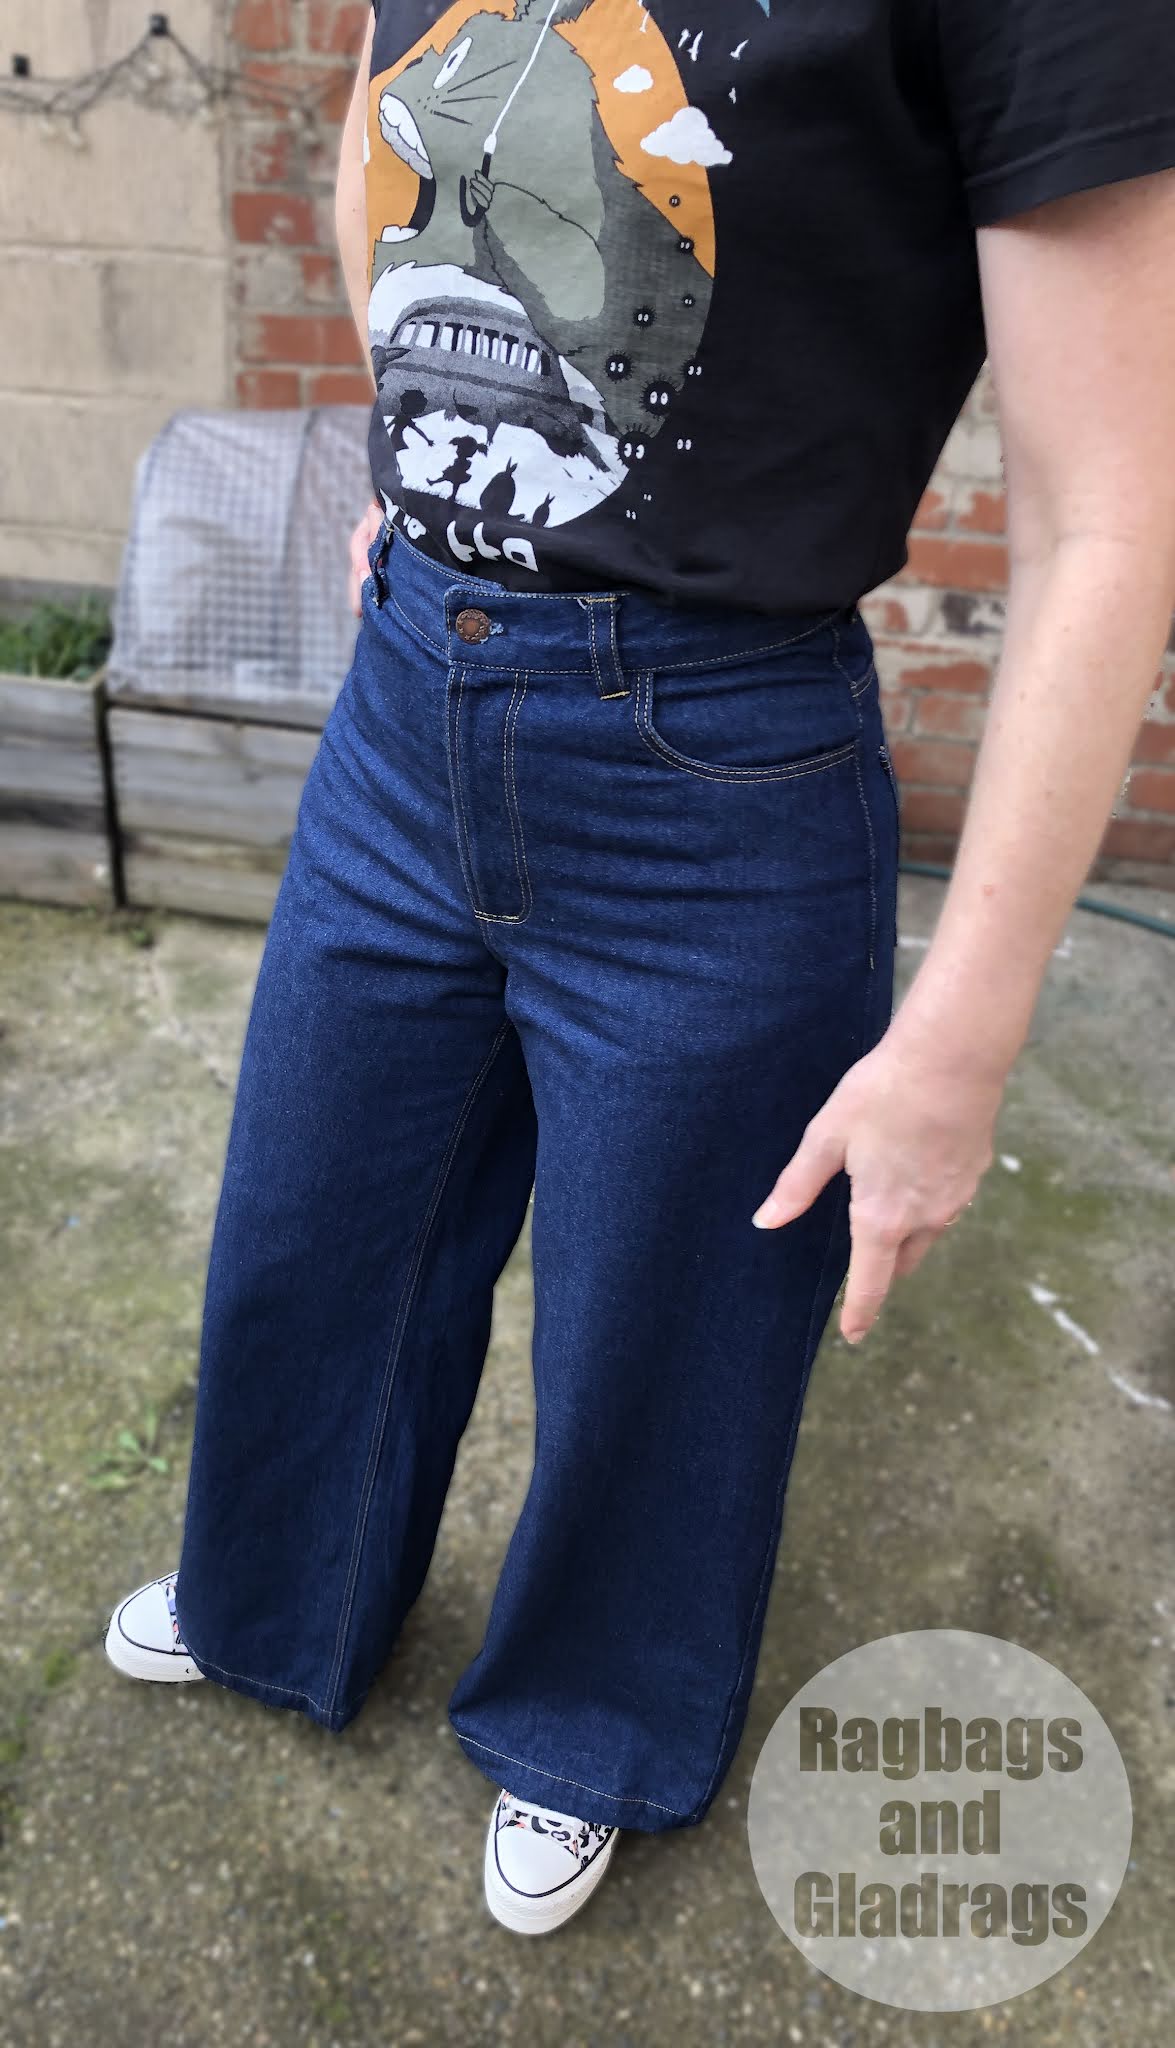
I've been loving the wider leg jean that has been so popular recently. I decided that I'd like to make myself some. Now with a 90's resurgence in fashion at the moment low rise is what many RTW style are going for. I still have a pair of low rise demin from the 90's (now cut into shorts) which get plenty of wear dueing the summer - BUT - I have a LONG torso, which can make my legs look short in comparison (I'm quite tall at 172cm). The low rise seems to accentuate the length of the torso, so I decided I wanted a high rise jean - the Megan Nielsen Dawn Jeans are certainly high rise. They hit right at my natural waist - which I love!

So, why choose the Megan Nielsen Dawn Jeans over other jeans that are out there? Especially when lots of folks have had fitting issues with these - simply this  - Lots of super versions out there. All trousers will need some fitting. 4 different views, so lots of bang for your buck! I made the wide leg version, full length.

Right then - Fitting! 

I made a toile up on some firm cotton I had in my stash. I cut a 12 at the hip, graded to an 8 at the waist. I had seen Liz Grylls (sewing bee 2020) had some fitting issues with the Dawn jeans and has documented these on her instagram highlights. After making my toile I realised one of the alterations she had done I needed to do too. In order to eliminate wrinkling and odd little pleats on the inseam. I needed to add some width to the inseam at the crotch. I added 2cm both front and back. This solved the issue.

I also found that I had some pooling of fabric just above the butt. so I took a 2cm wedge out of the centre back seam, graded to nothing at the side seams. As I have a small waist I still needed to take a bit out of the centre back width - I do this A LOT! About 1cm from the back piece = an adjustment of 2cm in total.

Construction

Once I was happy with the fit I prepped my denim. The denim is a medium weight rigid fabric which I bought from John Lewis with birthday vouchers. I prewashed it, pressed it and then cut the pieces out of a single layer. I had 2.2m and it was 150cm wide. As I was making the tall full length version I really did need the 2.2m and it fit perfectly. I did manage to leave a very good chunk of fabric left - theres enough for a skirt or bag or maybe evern the shorts version of the pattern - it won't go to waste!

As I made a zip fly I used the construction of the Ginger Jeans - I cut the front pieces with a cut on fly extension in order to do this. The zip I had bought was too small, but I managed to find a long metal zip in my stash and used that.

As with my Ginger jeans making I basted everything together without the waistband to check the fit and see if I needed to make any other alterations, but it was all good! I had my new overlocker set up (Jaguar 099) and it handled the super thick layers brilliantly with absolutlely no issues. My Pfaff select 3.2 was set up for the construction seams and My vintage Bernina 707 Minimatic was set up on the dining table for top stitching. I used Guttermann extra strong thread for this. Having two machines really helps with the process as you don't need to keep swapping threads during construction. The only top stitching I did on the Pfaff was the buttonhole as my Bernina doesn't have a buttonhole function.

I was going to use the Ginger Jeans waistband method, but I thought I'd give the Megan Nielsen technique a shot. It was actually very effective and It does mean the belt loops are secured very well. It's a good option as long as you don't have a super thick denim. I pressed all the thick bits light mad and gave the super thick areas a bit of a bash with a hammer to help compress the fabric and make topstitching easier. Both of my machines handled 8 layers of denim easily and the Bernina even managed 12 layers -where the belt loop sits over the centre back seam.

I thought I was going to need to lop a lot off the length of these, but once I tried them on with my boots I realised I only needed and extra 1cm off the length, so I just made the hem a little deeper. After the first washing they do seem to have shrunk a little more - and yes, I did pre wash the fabric.

Opinion

I LOVE THESE. They make my legs look long due to the high waist. They are super cool and will look fab with a fitted graphic tee and cardigan. I can't wait to wear these and I'm already envisioning a needlecord version and a linen pair for the summer - not to mention the shorts version. I think this is going to be a staple pattern that will get used a lot. The only minor additional alteration I will make is to reduce the height of the side seams by 1cm, grading to nothing at the centre front/ back. I think it will give a smoother line. I love that these will need minimum alterations to fitting for different fabrics rather that the whole massive alteration, depending on fabric stretch that the ginger jeans need!


LinkWithin

Related Posts Plugin for WordPress, Blogger...