Sunday, 31 July 2016

Summer Activity Day 2: Wet Felted Bowls


As I mentioned in my last post I ran 2 days of workshops for children at my school. Its an end of your activity and we had loads of fun. On the first day we did tie dye and I included a tutorial about how to do the tie dye.


On day two we used wet felting to create pod shaped vessels. It's rather involved to explain here.  There are many workshops and courses where you can learn how to do this. I learnt in a workshop with Wendy Stanger at the end of last year and thought it might be something the kids at school would enjoy. They did.


Felt making does require a degree of patience and some of the children were in a hurry to complete their work and the felt could have done with being 'fulled' for a little longer to make sturdier vessels. but they all created at least one strong bowl and the designs were great.


Most of the equipment needed is simple to find and if you can find a good supplier of wool tops they it can be inexpensive. Yorkshire Trading sell packs of felting wool for about £6. I ordered mine from George Weil. Excellent service and they arrived the next day.


Felting happens when woll fibres are placed at right angles to one another in thin even layers and water, soap, heat and friction are applied. the process is simple, but it does require practise to create sturdy pieces.


I first made felt in my art college days when I hand dyed raw fleece. I had to clean it, card it, dye it and felt it. I lost patience and ended up felting my work in the washing machine - which gave some interesting textures. The process used for this work was much easier.


Layers of fibre are placed around a template, wetted with hot water and soaped then turned over to create a design. I used about 4 layers of fibres. Net keeps the fibres in place as you create the design.


Then more soap, hot water and bubble wrap are used to felt the layers together.


The felt is then rolled in a bamboo mat and bubble wrap to "full" the fabric. Hot water aids this and as it felts together the fibres shrink around the template. A hole is cut and then bubble wrap is used to shape and felt the bowl until it's the desired shape.


Basic equipment required:
Soap
Hot soapy water in a spray bottle
Bubble Wrap
Neoprene for templates
Dress net
Bamboo mat (a large sushi mat is ideal)


Saturday, 23 July 2016

Summer Activity Day 1: Tie dye tutorial and workshop.


So it's the summer holidays here in the UK. Most schools have now broken up for the summer and parents are seeking activities that will entertain and engage their children without costing the earth.
Tie dye is fun messy and yields brilliant results for minimal cost. You might want to try some of the techniques shown here. I've included instructions so you can have a go. It's all about experimenting - so have fun.


I ran a workshop for 20 Children at my school as part of our activity days towards the end of term. Photos are from this workshop. As well as tie dye we also experimented with batik and fabric painting.

There are primarily two methods for tie dye. Traditional dip dye and space or galaxy dying.

Traditional method:


You will need:
Dye: such as Rit or Dylon - at least one colour.
Salt/ dye fixer
white or light coloured cotton cloth or clothing items - natural fibres work best, mixed fibres will result in a paler result.
Elastic bands or string.
Beads/ pebbles etc.
Rubber gloves

1. Pre-wash your cloth, especially if it is a new item and dry.
2. Prepare the dye according to the packet instructions. I used cold water dye but you can use this technique with machine dye or the type that you boil on the hob. Wear gloves when dealing with dye.
3. Tie up the fabric -here's where you can experiment. tie the fabric around beads or pebbles to create small circles; concertina fold the fabric and tie in bands to create a stripy effect; pinch the fabric in the centre and tie bands along it to create concentric circles or just scrunch it all up and tie string or bands around the bundle for a more random effect. You do need to make sure that the bands or string are really tight as this forms the resist. if they are loose the dye will seep under them and the effect will not be as striking.
4. Wet the fabric.
5. Place in the dye and stir occasionally. leave in for at least the recommended time.


6. Take out and rinse in cold water until the water runs clear. Remove the string/ bands and rinse again. The design should be evident.
7. Leave to dry.


Space dye method:


You will need:
Salt/ dye fixer
Dye: You can use the same sort of dye but will need several colours. I used Procion MX dyes and a dye fix.
Rubber gloves
White or light coloured cotton clothing
String/ rubber bands
Beads/ pebbles
Clean jam jars or small bottles with nozzles (clean hair dye bottles work well here).
Pipettes/ droppers/ syringe
Plastic bag

1. After pre-washing your fabric tie the fabric as for the traditional method.
2. Make up a fix bath. I used the fixer that came with my dye. If using Dylon you can use a salt solution.
3. Soak the pre tied fabric in the fix solution until thoroughly soaked.
4. Make up concentrated dye. Mix the dye powder in a small amount of hot water so that all the power is dissolved. Store in jars or small bottles - this will keep for a few days and can be used again.


5. Place the soaked fabric on a protective surface, plastic bags are perfect. Wear gloves as this gets messy. Use droppers or nozzles to drop small amounts of different coloured dye onto the fabric. Colour mixing rules apply here - so if you put red next to yellow you will get orange etc.


Make sure all the fabric is covered by dye and then place the item in the plastic bag so it doesn't dry out and leave so the dye can develop fully. At least 4 hours or overnight if possible.


6. Take out and rinse in cold water until the water runs clear. Remove the string/ bands and rinse again. The design should be evident.
7. Leave to dry.


Sunday, 17 July 2016

Off the shoulder top


I thought I'd jump on the cold shoulder top bandwagon; after all it is summer! Even if it doesnt feel like it.
This is style #104 from burdastyle 02/2014. It had caught my eye at the time and has a nice retro feel.
I made the size 38, but feel it's a bit big. I'm loathed to go down a size as it might be too tight acorss the arms.
I do like the drafting and its not low enough to be revealing, it feels secure and modest,  but also shows enough shoulder to be on trend.


I have some red spotty fabric to make another version. This black cotton has a tendency to crease rather a lot and it would be better in a fabric that has body, but does not crease. A stable knit or scuba fabric might work well with added bonus that it would not need a zipper.

The pattern could easily be adapted to include a ruffle at the neckline. I might try this with my next version.


I think this is going to get a lot of wear over the summer. I've worn it here with a full skirt (refashioned) but it would also look great with capris or skinny jeans. how would you wear it, and what would you do to improve the fit?

Sunday, 3 July 2016

Megan Nielsen Reef top and shorts

Hi All,


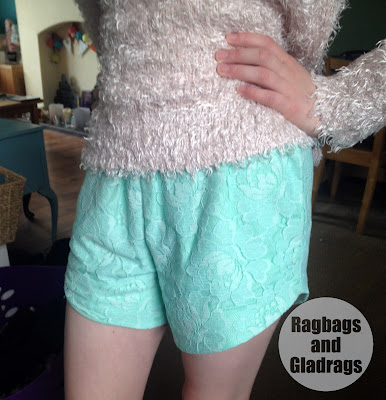
Last week Megan Nielsen released her top and shorts pattern Reef . I tested this pattern and made the top and version 2 shorts for my daughter.

She loves them and has begged me to make her a couple more pairs before she goes on holiday in August.


For the shorts my daughter chose a mint green lace and silky poly underlining. She wanted the lace effect, but obviously not see through.


The pattern was soooooo easy to follow and the fit is great. these have been in heavy roation since I made them for her back in April. The top is also a great make. It's super easy and a beginner could handle it. My daughter's version was in a satin fabric, which she wears as a PJ top. but she's keen to have more for the holidays.


The top is super easy to make and there are no tricky bits so it's perfect for a beginner. If you wanted to you could extend the facing and include an integrated bra.  I might give this a try.

I think this pattern is going to be a favourite. I might make some of the shorts for myself, but I will lengthen them as they are a bit short for me.

LinkWithin

Related Posts Plugin for WordPress, Blogger...