

Hold tight, this a photo heavy post!
I've toyed with a bit of coat making this year and learnt a few skills along the way, but I really wanted to have a go at making a good wool winter coat with proper tailoring and everything!!!! So when Minerva offered me the chance to review this amazing Lady McElroy wool blend coating I jumped at the chance. I recieved the fabric in return for a review, which you can read here.

I don't make coats unless I need them. Last winter I had identified that my smart winter coat was well past it's best. The cuffs were fraying, the lining was worn in places and the faux leather piping had split. The colour had faded a lot too. I knew I needed a replacement, but I'm determined to use the fabric of the old coat in some way too.

I thought long and hard about the style of coat that I wanted to have. It needed to be at least knee length; have a proper fastening rather than a tie belt; be formal enough to wear for special occassions and also fine to wear casually, if I so wished, and to top it all off a classic style that is not going to date. After browsing my burdastyle magazines and paper patterns, I eventually settled on style 119 from 11/2012. I think I'd ear marked this when the magazine first came out, but never had cause to make it.
This coat is made using some more traditional tailoring techniques to support the fabric. I bought some traditional interfacing and shoulder pads from Minerva and purchased the lining from The Sewing Machine Guy, which is my local fabric store (If you are ever in South east Northumberland do go and check it out!!!). As Burdastyle Magazine instructions are very, very brief I used a range of other resources to help me understand the construction. In short I referred to Couture Sewing Techniques by Claire Schaffer, The coat sew along on Gertie's new blog for better sewing and Gerties's new book for better sewing.

First Up I prepped the fabric. Normally I'd wash my fabrics in the machine, but as this blend has a very high wool content, I used my iron to steam the fabric, just hovering the iron over the fabric to allow the steam to penetrate it. I then let this dry. The traditional interfacing was prepared by soaking in a cold bath for and hour, leaving to dry naturally and then gently pressing.

While I was waiting for the fabric to dry. I traced the pattern - In Burdastyle, I usually cut a size 38, but as this is an overcoat, I decided that I'd go up a size and cut the 40. I did a pin fitting of the tissue before cutting the fabric and decided it was fine. Now the coat is finished I think the 38 would have been a slightly better fit, but the 40 is actually ok. It's not overly big and I'll be able to wear my thick jumpers underneath it!!!!

Once the main pieces were cut out, I cut the interfacing. I completely interlined the front, side front and collars. The back was underlined with cotton and the interfacing was used as a back stay and added at the hem edge and the sleeve cuffs.

The interfacing was permanently hand basted to the wrong side of the fabric. Once the front pieces were interfaced, I added a second layer of the interfacing above the bust as a chest piece to increase the stability in this area. I taped the roll line and pad stitched the lapels. I used Gertie's instructions for this and had a watch of her youtube tutorials. I also made bound buttonholes, which I think I'm getting better at.

Once the bound buttonholes are made, I baste them closed during construction. I also make a matching window in the facing. To reduce bulk I used a small square of organza, which prevents the edges fraying and allows them to be neat. These are then hand stitched in place.

I basted the coat together, without the sleeves in, to check the fit. I ended up taking a little bit off the side back and centre back seams to create a little more shaping at the back as it's quite a straight design. The pockets are easy as they are inseam, so no fussy welt pockets to stress over!

Once I was happy with the fit, I use a catch stitch to secure the seam allowances and then constructed and inserted the sleeves. I don't have a sleeve board but find a suitable alternative is a rolling pin rolled in a towel.

The hems were pressed up and then the collar and facing were attached. Once this was done the hems were catch stitched in place and the shoulderpads and sleeve heads were stitched in. The lining was then constructed and added along the edge of the facing and the sleeves were bagged, which gives a neat finish.

I decided that I would hand stitch the hems so that I had greater control over the vent.

It was finished with 4 buttons (plus one on the inside) and a final steam press.

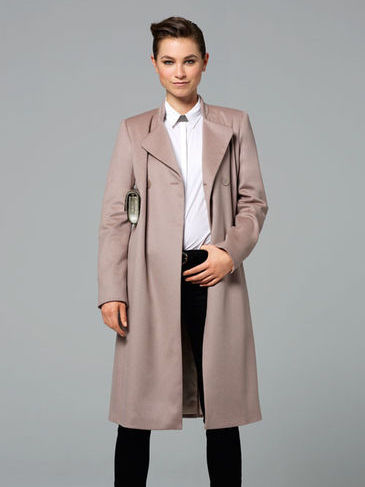
I really do love the classy lines of this coat. It will be easy to wear in many situations and I hope that it will last for many years to come.


I have really been looking forward to seeing the finished coat. It's super! I love the style and the choice of lining. Your technical tips are so useful. I hope you find a good use for the fabric from the old coat. I had a lovely green duffel coat for years and when it finally died I made a duffel coat for my daughters doll (and now my granddaughter plays with it) that's a fabulous coat and meets the formal/casual needs very well
ReplyDeleteThanks Angela. I doubt i'll be making dolls clothes as Bethan is a bit old for that, but maybe bags etc.
DeleteThis coat is fantastic, I love the style and the lining.Thanks for linking with #pocolo and hope to see you back again later this week
ReplyDelete