Showing posts with label slow sewing. Show all posts

Thursday, 19 November 2020

Classy Coat - Burdastyle 119 11/2012


Hold tight, this a photo heavy post! 

I've toyed with a bit of coat making this year and learnt a few skills along the way, but I really wanted to have a go at making a good wool winter coat with proper tailoring and everything!!!! So when Minerva offered me the chance to review this amazing Lady McElroy wool blend coating I jumped at the chance. I recieved the fabric in return for a review, which you can read here.

I don't make coats unless I need them. Last winter I had identified that my smart winter coat was well past it's best. The cuffs were fraying, the lining was worn in places and the faux leather piping had split. The colour had faded a lot too. I knew I needed a replacement, but I'm determined to use the fabric of the old coat in some way too.


I thought long and hard about the style of coat that I wanted to have. It needed to be at least knee length; have a proper fastening rather than a tie belt; be formal enough to wear for special occassions and also fine to wear casually, if I so wished, and to top it all off a classic style that is not going to date. After browsing my burdastyle magazines and paper patterns, I eventually settled on style 119 from 11/2012. I think I'd ear marked this when the magazine first came out, but never had cause to make it.
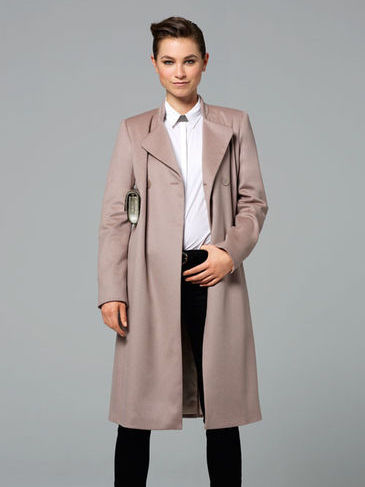
This coat is made using some more traditional tailoring techniques to support the fabric. I bought some traditional interfacing and shoulder pads from Minerva and purchased the lining from The Sewing Machine Guy, which is my local fabric store (If you are ever in South east Northumberland do go and check it out!!!). As Burdastyle Magazine instructions are very, very brief I used a range of other resources to help me understand the construction. In short I referred to Couture Sewing Techniques by Claire Schaffer, The coat sew along on Gertie's new blog for better sewing and Gerties's new book for better sewing.


First Up I prepped the fabric. Normally I'd wash my fabrics in the machine, but as this blend has a very high wool content, I used my iron to steam the fabric, just hovering the iron over the fabric to allow the steam to penetrate it. I then let this dry. The traditional interfacing was prepared by soaking in a cold bath for and hour, leaving to dry naturally and then gently pressing.

While I was waiting for the fabric to dry. I traced the pattern - In Burdastyle, I usually cut a size 38, but as this is an overcoat, I decided that I'd go up a size and cut the 40. I did a pin fitting of the tissue before cutting the fabric and decided it was fine. Now the coat is finished I think the 38 would have been a slightly better fit, but the 40 is actually ok. It's not overly big and I'll be able to wear my thick jumpers underneath it!!!!

Once the main pieces were cut out, I cut the interfacing. I completely interlined the front, side front and collars. The back was underlined with cotton and the interfacing was used as a back stay and added at the hem edge and the sleeve cuffs.


The interfacing was permanently hand basted to the wrong side of the fabric. Once the front pieces were interfaced, I added a second layer of the interfacing above the bust as a chest piece to increase the stability in this area. I taped the roll line and pad stitched the lapels. I used Gertie's instructions for this and had a watch of her youtube tutorials. I also made bound buttonholes, which I think I'm getting better at.

Once the bound buttonholes are made, I baste them closed during construction. I also make a matching window in the facing. To reduce bulk I used a small square of organza, which prevents the edges fraying and allows them to be neat. These are then hand stitched in place.

I basted the coat together, without the sleeves in, to check the fit. I ended up taking a little bit off the side back and centre back seams to create a little more shaping at the back as it's quite a straight design. The pockets are easy as they are inseam, so no fussy welt pockets to stress over!

Once I was happy with the fit, I use a catch stitch to secure the seam allowances and then constructed and inserted the sleeves. I don't have a sleeve board but find a suitable alternative is a rolling pin rolled in a towel.

The hems were pressed up and then the collar and facing were attached. Once this was done the hems were catch stitched in place and the shoulderpads and sleeve heads were stitched in. The lining was then constructed and added along the edge of the facing and the sleeves were bagged, which gives a neat finish.

I decided that I would hand stitch the hems so that I had greater control over the vent.


It was finished with 4 buttons (plus one on the inside) and a final steam press.

I really do love the classy lines of this coat. It will be easy to wear in many situations and I hope that it will last for many years to come. 


Monday, 22 July 2019

Slow Sewing: The Making of a Quilt


Hey! I made a quilt.
This has been a looooooong project. The joy of making this has been in the slowness of putting it together. I think if I had rushed it I would have been heartily sick of it by its completion. As it is as I have taken so long over it it has been a joy; completed in short bursts over a long period of time. How Long, you might be wondering? Well over a year!


This is the story of my quilt, and no it's not as long as it took to make.
When I went to my first #sewupnorth event in Leeds TWO years ago I won a couple of fat quarter packs in the raffle. These small pieces of quilting cotton were so smooth and the colours were just stunning I knew that I would have to use them somehow. I'm not a quilter so the thought of cutting and piecing the fabric, let alone quilting it filled me with dread. However, after the fabric had sat in my stash for 6 months I decided to give it a go.


I cut the fabric into wide strips and then stitched the strips together to create very long strips. Then I cut these into narrow strips using my rotary cutter and metal rule. Once cut, I rotated the strips, which meant unpicking a seam or two to create the stepped pattern you can see in my quilt. I sewed with a 6mm seam and pressed as I went along. Once I had completed the top I had a long rest until I could face quilting it.


I did not want to use polyester wadding for this quilt as I have been trying to cut down on waste and my use of plastics and the cotton batting was out of my price range. Instead, I used a couple of old flannel sheets for the wadding and the backing and binding fabric came from an old cotton duvet cover that had a rip on one side where it had become a little threadbare. The other side was fine, so this became my backing. I layered the backing, flannel sheets and quilt top and pinned together using safety pins. I know you can buy special safety pins for quilting, but I found the safety pins I had already were perfectly ok for the job. I rolled the quilt into the middle from the edges and secured the rolls with offcuts of flannel and pins. this gave me a 30cm wide strip to quilt. I gradually unrolled the quilt as I stitched it.


I decided to try free motion quilting and used my trusty Bernina 707 to do this. It's easy to drop the feed dogs on this machine and it has an extension table for the machine which provides a bit more support, as I was working with a large amount of fabric at a time I did most of the quilting at our monthly Crafternoon events as I had access to a larger table to support my work.


Unfortunately, I found it very tricky to keep my stitch length constant and even, but the overall effect is ok and the quilt feels nice and firm. This process has taken a long time and I've put this down for a couple of months before picking it up again. Last week at our Crafternoon session I finally finished the quilting.


During this week, I trimmed the edges of my quilt and cut 10cm wide strips to use for binding. Yesterday I sewed up the binding strips and stitched it to my quilt. Before beginning this I did a bit of research into how to mitre the corners, as on my last quilt this was unsatisfactory. There were loads of tutorials on Youtube and they all had basically the same method for stitching the top. Once I had stitched the binding to the top. I folded it under and finished the underside with tiny fell stitches. This took a couple of hours, but I find hand stitching quite relaxing and meditative (as long as I don't have to do too much of it).


Finally, I have a finished quilt and have saved a couple of flannel sheets and a duvet cover from landfill so I'm happy. Those of you who are expert quilt makers will be able to pick a boatload of mistakes with this. I don't care. It's been an achievement for me and because I've taken my time with it I have actually enjoyed it. It really is worth slowing down sometimes.

Monday, 27 August 2018

On Sewing, Sustainability and Style


SOI Eve dress - All the spots. I love this one

I began sewing back in 2011 as part of my recovery from a stress-related illness. At the time it was one of two creative outlets I had, one was my art and the other was sewing. I sewed to make things that fitted and helped me feel good about myself. I really needed a sense of accomplishment.


My first make

Over the last few years, I continue to sew to make things that fit and I know that my self-image and esteem has improved as I no longer feel the need to fit into the box that the world would have me believe is in 'Fashion' or 'Style'. As a beginner sewist, I made simple clothes in nice fabrics and I have challenged myself to try more challenging things. However, recently I have felt uncomfortable that the sewing world is becoming just like a high street shop - just with better made and fitted clothes. I see the same patterns again and again as each new indie pattern gets an outing. Does every sewer in blogland own a Keilo Wrap dress, Ogden Cami, Kalle Shirt, Ginger Jeans or Lander pants, to name but a few!!!!!

I love this dress and I still wear it - even if it's a bit faded

Don't get me wrong - these are all great patterns (and I have a couple of them) and that's why they are popular. I thought quite a lot about buying the Ogden Cami and the Kalle shirt but have made my mind up that I don't want to jump on that bandwagon. I like the designs, sure I do, but they're not really me and I have other patterns that are similar but don't get as much airtime as these patterns. I still love the Colette Sorbetto and I hardly ever see it made in blog land these days. It's actually my go-to sleeveless top and I love it.

Eyelet Sorbetto top - still in rotation.

I think the point I'm trying to make is that we consume pattern after pattern and make constantly  - whatever is the next new sewing thing. The stash of fabrics increases and we create boatloads of waste pieces. I'm as guilty of this as the next person and I'm trying to fight against it. So I cancelled my subscription to Burdastyle Magazine - I have 6 years worth of magazines - more than enough to keep me going for a wee while. I also don't buy a pattern as soon as I see it. I like to consider if it's really me and if it's something I'll actually wear or I can make for others and I'll make more than once. Recently this means I didn't buy a pattern, which I really did like and now need to source as it's a foreign company and not easy to get here. Procrastination does bite me sometimes.

Pigs might fly - same style lines again. great print.
Big bold prints

I'm also more considered about the fabric I buy. I make a lot fewer trips to the cheap fabric stall on the local market and I buy less synthetic fabric than I used to; I take time over my makes (when I rush they go wrong anyway); I try to use patterns that I already own; I piece my scraps at the end of a project to make patchwork yardage - I'll be using these for some zero waste projects over the coming months. I'm trying to upcycle pieces that are a little unloved (i've just finished a Cambie dress refashion) and I'm trying to make only what I'll wear or make for other people.

A bold print and a full skirt

Then there's the other thing - Style. My style has changed a bit and I do sew more basics than I used to as I wear nearly all me-made clothes. However, I have an aesthetic I'm drawn towards, yet I find myself making things I just won't wear or that actually don't fit my style. I also make far too many occasion wear pieces and don't wear them very often.


One of my many party dresses - I've worn this twice, but love it.

This summer I've also found myself wearing slobby clothes, combat shorts and t-shirts - nothing wrong with that, but it's actually not my style.
I'm determined to identify shapes that work for me, colours that work for me and be willing to embrace the slightly odd side of my character a little more. After all, I'm an Art teacher I can get away with it.

I always get lots of compliments when I wear this one - It might be black but I love the style, nipped in waist and full skirt.

So here goes:
Dresses/ skirts - Fitted waist with either a full skirt or pencil skirt at knee/ midi length. Shift dresses Knee length.

The dress that nearly didn't make it. the fit was off and I lost patience with it.

Trousers - cigarette pants or wide-legged trousers - 50's style. Shorts not shorter than mid-thigh, culotte styles work well.

cigarette trousers - still need to perfect the fit.

Tops - boat neck, jewel neck or shirt neck. T-shirts, fitted with a curved hem, short or 3/4 sleeves. Sleeveless shirts and tops that can be layered or cap sleeves/ extended shoulders.
Knitwear - cardigans - lots, waist length, semi-fitted and 3/4 to full sleeves.
Casual - jeans - skinny or bootcut, mid to high rise. Hoody tops/ tunics. Black leggings.
Accessories - Tights -  as many different colours/ patterns as I can find - opaque; Jewellery - chunky and bright; scarves;
Footwear - mid-height Mary Jane style shoes - Bright colours. Flat ballerinas. Doc Marten boots - the chunkier the better. Converse all stars or similar.

Summer - it doesn't get much wear but I love it.  Self-drafted.

Fabrics - natural where possible; bright or black; unusual prints; no ditsy/ chintzy type prints; All the spots - every time. I try an avoid neutral colours except for black and white. and my colour palette is "spring" so most pinks and blues look good on me along with some greens. I have to be careful with reds near my face and orange is a no go unless it's part of a design with other colours.

In light of my list, I need to have a wardrobe clear out - time for a clothes swap.

Another Sorbetto top and this summer's winner - Burdastyle culottes with fabric gifted to me by a friend.


LinkWithin

Related Posts Plugin for WordPress, Blogger...