Showing posts with label halter dress. Show all posts

Monday, 7 August 2017

How to hack a basic bodice into a halter style top - tutorial

A few people have asked how I created the bodice for my maxi halter dress. - it's relatively easy.

You will need:
A basic bodice pattern.
Scissors
Tape
Paper
ruler/ french curve.

I used the basic bodice from Gertie's ultimate dress book but any basic bodice will do. Make sure it fits you well before beginning -make a toile.

I have drawn out the steps on regular paper with sharpie as you could not see the changes to my actual pattern as I'd used a thin light pencil and tissue paper. However the steps below should give you the right idea.

1. Trace your basic block, front and back onto the paper you are going to use and mark in the seam lines. I would also measure the neck edge before you start adapting the pattern. If you are going to make a collar piece this will make this step easier. (you could also apply a bias binding to the finished edge.


2. On the shoulder seams mark your new seam length. I made mine 1.5cm. Don't forget to allow for seam allowance on the neck edge.


3. Draw new cut away armhole to your new marked seams from the underarm.


4. Add seam allowance (1-1.5cm)


5. Cut away the excess paper from the shoulder area. The back piece should be finished now.


6. On the front cut up one leg of each dart.


7. Tape the darts closed. You will end up with a curved or pointy piece of paper. (you can also do this with patterns that only have one dart. the principle is the same)


8. Cut a straight line from the neck edge through the point of the bust dart, and one through the waist dart. The closer you are to the dart point the flatter your paper will lie.


9. Tape paper behind your pattern, spreading the neckline edge open - it will look quite wide.
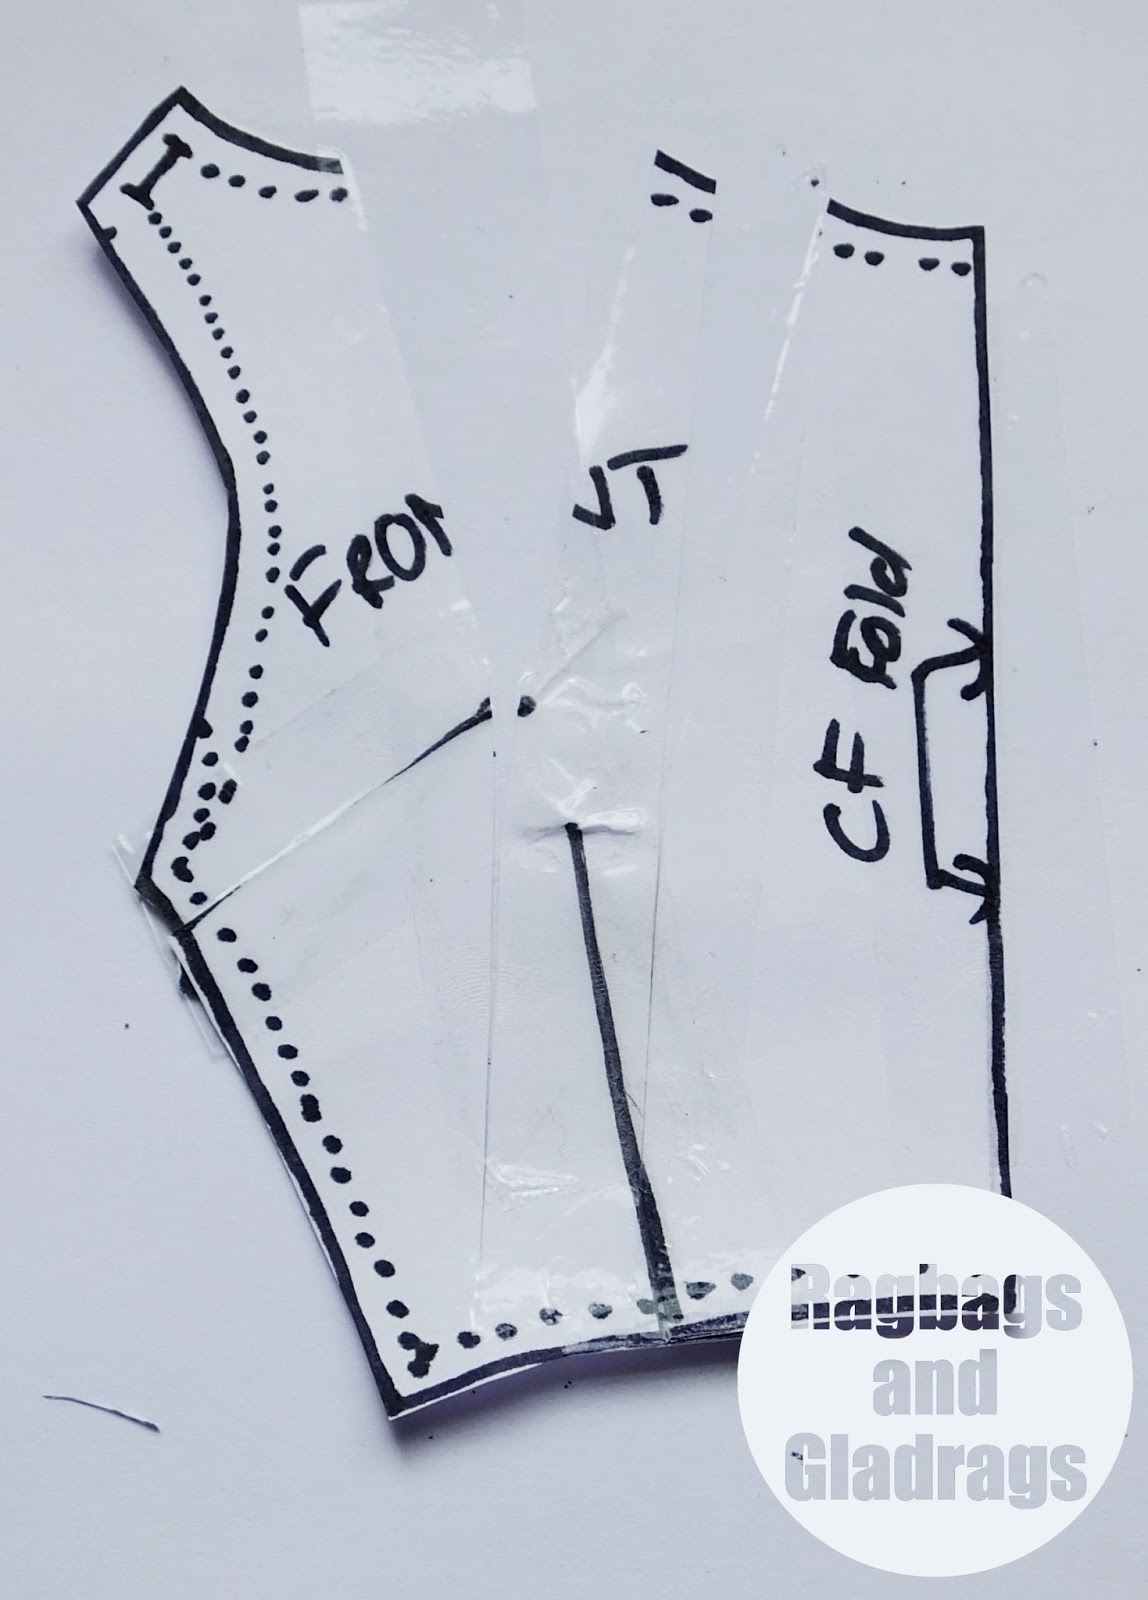

10. Join the neck edge seam line with a smooth curve from the shoulder to the centre front - use a french curve to help - then add your seam allowance.


11. This is the edge that will be gathered into the collar or neck binding. My collar piece was approx 22cm (folded in half) before I added the seam allowances.
To gather the neckline either sew two rows of basting stitched into the seam allowances and pull the ends of the thread up to ease into the collar or sew a zigzag over dental floss or cord and pull that up to gather the neckline.

Order of construction:
Sew darts in back bodice and press towards centre back. Sew shoulder and side seams together, press. Gather neckline and sew into collar. Sew collar facing and finish CB seam. Buttons, a tie, or zip work well.

Sunday, 6 August 2017

Maxi Halter Hack


Since getting into sewing 6 years ago I have always been inspired by Gertie and her love of fabrics and pattern adaptations. When I saw this fabric I originally thought it might make a Gertie style Tiki dress. but the fabric lacked the body needed for such a dress. I had bought this fab fabric from B&M fabrics in Leeds. I visited the shop as part of the #sewupnorth event. Once I had realised it would not make a tiki dress I had several other ideas for this fabric. I was going to make a version of my Alexandra dress, but wanted a maxi length and knew there would not be enough to add the ruffles and a long skirt. Then I was going to make the surplice dress from Gertie's Ultimate dress book but again that design requires fabric with more body.


In the end I decided to adapt a basic bodice as I wanted to get the most out of the drape of this fabric.
I took the basic bodice from the Ultimate dress book and cut away most of the shoulder area and closed the bust and waist darts, rotating the fullness to the front neck edge.


I drafted a collar piece. this started as a straight piece, but then I took out wedges along the top to give a curved finish, making sure I marked the shoulder line.

I sewed the back darts as normal and the shortened shoulder seams then gathered the front neckline into the collar. The armholes are finished with a bias facing.


The skirt is essentially the Pencil Skirt from Gertie's new book for better sewing. I used my usual size 6, but had to take in quite a bit at the waist to fit the top. In fact due to the drapey nature of the fabric and lack of lining I ended up taking almost an inch from the side seams of the bodice as the gaped quite a bit.

I added a concealed zip, which finished mid back and two buttons on the collar. A walking slit allows ease of movement. I think this just might get a lot of wear on my holidays.

Monday, 4 June 2012

Wedding Dress - Done!

The newly married Mr & Mrs Todd - Photo by Allison Davies
 Well it's been a manic weekend, but I can finally share Elaine's wedding dress with you. - whoo hoo.
While the rest of the country is in Jubilee madness, we celebrated the marriage of Elaine and Alan, and the 50th Birthday of John's sister, Ann. - 180 miles apart - on the same day. So it was off to Morpeth Town Hall for the ceremony and then to a sit down reception, before driving the 180 miles to Nottinghamshire and the BBQ for the Birthday celebrations. Sunday was filled with visiting John's parents and my Mum while we were in the area and then the long drive home. Lie in this morning and waking up to the glorious Northumberland sunshine and the keen coastal breeze.

posing for photographs
Anyway back to the dress!
I've been posting little snippets over the last few weeks as I've been making it. There was a lot of time consuming hand sewing in this dress as the fabric was very fine.

the bodice in early stages of creation
 I began by drafting the dress using cotton and draping on a dress form. Then, when Elaine had chosen her fabric the stitching began. it was a combination of drafting and draping, often being pinned and stitched on the dress form to keep the shape.

Adding buttons and button loops
 The Fabric was a fine turquoise polyester georgette, with a top layer of viscose silk - devore style pattern, although there was a lot of backing fabric and only a sparse design. the overall effect was to create a baby blue colour. Exactly what Elaine wanted.

Back view
 I made a fitted inner bodice on which the rest of the dress was supported. this had to be quite substantial as the fabric was surprisingly weighty.

Elaine and her brother
 The outer bodice was added then the dropped waist and finally the skirt - which was draped into place first and pinned before the final stitching took place. The Zip was hidden by a row of pearl buttons and covered pieces of boning which hooked into the bra at the back prevented the dress from slipping and revealing Elaine's bra. I used the same technique on the halterneck dress that I made (and wore) for the wedding.


 Elaine loved it and I'm so glad I could have a special part in her day.

LinkWithin

Related Posts Plugin for WordPress, Blogger...