Showing posts with label #handmade. Show all posts

Saturday, 6 April 2019

Red Floral Saraste Shirt Dress


This is my first version of the Saraste shirt dress from the Breaking the Pattern book by Named Clothing and it will not be the last. After a few recent makes with some tricksy fabrics, this was an absolute dream to sew.


I'm always a bit nervous when I first sew a pattern as I wanted an easy well fitting garment. This week has produced both an unwearable pair of trousers (which I won't go into here) and this stunning dress, which I love.


I compared my measurements to the size guide and finished measurements and based on these I cut a straight size 3. The pattern calls for just over 2m of 150cm wide fabric. Unfortunately I only had 2m of the fabric and it was narrower than 150cm wide too, which meant I had to shorten the skirt portion of the dress considerably and cut the inner yoke, inner collar stand and under collar in a contrasting fabric, which I also used to make bias binding for the armscye as there was not enough fabric for sleeves. I quite like the contrast effect if I'm honest.


I'm not normally a huge fan of floral fabric, but there was just something about the colour combination of this fabric that I really like. I didn't buy it myself and I'm not sure where it's from, but it has a really nice feel and a slight stretch. My sister-in-law gave it to me as a Christmas gift and I've been looking for a project to use it on since then. The contrast fabric was also a Christmas gift. My sister had bought me some yardage from Simply Fabrics in Brixton and had also spotted some remnants. This was one of those remnants - there was about 1/3m of this one.


Once I'd managed pattern Tetris to make all the pieces fit. I started on the construction. I followed this exactly as directed in the book. The bodice back and side front are constructed and stitched together at the side seams, then the gathered skirt is added before the centre front pieces are added and yoke are joined at the shoulder.


I can see why it's constructed in this way, but it doesn't leave many options for alterations. I really like the fit and won't be making any changes to this one, but I would normally have a closer fitting waist, so taking a bit off the side seams and back darts would help with this. If you think you might need to make similar alterations I would construct the back and front separately before joining at the shoulders and side seams.


The drafting is excellent on this and all the pieces matched perfectly. I left off the frill at the edge of the collar and used the grainline archer sew-a-long for the construction of the collar as it gives a great finish. The Saraste instructions are similar here, but the sew-a-long just gives a bit more detail.

I finished all inside seams with the overlocker. The hem was also overlocked and a narrow hem sewn in order to keep as much length as possible. The armscye is finished with contrast bias binding.


This dress is just completely my style. I will get a lot of wear out of it and I think there will be more of these.


Sunday, 4 March 2018

I made a quilt


I've always loved the beautiful soft quilts that I see at friends homes. I always fancied making my own. A couple of years ago I decided to get started. I cut and pieced scraps together from my sewing offcuts. The process of cutting out took ages, and by the time I'd pieced a handful of small square and rectangles into bigger squares and sewn about 40 of them together, I'd had enough.


I was sorting through my stash and found the bag with this in. There were just a few squares left to sew together, and since my physio said I could do a bit of sewing as it was good for keeping circulation going in my operated on side, I thought I'd give it a go. I stitched the remaining few squares together and pressed the patchwork. not a bad size, about 1m by 1.5m. I found some fabric that was suitable for the backing and bought the wadding from The Sewing Machine Guy (he has some beautiful fabrics in stock - check them out or visit if you're in Northumberland). Ellen from Ellen's of Ellington showed me how to true the sides, pin the layers together and a really simple way to quilt it all together - I just used straight lines! Then she showed me how to bind it - the edges look great, but I'm not really happy with the corners - I think my binding was a bit too thick to get a really neat finish here.


I know many quilt artists would be shocked by my piecing and overly simple quilting, however, this quilt has used up a good chunk of scrap fabric, so it's definitely recycled. The only thing purchased was the wadding, so it was also cheap (materials wise). And with the current cold spell in the UK. I have sat underneath this for the last week, keeping warm. even the kids think it's warm and snuggly.


I'm not sure I'll ever make one again,  I'm trying to find different ways to use up my waste fabrics and just use less generally, but if I find myself with a supply of good quality cotton offcuts - well who knows?

Monday, 7 August 2017

How to hack a basic bodice into a halter style top - tutorial

A few people have asked how I created the bodice for my maxi halter dress. - it's relatively easy.

You will need:
A basic bodice pattern.
Scissors
Tape
Paper
ruler/ french curve.

I used the basic bodice from Gertie's ultimate dress book but any basic bodice will do. Make sure it fits you well before beginning -make a toile.

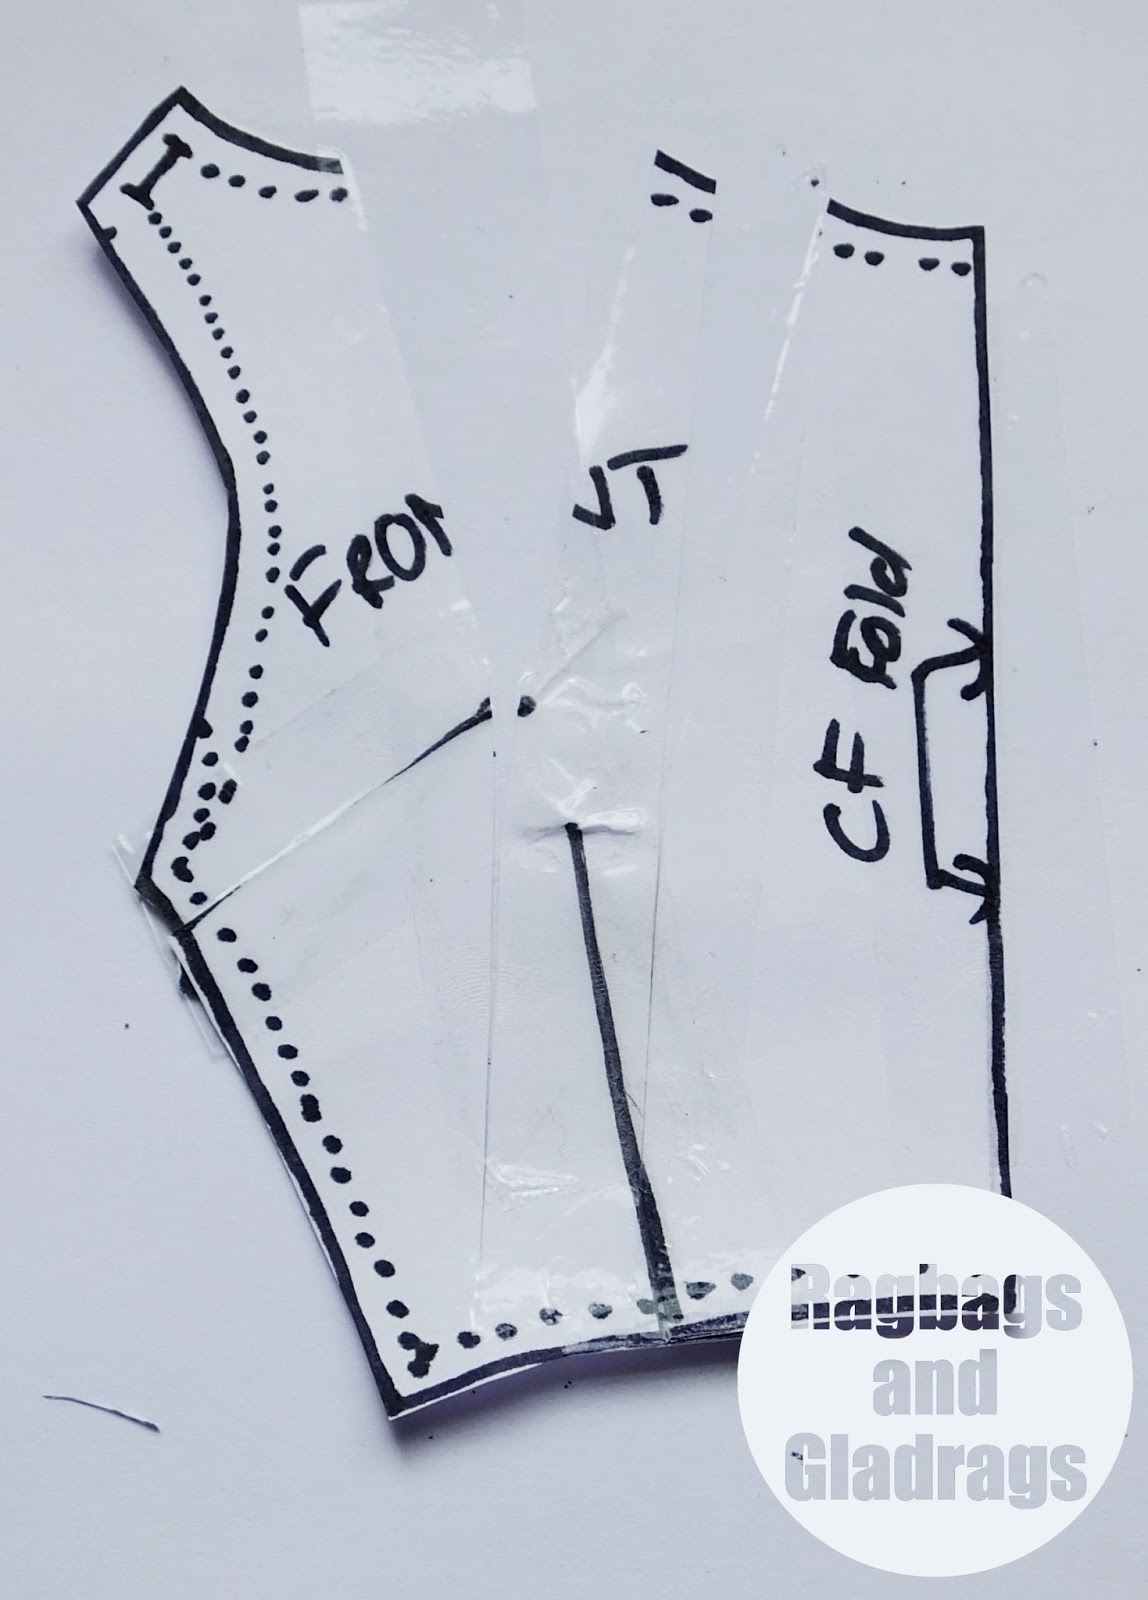
I have drawn out the steps on regular paper with sharpie as you could not see the changes to my actual pattern as I'd used a thin light pencil and tissue paper. However the steps below should give you the right idea.

1. Trace your basic block, front and back onto the paper you are going to use and mark in the seam lines. I would also measure the neck edge before you start adapting the pattern. If you are going to make a collar piece this will make this step easier. (you could also apply a bias binding to the finished edge.


2. On the shoulder seams mark your new seam length. I made mine 1.5cm. Don't forget to allow for seam allowance on the neck edge.


3. Draw new cut away armhole to your new marked seams from the underarm.


4. Add seam allowance (1-1.5cm)


5. Cut away the excess paper from the shoulder area. The back piece should be finished now.


6. On the front cut up one leg of each dart.


7. Tape the darts closed. You will end up with a curved or pointy piece of paper. (you can also do this with patterns that only have one dart. the principle is the same)


8. Cut a straight line from the neck edge through the point of the bust dart, and one through the waist dart. The closer you are to the dart point the flatter your paper will lie.


9. Tape paper behind your pattern, spreading the neckline edge open - it will look quite wide.


10. Join the neck edge seam line with a smooth curve from the shoulder to the centre front - use a french curve to help - then add your seam allowance.


11. This is the edge that will be gathered into the collar or neck binding. My collar piece was approx 22cm (folded in half) before I added the seam allowances.
To gather the neckline either sew two rows of basting stitched into the seam allowances and pull the ends of the thread up to ease into the collar or sew a zigzag over dental floss or cord and pull that up to gather the neckline.

Order of construction:
Sew darts in back bodice and press towards centre back. Sew shoulder and side seams together, press. Gather neckline and sew into collar. Sew collar facing and finish CB seam. Buttons, a tie, or zip work well.

Friday, 2 June 2017

MMMay 2017 done

Well I successfully did MMMay. I wore at least one handmade item everyday. I did not blog or post much on Instagram as I just didn't have time. Here are some of the things I did wear - just not recent photos.

Gertie Sundress view B
Self drafted drape dress
culottes


refashioned skirt - 3rd incarnation


woven Keilo Dress

selfdrafted Frida Khalo dress

Skull Crop top

Re-dyed Mary Jane DM shoes

Crochet dress

cap sleeve sorbetto

Shirt dress

sorbetto with collar

self drafted dress

Black eyelet shift dress

MMMay has thrown up some issues with my wardrobe, namely being the type of clothes I have and what I wear. Work days were easy - I have lots of dresses. However it's more casual items that I seem to be lacking. I only wore one me made skirt and one pair of me made culottes. I do have plenty of skirts that I have acquired over the years, but I don't really have many shorts, trousers, jeans to wear. I wore lots of me made tops - mostly Sorbetto tops, I seem to wear these a lot in the warmer months. I also had a couple of pleat neck tanks from a Burda pattern - last summer's magazine.

So the outcome is that I need to make separates, things I can layer and summer wear as most of what I have is getting a bit tatty.

So on my to make list:-

cigarette pants
wide leg trousers/ culottes
Dungarees
shorts
Long and short sleeve t shirts
vest tops
blouses/ shirts

I might just have to take part in summer of basics!!!!

What did me made May throw up as gaps in your wardrobe ?

Saturday, 12 November 2016

Art Sale - Pay what you decide.


The Church on the point 120 by 120 cm acrylic on canvas
I'm hoarding art works!
They are no good to anyone stuck in the spare room.

The church on the point - detail
I need to clear some space and raise some funds for my next art project (which I cant wait to share with you!!!!).

The House on the Hill, 50 by 100 cm. Acrylic and mixed media on canvas
So I'm selling.
I have a range of work - on canvas and paper, from large to small. All I ask is that you pay what you think it's worth, plus the postage and packing. I'll be sharing works for sale over the next couple of weeks. These are the first three.

The house on the Hill  -  detail
Depending where you live will affect the cost (within the UK most postage will be under £20). I'm willing to post world wide, but please be aware my work sometimes contains, grass, sand and other natural materials which can be restricted for import.

Night Sky. 50 by 100 cm, Acrylic on Canvas

Message me if you are interested or find my event on facebook.


LinkWithin

Related Posts Plugin for WordPress, Blogger...