Showing posts with label pattern hack. Show all posts

Thursday, 27 June 2019

Perfect Prom Dress


Well over a year ago I offered to make my daughter her prom dress. I know her ideas had changed frequently from short beaded pastel coloured dresses to edgier dark designs. She has looked at everything from mint green to black; short to long; full skirt to slim fitting; strapless to full bodice.

https://cdn.shopify.com/s/files/1/1104/9862/products/Macloth-10718_1024x1024.jpg?v=1518154505
By the new year, she had settled on a dress similar to this but in Emerald Green. She didn't really want emerald green, but something much darker and we bought 4m of this Bottle Green satin backed dupion from Minerva Crafts (it was the same colour as my bridesmaid dresses). She had already bought shoes and jewellery and had a clear idea of how it was all going to be styled.

Partially constructed bodice
After looking at her design choice and discussing what she wanted I chose to use the strapless bodice from Gertie's Ultimate dress book and adapted the bias band to create the eyelash bodice, but with off the shoulder bands like the inspiration photo. Narrow spaghetti straps were also added.

The skirt is based on the BHL Anna dress skirt, with the seam lines adjusted to match with the bodice seams.


Construction:
I made the bodice inner structure from canvas, which was fitted to Bethan before adding boning. I also used the alternations I made to adjust the pattern pieces for the shell and lining.

I made a bit of an error here. I had to make very little adaptations to the bodice pieces, but one thing I did do was take about 1/2cm from each side seam. I should have left this as it was as that extra space was taken up by the boning and by the time I'd sewn it all together it was a bit too tight and I ended up letting out the side seams. DO NOT OVERFIT when using many layers and boning. I used plastic boning as this dress will be going in the washing machine and used it on all the seams in the bodice.

Catch Stitching the seams
I added the bias band once the outer bodice was constructed. The bands were stitched closed for the sections that go off the shoulder and then turned before the raw edges were neatened and sewn to the bodice front and back.

It was a really bright evening!!

The skirt was then sewn and attached to the bodice before adding the zip and lining. I used an invisible zip. I know this is risky with a dress this fitted, but as this won't get loads of wear I think it's ok.

Photo bombed by dad!

I allowed the dress to hang for a few days before heming. I think you'll agree that she looks stunning in it! All set for a great evening of partying!

Friends together

Monday, 7 August 2017

How to hack a basic bodice into a halter style top - tutorial

A few people have asked how I created the bodice for my maxi halter dress. - it's relatively easy.

You will need:
A basic bodice pattern.
Scissors
Tape
Paper
ruler/ french curve.

I used the basic bodice from Gertie's ultimate dress book but any basic bodice will do. Make sure it fits you well before beginning -make a toile.

I have drawn out the steps on regular paper with sharpie as you could not see the changes to my actual pattern as I'd used a thin light pencil and tissue paper. However the steps below should give you the right idea.

1. Trace your basic block, front and back onto the paper you are going to use and mark in the seam lines. I would also measure the neck edge before you start adapting the pattern. If you are going to make a collar piece this will make this step easier. (you could also apply a bias binding to the finished edge.


2. On the shoulder seams mark your new seam length. I made mine 1.5cm. Don't forget to allow for seam allowance on the neck edge.


3. Draw new cut away armhole to your new marked seams from the underarm.


4. Add seam allowance (1-1.5cm)


5. Cut away the excess paper from the shoulder area. The back piece should be finished now.


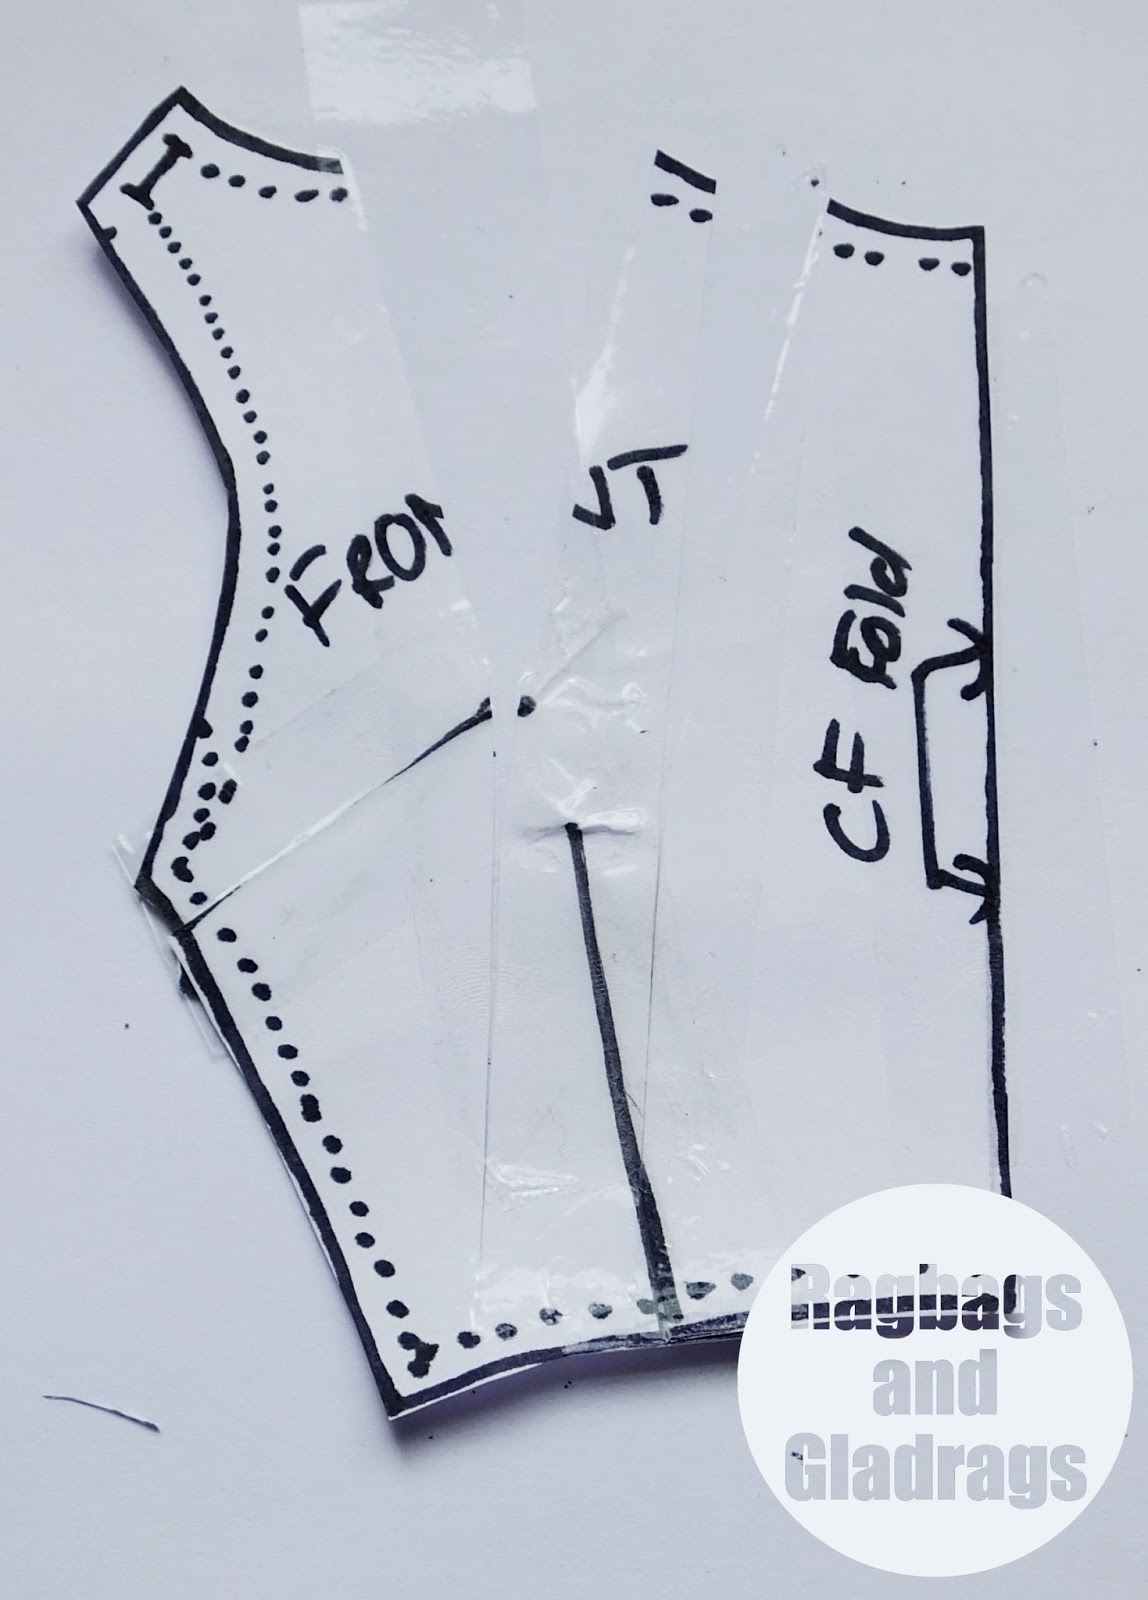
6. On the front cut up one leg of each dart.


7. Tape the darts closed. You will end up with a curved or pointy piece of paper. (you can also do this with patterns that only have one dart. the principle is the same)


8. Cut a straight line from the neck edge through the point of the bust dart, and one through the waist dart. The closer you are to the dart point the flatter your paper will lie.


9. Tape paper behind your pattern, spreading the neckline edge open - it will look quite wide.


10. Join the neck edge seam line with a smooth curve from the shoulder to the centre front - use a french curve to help - then add your seam allowance.


11. This is the edge that will be gathered into the collar or neck binding. My collar piece was approx 22cm (folded in half) before I added the seam allowances.
To gather the neckline either sew two rows of basting stitched into the seam allowances and pull the ends of the thread up to ease into the collar or sew a zigzag over dental floss or cord and pull that up to gather the neckline.

Order of construction:
Sew darts in back bodice and press towards centre back. Sew shoulder and side seams together, press. Gather neckline and sew into collar. Sew collar facing and finish CB seam. Buttons, a tie, or zip work well.

Sunday, 6 August 2017

Maxi Halter Hack


Since getting into sewing 6 years ago I have always been inspired by Gertie and her love of fabrics and pattern adaptations. When I saw this fabric I originally thought it might make a Gertie style Tiki dress. but the fabric lacked the body needed for such a dress. I had bought this fab fabric from B&M fabrics in Leeds. I visited the shop as part of the #sewupnorth event. Once I had realised it would not make a tiki dress I had several other ideas for this fabric. I was going to make a version of my Alexandra dress, but wanted a maxi length and knew there would not be enough to add the ruffles and a long skirt. Then I was going to make the surplice dress from Gertie's Ultimate dress book but again that design requires fabric with more body.


In the end I decided to adapt a basic bodice as I wanted to get the most out of the drape of this fabric.
I took the basic bodice from the Ultimate dress book and cut away most of the shoulder area and closed the bust and waist darts, rotating the fullness to the front neck edge.


I drafted a collar piece. this started as a straight piece, but then I took out wedges along the top to give a curved finish, making sure I marked the shoulder line.

I sewed the back darts as normal and the shortened shoulder seams then gathered the front neckline into the collar. The armholes are finished with a bias facing.


The skirt is essentially the Pencil Skirt from Gertie's new book for better sewing. I used my usual size 6, but had to take in quite a bit at the waist to fit the top. In fact due to the drapey nature of the fabric and lack of lining I ended up taking almost an inch from the side seams of the bodice as the gaped quite a bit.

I added a concealed zip, which finished mid back and two buttons on the collar. A walking slit allows ease of movement. I think this just might get a lot of wear on my holidays.

LinkWithin

Related Posts Plugin for WordPress, Blogger...